


CAUTION:
the appliance is designed for the electrical specifications given on the plate applied to the
rear of the appliance; before connecting to the electricity power supply refer to chapter 4.2 connecting
to the electricity supply.
3 CONSIGNING THE APPLIANCE
3.1
TRANSPORTING THE APPLIANCE
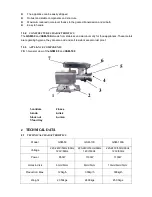
The
GSM-50
and
GSM-100
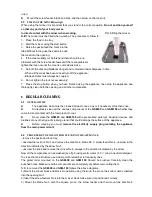
leaves our warehouse carefully packed; packaging consists in:
a) this manual
b) food tray;
c) pestle
3.2
CHECKING PACKAGING UPON CONSIGNMENT
When the goods are received proceed with opening the packaging if there are no signs of damage,and
make sure that inside there are all the listed items.if when the goods are delivered there are signs of
damage to the packaging, agent or courier, and within three days from the date indicated on the
documents draw up a detailed list and report of all
damage to the goods
. Do not turn the packed
goods upside down!
When transporting the package make sure its four main points are firmly secured
(maintain the goods parallel to the ground).
3.3
DISPOSING OF PACKAGING
The various items used for packaging (cardboard, pallets, plastic straps, polyurethane foam) are normal
urban waste products and can be disposed of without difficulty.
If the appliance is destined to countries where are specific standards regarding waste, dispose of
packaging respecting the standards and laws in force.
4 INSTALLING THE APPLIANCE
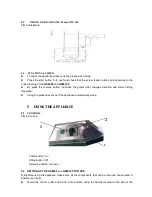
4.1
APPLIANCE LOCATION
The work surface where the
GSM-50
and
GSM-100
will be located must be suitable for the size of the
appliance,please refer to the measurements given in Tab 1.The work surface must be level and dry and
at a height of 80 cm from the ground. The appliance must be located in a non-salty environment with a
max humidity value of 75% and with a temperature between 5
℃
and 35
℃
;and however, always in
areas and environments that do not cause any type of malfunction to the appliance.
4.2
CONNECTON TO THE ELECTRICAL SUPPLY
GSM-50
and
GSM-100 with a single-phase motor
The
GSM-50
and
GSM-100
comes supply with a 3x1 mm
2
long
power cable.
Connect with
GSM-50
and
GSM-100
to a 120v 60Hz power supply; At this point makes sure the main
earth circuit functions correctly.
Also check that the information given on the technical data and serial number plate corresponds to the
information given in the accompanying documents.
Measurement
60.20x45.40x26.20cm
60.20x45.40x26.20cm
60.20x45.40x26.20cm


