background image


E

sp

a

ñ

o

E

n

g

lis

h


P

o

rt

u

g

u

ê

s


59 

E

sp

a

ñ

o

E

n

g

lis

h


P

o

rt

u

g

u

ê

s


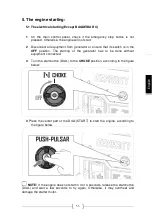
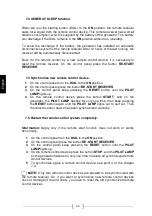
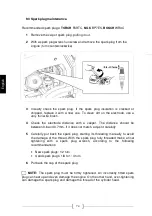
5.4 The manual starting on the BAQUEIRA RC model 


On  the  main  control  panel,  check  if  the  emergency  stop  button  is  not 

pressed. Otherwise, the engine will not start. 


Disconnect all equipment from generator or ensure that its switch is in the 

OFF

  position.  The  starting  of  the  generator  has  to  be  done  without 

equipment connected. 


  Turn  the  start  button  (DIAL)  to  the 

ON

  position,  according  to  the  figure 

below: 


Place the choke to 

START 

position

,

 according to the figure below: 


Information: 

If the engine has recently stopped and is still hot, the choke position 

procedure may not be necessary. In this case, to start directly, place it in the 

RUN


position. 

Summary of Contents for BAQUEIRA

Page 1: ...NS FOR USE PLEASE READ THIS MANUAL CAREFULLY BEFORE USING THE MACHINE INSTRU ES DE UTILIZA O DEVE LER ESTE MANUAL COM ATENC O ANTES DE UTILIZAR O EQUIPAMENTO KEEP THIS MANUAL It includes important saf...

Page 2: ......

Page 3: ...s productos bajo la marca GENERGY y la revisi n del manual sin previo aviso Use este manual como parte del generador Si revende el generador se debe entregar el manual con el generador Este manual con...

Page 4: ...RC 20 7 1 Arranque por control remoto 20 7 2 Detener el generador por control remoto 21 7 3 Funci n SLEEP de GENERGY 22 7 4 Sincronizar nuevos mandos 22 7 5 Resetear el sistema remoto por completo 22...

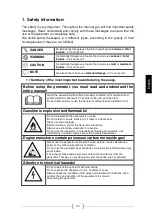
Page 5: ...equipo sin estar correctamente informado de su funcionamiento y normas de seguridad entra a peligros No permita que nadie use el grupo sin haber sido instruido para ello La gasolina es explosiva e inf...

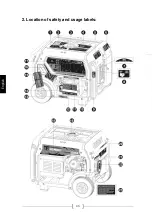
Page 6: ...Espa ol English Portugu s 4 Espa ol English Portugu s 2 Ubicaci n de los adhesivos de seguridad y uso...

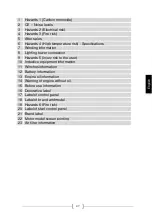
Page 7: ...8 Conexion torre iluminaci n 9 Peligro 5 atrapamientos 10 Informacion equipos inductivos 11 Informaci n engancha cables 12 Informacion bater a 13 Informacion aceite motor 14 Aviso motor sin aceite 15...

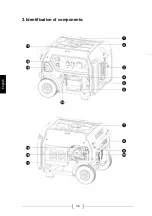
Page 8: ...Espa ol English Portugu s 6 Espa ol English Portugu s 3 Identificaci n de los componentes...

Page 9: ...230V 5 Soporte para torre de iluminaci n 6 Bater a de arranque 7 Tanque de combustible 8 Panel de control para arranque 9 Motor t rmico GENERGY 10 Filtro de aire 11 Mancera de transporte 12 Carburador...

Page 10: ...de goma es necesario retirar estos ngulos antes de la puesta en marcha de la m quina ver figura inferior NOTA Usar la maquina sin haber retirado antes los ngulos de fijaci n pueden causar da os graves...

Page 11: ...e superior H mostrado en la figura inferior La capacidad del aceite orientativa hasta el nivel correcto seg n modelo es Modelos inferiores a 4000W 0 6L Modelos superiores a 4000W 1 1L Usar aceite de m...

Page 12: ...proximada del dep sito es de 14L litros para los modelos inferiores a 4000W y de 28L para los modelos superiores a 4000W PELIGRO La gasolina es extremadamente explosiva e inflamable Esta totalmente pr...

Page 13: ...acorrientes cualquier aparato o bien aseg rese que su interruptor est en OFF El generador tiene que arrancar sin cargas conectadas 3 Gire el DIAL de arranque a la posici n de CHOKE seg n la siguiente...

Page 14: ...el DIAL en RUN Informaci n Puede no ser necesario el uso de la posici n CHOKE estrangulador si el motor fue detenido recientemente y a n est caliente En ese caso situar directamente el DIAL en RUN y p...

Page 15: ...terruptor est en OFF El generador tiene que arrancar sin cargas conectadas 3 Gire el DIAL de arranque a la posici n de CHOKE seg n la figura siguiente 4 Tire suavemente de la cuerda hasta encontrar re...

Page 16: ...ancado gire lentamente el DIAL de arranque a la posici n de RUN seg n la figura siguiente NOTA No mantenga el motor funcionando en la posici n CHOKE ya que la mezcla ser a demasiado rica y provocar a...

Page 17: ...omacorrientes cualquier aparato o bien aseg rese que su interruptor est en OFF El generador tiene que arrancar sin cargas conectadas 3 Gire el DIAL de arranque a la posici n de ON seg n la figura sigu...

Page 18: ...RUN seg n la siguiente figura NOTA No mantenga el motor funcionando con el estrangulador en la posici n START ya que la mezcla ser a demasiado rica y provocar a problemas en el motor Por tanto tan pr...

Page 19: ...macorrientes cualquier aparato o bien aseg rese que su interruptor est en OFF El generador tiene que arrancar sin cargas conectadas 3 Gire el DIAL de arranque a la posici n de ON seg n la figura sigui...

Page 20: ...bierto por la garant a NOTA No suelte la maneta despu s del tir n para evitar que el tirador pueda golpear la m quina Acompa e con la mano la maneta hasta que se haya recogido NOTA Nunca tire de la cu...

Page 21: ...nte el bot n de pare en emergencia seg n la siguiente figura NOTA Utilice el bot n de emergencia nicamente cuando exista una emergencia real caso contrario apague mediante el m todo normal 6 2 Detener...

Page 22: ...de pare de emergencia del panel principal est liberado caso contrario el motor no arrancara 2 Gire el DIAL de arranque a la posici n de ON seg n la figura siguiente 3 Pulse RE START RECEIVER para act...

Page 23: ...yed La salida de corriente del generador tiene un retardo de 20 segundos desde que el motor se puso en marcha De esta manera se evita que el generador arranque con carga conectada Informaci n Si la lu...

Page 24: ...l panel principal 3 Mantenga presionado RESET en el panel principal hasta que se ilumine el PILOT LAMP en el panel 4 Presione START en el mando de control remoto PILOT LAMP har un parpadeo en el gener...

Page 25: ...al equipo o incluso un incendio ADVERTENCIA No haga la conexi n en paralelo con otros generadores con el objetivo de sumar sus potencias ambos resultar an da ados y con riesgo de incendio NOTA Cuando...

Page 26: ...2Protecci n por sobrecarga Su generador est equipado con disyuntores que cortaran la salida de corriente en caso de sobrecargas o cortocircuito Seg n la figura inferior pueden ser de General 1 Para pr...

Page 27: ...islamientos de maquinaria posibles contactos de las l neas con agua Rearme el diferencial seg n la figura inferior solo cuando se haya revisado por completo la instalaci n ADVERTENCIA para que el dife...

Page 28: ...inaci n opcional 1 Instale la torre de luz sobre el generador seg n la figura 2 Conexione la l nea de alimentaci n de la torre en el conector especial 1 del generador seg n la siguiente figura 3 Suba...

Page 29: ...antes La responsabilidad nica de la aver a seria del cliente por falta de mantenimiento y la reparaci n seria excluida de la garant a Recuerde que es una seguridad en caso de nivel cr tico no es un av...

Page 30: ...50horas Reemplazar a las 250horas o antes si se observa deterioro Filtro de la v lvula de gasolina Limpiar cada 300horas o 1 a o lo que antes suceda Escobillas del alternador Reemplazar cada 500horas...

Page 31: ...coger el aceite usado 3 Desenrosque el tornillo de drenaje de aceite girando en sentido inverso a las agujas del reloj reserve el tornillo y su junta 4 Suelte el tap n de llenado de aceite para que el...

Page 32: ...cumplir con los requisitos medioambientales el aceite usado se debe poner en un recipiente sellado y ser transportado a la estaci n de servicio para reciclar No lo tire a la basura y no lo derrame en...

Page 33: ...3 d jelo secar por completo 4 Sumerja el filtro bien seco en aceite del mismo tipo que usa el motor del generador 4 5 Escurra presionando con la mano el filtro de aire hasta que escurra todo el aceite...

Page 34: ...os de suciedad 4 Mida la distancia del electrodo con una galga Valor normal 0 6 0 7 mm Ajuste la abertura con cuidado si el valor no es correcto 5 Vuelva a colocar con cuidado la buj a iniciando el ro...

Page 35: ...de aire combustible del carburador ser demasiado rica Se reducir el rendimiento y el consumo de combustible aumentar Una mezcla muy rica ensuciar tambi n la buj a y dificultar el arranque Si el gener...

Page 36: ...No llene en exceso el tanque si se va a transportar el equipo PRECAUCION Vac e el tanque de combustible cuando el generador se traslade por carretera muy bacheada o campo a trav s 10 2 Almacenaje del...

Page 37: ...ina seg n las indicaciones del fabricante en una garrafa con un par de litros de gasolina 3 Ponga estos dos litros de gasolina tratada en el tanque del generador Arranque el generador y deje el motor...

Page 38: ...no de gasolina con el tratamiento del estabilizador Tras poner el estabilizador arranque el motor por 10 minutos para que recircule la gasolina tratada hasta el motor Cierre la v lvula y mantenga el m...

Page 39: ...ntacto con nuestro servicio de asistencia spv sg group es Vuelva a llenar el tanque de combustible Est utilizando el estrangulador CHOKE Conecte o revise la bater a Utilice el estrangulador seg n las...

Page 40: ...en posici n ON Compruebe si el equipo conectado al generador tiene alg n fallo Cable o conector suelto Escobillas en mal estado Revisar visualmente el cableado del equipo y del panel de control Revis...

Page 41: ...ase seg n rendimiento G1 Est ndar ISO 8528 13 2016 Kit de transporte Integrado con ruedas de 10 Dimensiones 859 x 667 x 664mm Peso 107kg MODELO BAQUEIRA BAQUEIRA S Sistema de estabilizaci n de Voltaje...

Page 42: ...imiento G1 Est ndar ISO 8528 13 2016 Kit de transporte Integrado con ruedas de 10 Dimensiones 859 x 667 x 664mm Peso 111 5kg MODELO FORMIGAL FORMIGAL S Sistema de estabilizaci n de Voltaje Voltaje Fre...

Page 43: ...i n de la garant a Su m quina dispone de la siguiente garant a 2 a os para maquinas facturadas a consumidores particulares 1 a o para maquinas facturadas a empresas sociedades cooperativas aut nomos y...

Page 44: ...Espa ol English Portugu s 42 Espa ol English Portugu s...

Page 45: ...well as its manuals without previous consent This manual must be used as part of the generator If you resell the generator the manual must be delivered with the generator This manual explains the corr...

Page 46: ...he starting with remote control 62 7 2 The shutdown with remote control 63 7 3 GENERGY SLEEP function 64 7 4 Synchronize new remote control device 64 7 5 Restart the remote control system completely 6...

Page 47: ...ndards will result in hazards to the user and the plant Do not allow anyone to use the generator without being qualified to do it Gasoline is explosive and flammable Do not refuel while the generator...

Page 48: ...Espa ol English Portugu s 46 Espa ol English Portugu s 2 Location of safety and usage labels...

Page 49: ...on 8 Lighting tower connection 9 Hazards 5 injury risk to the user 10 Inductive equipment information 11 Winches information 12 Battery information 13 Engine oil information 14 Warning of engine witho...

Page 50: ...Espa ol English Portugu s 48 Espa ol English Portugu s 3 Identification of components...

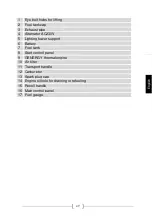
Page 51: ...cap 3 Exhaust pipe 4 Alternator AC230V 5 Lighting tower support 6 Battery 7 Fuel tank 8 Start control panel 9 GENERGY thermal engine 10 Air filter 11 Transport handle 12 Carburetor 13 Spark plug cap 1...

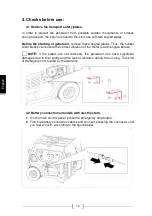
Page 52: ...Thus the rubber silent blocks can ensure the correct vibration of the motor see the figure below NOTE if the plates are not removed the generator can have significant damages due to the rigidity and t...

Page 53: ...er limit H of the level see the figure below The estimated amount of oil to reach a correct level per model is the following Models less than 4000W 0 6L Models greater than 4000W 1 1L Use good quality...

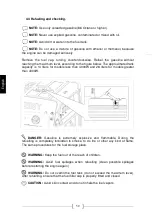
Page 54: ...w The approximated tank capacity is 14 liters for models less than 4000W and 28 liters for models greater than 4000W DANGER Gasoline is extremely explosive and flammable During the refuelling is compl...

Page 55: ...rator or ensure that its switch is in the OFF position The starting of the generator has to be done without equipment connected 3 Turn the start button DIAL to the CHOKE position according to the figu...

Page 56: ...started the user must ensure that the DIAL is placed in the RUN position Information If the engine has recently stopped and is still hot CHOKE position procedure may not be necessary In this case to...

Page 57: ...tch is in the OFF position The starting of the generator has to be done without equipment connected 3 Turn the start button DIAL to the CHOKE position according to the figure below 4 Smoothly pull the...

Page 58: ...s slowly rotate the DIAL to the RUN position according to the figure below NOTE The engine must not be kept running in the CHOKE position because the mixture would be too rich and cause engine problem...

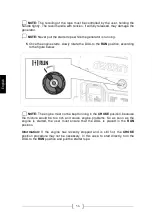
Page 59: ...rom generator or ensure that its switch is in the OFF position The starting of the generator has to be done without equipment connected 3 Turn the start button DIAL to the ON position according to the...

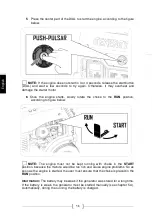
Page 60: ...starts slowly rotate the choke to the RUN position according to figure below NOTE The engine must not be kept running with choke in the START position because the mixture would be too rich and cause...

Page 61: ...generator or ensure that its switch is in the OFF position The starting of the generator has to be done without equipment connected 3 Turn the start button DIAL to the ON position according to the fig...

Page 62: ...coiling of the starter rope must be controlled by the user holding the handle tightly The recoil handle with tension if wilfully released may damage the generator NOTE Never pull the starter rope whil...

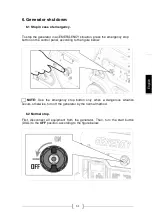
Page 63: ...ess the emergency stop button on the control panel according to the figure below NOTE Use the emergency stop button only when a dangerous situation occurs otherwise turn off the generator by the norma...

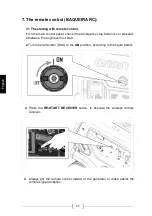
Page 64: ...panel check if the emergency stop button is not pressed Otherwise the engine will not start 2 Turn the start button DIAL to the ON position according to the figure below 3 Press the RE START RECEIVER...

Page 65: ...t generate electricity in the socket This ensures that the generator starts without supplying power to the connected equipment Information If the LED of the remote control device does not turn on or i...

Page 66: ...ep pressing the RESET button until the PILOT LAMP lights up 4 On the remote control device press the button START And on the generator the PILOT LAMP flashes for only one time then keep pressing the R...

Page 67: ...tor output which will do serious damages to the generator or even a fire WARNING Do not connect the generator in parallel with other generators in order to add powers The generators will be damaged an...

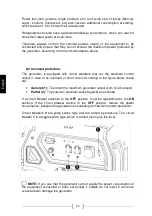
Page 68: ...cuit breakers that cut the electrical current output in case of an overload or short circuit According to the figure below these are General 1 To protect the maximum generator output sum of all socket...

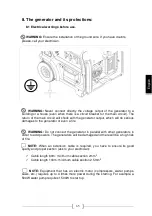
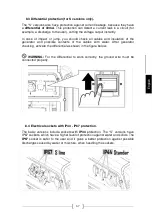
Page 69: ...ation of the generator and possible contacts of the cables with water After generator checking activate the differential as shown in the figure below WARNING For the differential to work correctly the...

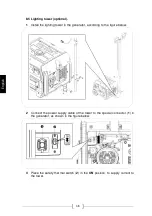
Page 70: ...1 Install the lighting tower in the generator according to the figure below 2 Connect the power supply cable of the tower to the special connector 1 in the generator as shown in the figure below 3 Pl...

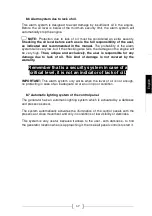
Page 71: ...e user is responsible for any damage due to lack of oil This kind of damage is not covered by the warranty Remember that is a security system in case of a critical level it is not an indicator of lack...

Page 72: ...At a maximum of 250 hours or earlier if it is damaged replace Gasoline valve filter Every 300 hours or 1 year if first than 300 hours clean Alternator brushes Every 500 hours or earlier if the generat...

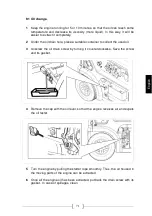
Page 73: ...le place a suitable container to collect the used oil 3 Unscrew the oil drain screw by turning it counterclockwise Save the screw and its gasket 4 Remove the cap with the oil level so that the engine...

Page 74: ...ith oil level into the access hole sealing the engine IMPORTANT To safeguard the environmental regulations the used oil must be placed in a sealed container and delivered to a service station for recy...

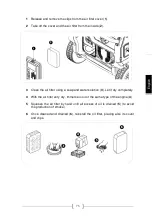
Page 75: ...he inside 2 3 Clean the air filter using a soap and water solution 3 Let it dry completely 4 With the air filter very dry immerse in oil of the same type of the engine 4 5 Squeeze the air filter by ha...

Page 76: ...electrode distance with a caliper The distance should be between 0 6 and 0 7mm If it does not match adjust it carefully 5 Carefully put back the spark plug starting its threading manually to avoid the...

Page 77: ...uel in the carburettor will be too rich The performance is reduced and the fuel consumption is increased A very rich mixture also soils the spark plug and makes the starting of the engine more difficu...

Page 78: ...sive environment inside the vehicle WARNING In case of transport do not fill too much the fuel tank CAUTION To empty the fuel tank if the generator will be transported over rough roads or fields 10 2...

Page 79: ...commendations one bottle per few liters of gasoline see specifications 3 Put back this treated gasoline in the generator tank Start the generator and let the engine runs during few minutes so that the...

Page 80: ...can also choose to let it completely filled with a gasoline and stabilizer treatment After adding the stabilizer start the engine and keep it running for 10 minutes for the treated gasoline to flow S...

Page 81: ...n If the engine still does not start contact our Technical Support Service spv sg group es Refill the fuel tank Release the emergency stop button Are you using the choke CHOKE Connect or check the bat...

Page 82: ...voltage at the 230V socket Check if the equipment connected to the generator has any failure Loose cable or connector Brushes in poor condition Visually check the connections of the generator and the...

Page 83: ...y A Performance class G1 Normalization ISO 8528 13 2016 Transport kit Integrated with 10 wheels Dimensions 859 x 667 x 664mm Weight 107kg MODEL BAQUEIRA BAQUEIRA S Voltage stabilizer system Voltage Fr...

Page 84: ...class G1 Normalization ISO 8528 13 2016 Transport kit Integrated with 10 wheels Dimensions 859 x 667 x 664mm Weight 111 5kg MODELO FORMIGAL FORMIGAL S Voltage stabilizer system Voltage Frequency Elect...

Page 85: ...tor an option of the following 2 years for machines billed to consumers end user 1 year for machines billed to companies cooperatives or any other legal entity other than the final consumer end user T...

Page 86: ...Espa ol English Portugu s 84 Espa ol English Portugu s...

Page 87: ...rca Genergy bem como os seus manuais sem aviso pr vio Este manual deve ser utilizado como parte do gerador Em caso de revenda do gerador deve se entregar o manual com o gerador Este manual cont m os p...

Page 88: ...104 7 1 Arranque por controlo remoto 104 7 2 Paragem do gerador por controlo remoto 105 7 3 Fun o SLEEP da GENERGY 106 7 4 Sincronizar novos comandos 106 7 5 Reiniciar o sistema remoto por completo 10...

Page 89: ...n a implica perigos para o utilizador e instala es N o permita que ningu m utilize o gerador sem estar habilitado para tal A gasolina explosiva e inflam vel N o reabastecer com o gerador em funcioname...

Page 90: ...Espa ol English Portugu s 88 Espa ol English Portugu s 2 Localiza o das etiquetas de seguran a e utiliza o...

Page 91: ...na o 9 Perigo 5 risco de les es para o utilizador 10 Informa o equipamentos indutivos 11 Informa o sobre guinchos 12 Informa o sobre a bateria 13 Informa o sobre o leo do motor 14 Aviso motor sem leo...

Page 92: ...Espa ol English Portugu s 90 Espa ol English Portugu s 3 Identifica o dos componentes...

Page 93: ...V 5 Suporte para torre de ilumina o 6 Bateria de arranque 7 Dep sito de combust vel 8 Painel de controlo para arranque 9 Motor t rmico GENERGY 10 Filtro de ar 11 Bra o de transporte 12 Carburador 13 T...

Page 94: ...chapas angulares S assim os sinoblocos de borracha podem garantir a correta vibra o do motor durante o seu funcionamento ver figura abaixo NOTA caso as chapas n o sejam removidas o gerador pode sofre...

Page 95: ...r figura abaixo A quantidade indicativa de leo a colocar para um n vel correto por modelo a seguinte Modelos inferiores a 4000W 0 6L Modelos superiores a 4000W 1 1L Utilizar leo de motor a 4 tempos de...

Page 96: ...apacidade aproximada do dep sito de 14 litros para os modelos inferiores a 4000W e de 28 litros para os modelos superiores a 4000W PERIGO A gasolina extremamente explosiva e inflam vel No momento de r...

Page 97: ...equipamentos ou assegurar que o seu interruptor est na posi o OFF O arranque do gerador tem de ser feito sem equipamentos carga 3 Rode o bot o de arranque DIAL at posi o CHOKE segundo a figura abaixo...

Page 98: ...a posi o RUN Informa o Se o motor deixou de funcionar recentemente e ainda est quente pode n o ser necess rio o procedimento da posi o CHOKE estrangulador Neste caso para arrancar diretamente roda se...

Page 99: ...st na posi o OFF O arranque do gerador tem de ser feito sem equipamentos carga 3 Rode o bot o de arranque DIAL at posi o CHOKE segundo a figura abaixo 4 Suavemente puxar a corda de arranque at encontr...

Page 100: ...ot o de arranque DIAL para a posi o RUN segundo a figura abaixo NOTA O motor n o deve ser mantido a funcionar na posi o CHOKE j que a mistura seria demasiado rica e provocaria problemas no motor Porta...

Page 101: ...alimenta o todos os equipamentos ou assegurar que o seu interruptor est na posi o OFF O arranque do gerador tem de ser feito sem equipamentos carga 3 Rode o bot o de arranque DIAL at posi o ON segund...

Page 102: ...UN segundo a figura abaixo NOTA O motor n o deve ser mantido a funcionar com o estrangulador na posi o START j que a mistura seria demasiado rica e provocaria problemas no motor Portanto logo que tenh...

Page 103: ...alimenta o todos os equipamentos ou assegurar que o seu interruptor est na posi o OFF O arranque do gerador tem de ser feito sem equipamentos carga 3 Rode o bot o de arranque DIAL at posi o ON segundo...

Page 104: ...NOTA Acompanhe o curso da corda de arranque at que esta se recolha totalmente segurando o seu punho de modo firme Soltar o punho deliberadamente durante o curso pode provocar danos no gerador NOTA Nun...

Page 105: ...ot o de paragem de emerg ncia no painel de controlo segundo a figura abaixo NOTA Utilizar o bot o de paragem de emerg ncia apenas quando existe uma situa o de risco caso contr rio desligue o gerador p...

Page 106: ...ipal verificar se o bot o de paragem de emerg ncia n o est pressionado Caso contr rio o motor n o arranca 2 Rode o bot o de arranque DIAL at posi o ON segundo a figura seguinte 3 Pressione o bot o RE...

Page 107: ...nque o gerador n o gera eletricidade para a tomada Deste modo assegura se que o gerador arranca sem equipamentos em carga Informa o Se o LED do comando n o liga ou est fraco deve se substituir a pilha...

Page 108: ...tenha pressionado o bot o RESET at acender o indicador PILOT LAMP 4 No comando remoto pressione o bot o START e no gerador o indicador PILOT LAMP piscar Mantenha o bot o RESET pressionado at que o ind...

Page 109: ...s no mesmo ou at um inc ndio AVISO N o conectar o gerador em paralelo com outros geradores com o objetivo de somar as pot ncias Os geradores ficar o danificados e h um elevado risco de inc ndio NOTA Q...

Page 110: ...o contra sobrecarga O gerador est equipado com disjuntores que cortam a sa da da corrente el trica em caso de sobrecarga ou curto circuito Segundo a figura abaixo estes s o Geral 1 Para proteger a po...

Page 111: ...os e isolamentos do gerador poss veis contactos dos cabos com gua Rearme o diferencial segundo a figura seguinte mas s ap s verifica o por completo o gerador AVISO Para o diferencial atuar corretament...

Page 112: ...ilumina o opcional 1 Instalar a torre de ilumina o no gerador de acordo com a figura abaixo 2 Ligue o cabo de alimenta o da torre ao conetor especial 1 do gerador segundo a figura abaixo 3 Posicione o...

Page 113: ...ponsabilidade de uma eventual avaria por falta de leo nica e exclusivamente do utilizador A sua repara o n o considerada ao abrigo da garantia Tenha presente que este sistema uma seguran a em caso de...

Page 114: ...star o el trodo No m ximo de 250 horas ou antes se est deteriorado substituir Filtro da v lvula de gasolina A cada 300 horas ou 1 ano se primeiro que as 300 horas limpar Escovas do alternador A cada 5...

Page 115: ...ara recolha do leo usado 3 Desenroscar o parafuso de drenagem do leo rodando em sentido contr rio aos ponteiros do rel gio Preserve o parafuso e a sua junta 4 Retirar o tamp o com o n vel de leo para...

Page 116: ...cio de acesso selando o motor IMPORTANTE Para salvaguardar as normas ambientais o leo usado deve ser colocado num recipiente selado e entregue numa esta o de servi o para reciclar N o o coloque no li...

Page 117: ...ior 2 3 Limpar o filtro de ar utilizando uma solu o de gua e sab o 3 Deixar secar por completo 4 Com o filtro de ar bem seco mergulhar em leo do mesmo tipo do motor 4 5 Espremer o filtro de ar com a m...

Page 118: ...e muito fino 4 Verificar a dist ncia do el trodo com um medidor A dist ncia dever estar entre 0 6 e 0 7mm Caso n o esteja conforme ajuste a cuidadosamente 5 Recolocar a vela com muito cuidado iniciand...

Page 119: ...ust vel no carburador ser demasiado rica O rendimento reduzido e o consumo de combust vel aumentado Uma mistura muito rica suja tamb m a vela e dificulta o arranque do motor Se um gerador funciona sem...

Page 120: ...losivo dentro do ve culo AVISO Em caso de transporte n o abaste a em excesso o dep sito de combust vel PRECAU O Esvazie o dep sito de combust vel em caso de transporte por estradas acidentadas ou atra...

Page 121: ...a es do fabricante uma garrafa por alguns litros de gasolina 3 Volte a colocar a gasolina tratada no dep sito do gerador Arranque o gerador e deixe o motor funcionar durante alguns minutos para que a...

Page 122: ...mpletamente cheio de gasolina com o tratamento do estabilizador Ap s adicionar o estabilizador arranque o motor e mantenha em funcionamento durante 10 minutos para a gasolina tratada fluir at ao motor...

Page 123: ...m Se o motor continua sem arrancar contacte o nosso Servi o T cnico de assist ncia spv sg group es Reabaste a o dep sito de combust vel Liberte o bot o de paragem de emerg ncia Est a utilizar o estran...

Page 124: ...e voltagem na sa da das tomadas 230V Verificar se o equipamento conectado ao gerador tem alguma falha Cabo ou conector solto Escovas em mau estado Visualmente verificar as liga es do gerador e do pain...

Page 125: ...sse segundo rendimento G1 Normaliza o ISO 8528 13 2016 Kit de transporte Integrado com rodas de 10 Dimens es 859 x 667x 664mm Peso 107kg MODELO BAQUEIRA BAQUEIRA S Sistema estabilizador de Voltagem Vo...

Page 126: ...imento G1 Normaliza o ISO 8528 13 2016 Kit de transporte Integrado con rodas de 10 Dimens es 859 x 667x 664mm Peso 111 5kg MODELO FORMIGAL FORMIGAL S Sistema estabilizador de Voltagem Voltagem Frequ n...

Page 127: ...garantia 2 anos para m quinas faturadas a consumidores particulares 1 ano para m quinas faturadas a empresas sociedades cooperativas ou qualquer outra entidade legal diferente do consumidor final par...

Page 128: ...Espa ol English Portugu s 126 Espa ol English Portugu s...

Page 129: ...Espa ol English Portugu s 127 Espa ol English Portugu s...

Page 130: ...Espa ol English Portugu s 128 Espa ol English Portugu s...

Page 131: ...Espa ol English Portugu s 129 Espa ol English Portugu s...

Page 132: ...Espa ol English Portugu s 130 Espa ol English Portugu s...

Reviews: