background image


ver 1.0 


6

66

6

~ÄëçäìíÉ=ÑáÇÉäáíó


2  Setting up: Multi-channel 

2.1  Positioning for Center Channel 

A good starting position is for the G6.1c to be placed horizontally about 
20 inches from the floor, and angled upwards by 3 to 5 degrees. This is 
assuming that the speaker doesn’t block the screen in this position. 

Use a good quality stand that is solidly built and as rigid as possible. The 
Genesis ServoSub™ 4/8 is a unique subwoofer that complements the 
G6.1c to turn it into a full-range absolute fidelity™ system, and also 
makes a perfect stand for the G6.1c. 

An alternative is to place the speaker horizontally above the television 
set, and angle it downwards by 3 to 5 degrees. In either case, do not 
point the speaker directly at the head of the listener, but either over her 
heads, or at her chest. 

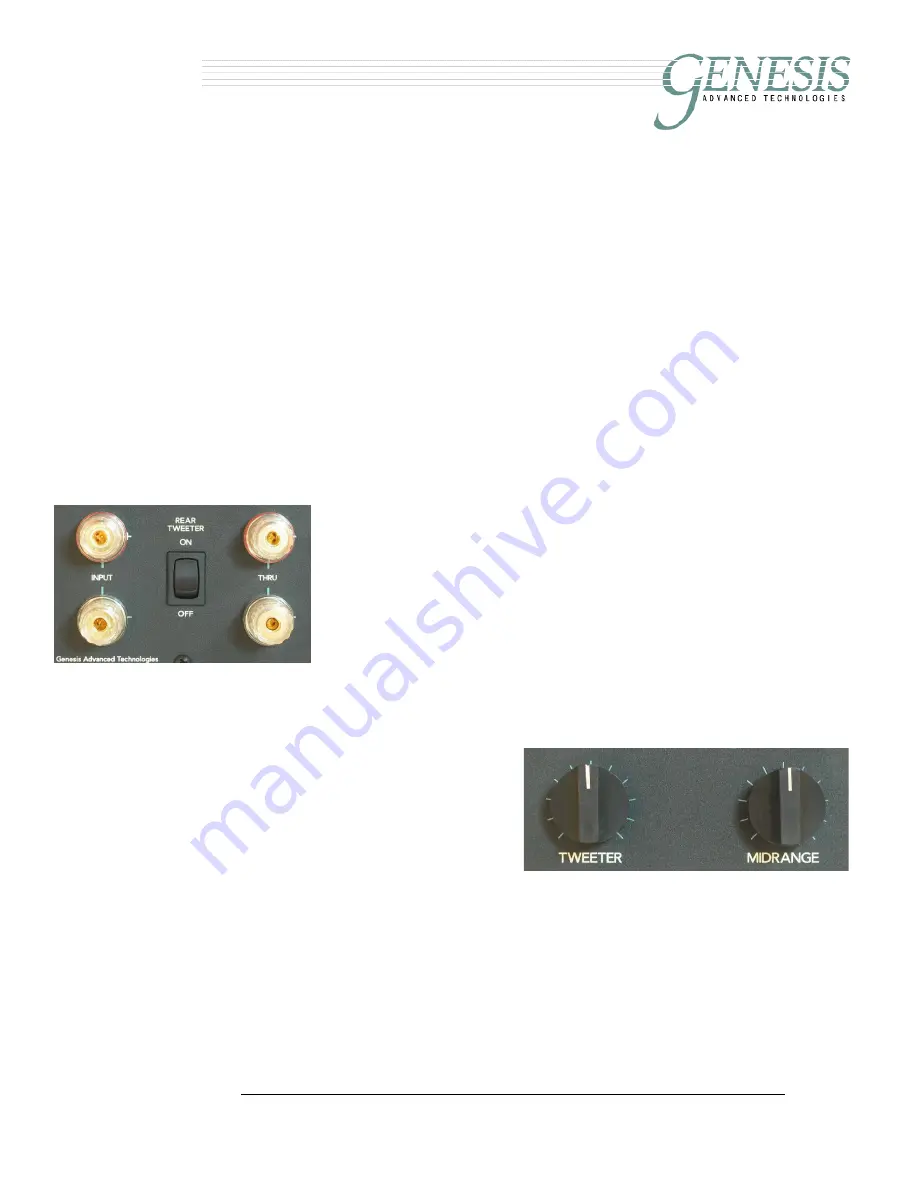
As these speakers are dipolar with a rear-firing tweeter, 
there should be at least 12 inches (30cm) of space between 
the back of the speaker and the wall. If this space is not 
available, switch the rear tweeter off with the tweeter defeat 
switch. 

On the home theatre processor, set the speaker to 
“LARGE” as the 6.1c plays below 60Hz. 

2.2 Loudspeaker Controls 

2.2.1  Tweeter and Midrange Controls 

The two knobs at the top of the 
plate on the back of the speaker 
tailor the mid- and high-frequency 
response of the G6.1c. They are 
subtle controls, but they can make 
a great difference in gaining that 
last bit of additional performance 
in tuning your speakers for the 
room in which you are using them. They can turn your system from very 
good to exceptional, so take the time to work through this process. 

The left knob marked T

WEETER

 is a volume control for the front tweeter. 

Turning this control clockwise will increase the level of the tweeters. Use 
this control if you need a bit more treble, or to increase the apparent 
space of the soundstage. Too high a tweeter level, and you can feel that 
voices are too sibilant. With music, crashing cymbals are leaping out at 


Summary of Contents for 5.2 Convertible

Page 1: ...LS 6 2 2 1 TWEETER AND MIDRANGE CONTROLS 6 2 2 2 TWEETER DEFEAT 7 3 SETTING UP AS STEREO PAIR 8 3 1 POSITIONING 8 3 2 LOUDSPEAKER CONTROLS 8 3 2 1 TWEETER AND MIDRANGE CONTROLS 8 3 2 2 TWEETER DEFEAT 9 3 3 TUNING THE SYSTEM 9 3 4 ONE CHANGE AT A TIME 10 3 5 IMAGING AND SOUNDSTAGE 10 3 6 DEFINING THE SOUNDSTAGE 11 3 7 ROOM TREATMENT 12 3 8 MASTERING THE REFINEMENTS OF THE SYSTEM 13 4 THE TECHNOLOGY...

Page 2: ...ver 1 0 2 2 2 2 ÄëçäìíÉ ÑáÇÉäáíó 4 2 2 TITANIUM MIDRANGE 15 4 2 3 ALUMINUM CONE WOOFERS 15 4 3 CROSSOVER 15 4 4 VIBRATION FREE CABINET 16 5 SPECIFICATIONS 17 ...

Page 3: ...l principles It is a perfect match for the elegant and beautiful Genesis 6 1 Loudspeaker system with the same look and driver complement except for the bass drivers Being a Genesis absolute fidelity product it is also a perfect complement to any other Genesis model all the way up to the Genesis 1 1 Sound structural engineering principles have been applied to make the G6 1c cabinet rigid and well d...

Page 4: ...oint the tweeter directly at the ears of the listeners Angle the speaker so that the tweeter points 12 inches 30cm below the ears or over the top of the head As a stereo pair of speakers a good starting position for your G6 1c is about 18 inches 46cm into the room as measured from the front wall the wall you look at as you are seated listening to the speakers to the back of the speakers Place the ...

Page 5: ...o the 12 o clock position That is a good place to start The G6 1c will sound great straight out of the box set up like this As you play your system for the next hundred hours or so the speaker will settle in and break in If you have at least 12 inches 30cm of space between the back of the speaker and the rear wall the rear tweeter should be left ON Otherwise turn the rear tweeter off with the twee...

Page 6: ...east 12 inches 30cm of space between the back of the speaker and the wall If this space is not available switch the rear tweeter off with the tweeter defeat switch On the home theatre processor set the speaker to LARGE as the 6 1c plays below 60Hz 2 2 Loudspeaker Controls 2 2 1 Tweeter and Midrange Controls The two knobs at the top of the plate on the back of the speaker tailor the mid and high fr...

Page 7: ...d fuller A fuller midrange can also make voices sound more forward There is about a one and a half dB range for this control These two controls can also be used to fine tune the speaker when it is used behind a perforated screen which typically attenuates the mid to high frequency response 2 2 2 Tweeter Defeat The G6 1c should be placed at least 12 inches 30cm away from the wall behind the speaker...

Page 8: ...4 to 3 0 metres away from the speakers if you have the space We will experiment with moving the speakers around later As these speakers are dipolar in the high frequencies they are pretty room friendly and you are free to move the speakers closer to or further away from the front and side walls We do recommend however that you give the speakers a little bit of breathing space behind them so don t ...

Page 9: ...nd leaner turning it clockwise will make the midrange sound fuller A fuller midrange can also make the soundstage appear more forward There is about a one and a half dB range for this control 3 2 2 Tweeter Defeat The optimal way to use these speakers as a stereo pair is to leave the rear tweeters on and run them as dipole and approximately 18 inches from the wall However in some cases this may not...

Page 10: ...e you should first check the system volume Is it a volume that would be appropriate for someone actually singing in your room If there is too much volume the artist will appear too big and the opposite is true for too little volume If the volume is set correctly and the image is still too big place the speakers closer together and re listen Place the speakers no less than 5 feet apart If the image...

Page 11: ...t and front to back depth can be adjusted by the distance from the rear wall Further as the system breaks in the depth and width of the soundspace will increase and so will the smoothness of the sound 3 6 Defining the Soundstage A common problem we find with many set ups is a tendency to separate the speakers too far from each other This gives an unnaturally wide soundstage between the two speaker...

Page 12: ...ned or sound proofed wall would be considered a dead wall or a non reflective wall A normal thin curtain across a window causes only a small amount of absorption Sidewalls Because the speaker is a dipole it is less sensitive to the sidewalls However as a rule of thumb it is a good idea to keep the speaker as far away from the sidewalls as is practical In some rooms it may be helpful to add some da...

Page 13: ... wall or farther from the front wall the resonance may be reduced at the listener s position There are no absolute rules concerning problematic rooms so do not be afraid to experiment with speaker placement to determine the best position of the speakers in your room One of the best pieces of advice we can offer is that you take advantage of your ear s ability to identify similarities in sound This...

Page 14: ...which means that there is minimum radiation of sound to the sidewalls of the room The G6 1c uses the wall behind the speaker to give more depth to the soundstage and air to the speaker without detail robbing room reflections from the sidewalls Hence it has the advantages of omni directional speakers without the disadvantages With fewer spurious reflections to confuse your hearing the program sourc...

Page 15: ... and voice coil have been maximized for long distortion free excursion so as to increase dynamic range Our aluminium cones are a magnitude stiffer than plastic or paper cones and virtually eliminate the problems caused by cone bending and break up 4 3 Crossover If the servo controlled bass amplifier is the heart of the loudspeaker the crossover is the brain In order to manage and maximize the perf...

Page 16: ...erial of choice for its damping properties and its consistency in hardness density and rigidity It would actually have been cheaper and easier to make the cabinet of solid wood but that would have been a compromise Genesis designed a unique tongue and groove joint in order to improve the structural rigidity of the cabinet Crystalline glue the dissolves into the mdf was chosen to ensure that the in...

Page 17: ...rs Two Genesis 1 Circular Ribbon Tweeters front rear Midrange Transducers One Genesis 5 titanium cone midrange LF Transducers Two Genesis 6 5 aluminium cone Controls Midrange Level Tweeter level Rear Tweeter Defeat Inputs High level with 5 way binding posts Throughputs High level with 5 way binding posts Dimensions H 10 x W 33 x D 14 Weight 69 lbs 31 5kg Finishes Rosewood Olive Ash or Pomele Sapel...

Reviews: