background image

SPECIFICATION

• Keyboard size
• Connector
• Number of key
• Number of multimedia keys

435 x 193 x 34 mm
USB 2.0
108
12

PACKAGE CONTENT

• Thor 401 RGB keyboard
• Quick installation guide

WARRANTY

• 2 years limited manufacturer warranty

REQUIREMENTS

• PC or PC compatible device with a USB port
• Windows® XP/Vista/7/8/10

FEATURES

• Aluminum body
• N-Key Rollover
• Durable key caps in “Double injection“ technology
• RGB backlight with PRISMO effect

INSTALLATION

Connect your device to the USB port of your computer, it is necessary to wait about 15 seconds for the first connection until the 

drivers are fully installed. The keyboard includes software that allows you to set up advanced features, if you want to use these 

features, you need to download and install the software from our website www.genesis-zone.com. Open the installation folder and 

then double-click the setup.exe. Follow the installation instructions. After a successful installation, the software icon appears on the 

main bottom panel. Double-clicking the icon opens the settings interface.

BACKLIGHT MODE AND 

MULTIMEDIA MODE

To change between backlight mode and multimedia mode 

press and hold the knob for 5 sec.

BACKLIGHT BRIGHTNESS

To change the backlight brightness level turn the knob in 

backlight mode.

WINDOWS KEY LOCK

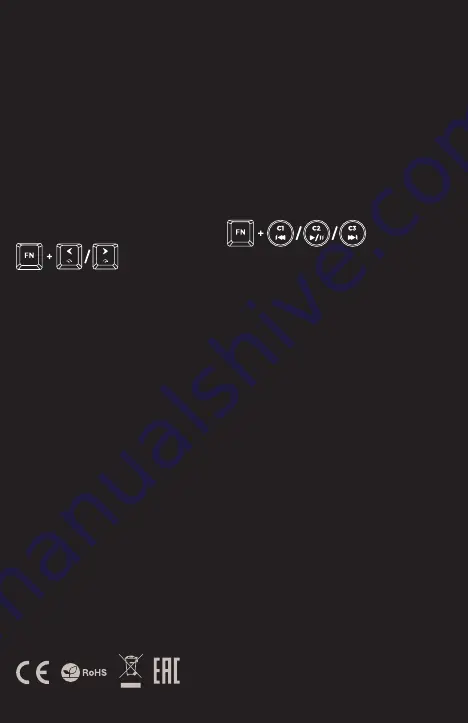
To lock the Windows® tab key press [FN + WINDOWS].

CHOOSING BACKLIGHT COLOUR

Some backlight modes allows to set uniform color, press 

[FN+SCLK] to display the palette of available colors and 

then press key with desired backlight color.

WHITE BACKLIGHT MODE

To choose white uniform backlight color, press [FN+PABK].

SPEED OF BACKLIGHT EFFECTS

To change the speed of backlight effects press keys [FN + 

arrow left/right].

SETTING OF BACKLIGHT 

PROFILES

To save your favorite backlight profile press and hold the 

button [C1, C2 or C3]. Short pressing of [C1, C2 or C3] activates 

a previously saved profile.

CUSTOM MODE

Custom mode allows you to set the individual illumination of 

each key.

1. Press [FN + DEL/END/PGDN] to select one of three 

available „custom  modes”.

2. Press [FN + HOME] to enter into recording mode (led 

indicators will start blinking).

3. Press [FN + SCLK] to display the palette of available 

colors and then press key with desired backlight color. 

The color of each key can be changed during recording, 

just press [FN + SCLK] again and select other color.

4. Press [FN + HOME] to save your settings and exit the 

recording mode.

EN

PL

DE

ES

CZ
SK

RO
HU
BG
RU

SAFETY INFORMATION

GENERAL

• Use as directed.
• Non-authorized repairs or taking the device to pieces make the warranty 

void and may cause the product damage.

• Avoid to hit or friction with a hard object, otherwise it will lead to grind 

surface or other hardware damage.

• Do not use the product in low and high temperatures, in strong magnetic 

fields and in the damp or dusty atmosphere.

• Do not drop, knock, or shake the device. Rough handling can break it.
• Slots and openings in the case are provided for ventilation and should not 

be obscure. Blocking the vents can cause overheating of the device.

• The safe product, conforming to the EU requirements.
• The product is made in accordance with RoHS European standard.
• The WEEE symbol (the crossed-out wheeled bin) using indicates that 

this product in not home waste. Appropriate waste management 

aids in avoiding consequences which are harmful for people and 

environment and result from dangerous materials used in the device, 

as well as improper storage and processing. Segregated household 

waste collection aids recycle materials and components of which the 

device was made. In order to get detailed information about 

recycling this product please contact your retailer or a local authority.

STANDARD BACKLIGHT MODES

Press the knob in backlight mode to change between 13 

standard backlight modes. 

RESTORE FACTORY SETTINGS

All saved settings can be easy restored to default settings 

by pressing the keys [FN + ESC]. To restore factory settings, 

hold the keys [FN + ESC] for 5 seconds. 

Summary of Contents for THOR 401

Page 1: ...EN PL DE ES CZ SK RO HU BG RU QUICK INSTALLATION GUIDE THOR 401 WWW GENESIS ZONE COM ...

Page 2: ...activates a previously saved profile CUSTOM MODE Custom mode allows you to set the individual illumination of each key 1 Press FN DEL END PGDN to select one of three available custom modes 2 Press FN HOME to enter into recording mode led indicators will start blinking 3 Press FN SCLK to display the palette of available colors and then press key with desired backlight color The color of each key ca...

Page 3: ...com Otwórz folder instalacyjny i następnie kliknij dwukrotnie na ikonę setup exe Postępuj zgodnie ze wskazówkami aby zainstalować oprogramowanie Gdy instalacja zostanie zakończona pomyślnie na pasku zadań wyświetli się ikona oprogramowania Kliknij dwukrotnie na ikonę by wyświetlić interfejs z ustawieniami TRYB PODŚWIETLENIA i TRYB MULTIMEDIALNY Aby przełączać się pomiędzy trybem multimedialnym a t...

Page 4: ...ationsordner und doppelklicken Sie dann auf das Symbol setup exe Folgen Sie den Anweisungen um die Software zu installieren Sobald die Installation erfolgreich abgeschlossen ist erscheint das Software Symbol in derTaskleiste Doppelklicken Sie auf das Symbol um die Einstellungsoberfläche anzuzeigen BELEUCHTUNGS und MULTIMEDIAMODUS Um zwischen Multimedia und Beleuchtungsmodus umzuschalten halten Sie...

Page 5: ...do la instalación haya finalizado con éxito se mostrará en la barra de tareas el icono del programa Haz clic dos veces en el icono para mostrar la interfaz con los ajustes MODO DE ILUMINACIÓN y MODO MULTIMEDIA Para cambiar entre el modo multimedia y el modo de iluminación mantén presionado el control giratorio durante unos 5 segundos BRILLO DE LA ILUMINACIÓN Para cambiar el brillo de la iluminació...

Page 6: ...ční složku a potom kliknete dvakrát na soubor setup exe Postupujte podle pokynu instalace Po úspěšném zakončení instalace se na hlavním panelu zobrazí ikona softwaru Dvojitým kliknutím na ikonu se otevře interfejs nastavení REŽIM PODSVÍCENÍ A MULTIMEDIÁLNÍ REŽIM Pro přepnutí na režim podsvícení a multimediální režim stiskněte a podržte knoflík pod dobu 5 sekund JAS PODSVÍCENÍ Úroveň jasu podsvícen...

Page 7: ...talačný priečinok a potom kliknite dvakrát na súbor setup exe Postupujte podľa pokynov inštalácie Po úspešnom zakončení inštalácie sa na hlavnom paneli zobrazí ikona softvéru Dvojitým kliknutím na ikonu sa otvorí interfejs nastavenia REŽIM PODSVIETENIA A MULTIME DIÁLNY REŽIM Pre prepnutie na režim podsvietenia a multimediálny režim stlačte a podržte koliesko pod dobu 5 sekúnd JAS PODSVIETENIA Úrov...

Page 8: ...e pe pagina de Internet www genesis zo ne com Deschideți directorul de instalare și executați dublu clic pe iconița setup exe Procedați conform indicațiilor pentru a încheia instalarea software ului Când instalarea se va încheia cu succes pe bara de meniu va apărea iconița software ului Efectuați dublu clic pe iconiță pentru a deschide interfața setărilor MODUL DE ILUMINARE ȘI MODUL MULTIMEDIA Pen...

Page 9: ...pítéséhez kövesse az utasításokat A sikeres telepítést követően a tálcán megjelenik a program ikonja A beállítások megjelenítéséhez kattintson duplán az ikonra MEGVILÁGÍTÁSI ÉS MULTIMEDIÁLIS ÜZEMMÓD A megvilágítási és a multimediális üzemmódok közötti átváltáshoz 5 másodpercen át tartsa nyomva a szabályozógombot MEGVILÁGÍTÁS FÉNYEREJE Megvilágítási üzemmódban a megvilágítás fényereje a szabályozóg...

Page 10: ...рукциите за да инсталирате програмата Когато инсталирането бъде завършено успешно на стартовата лента ще се появи иконата на програмата Кликнете двукратно на иконата за да видите интерфейса с настройките РЕЖИМ НА ПОДСВЕТКА И МУЛТИМЕДИАЛЕН РЕЖИМ За да превключите между мултимедиалния режим и режим на подсветка натиснете селектора и задръжте за 5 секунди ЯРКОСТ НА ПОДСВЕТКАТА За да се промени яркост...

Page 11: ...ната на програмата Кликнете двукратно на иконата за да видите интерфейса с настройките РЕЖИМ НА ПОДСВЕТКА И МУЛТИМЕДИАЛЕН РЕЖИМ За да превключите между мултимедиалния режим и режим на подсветка натиснете селектора и задръжте за 5 секунди ЯРКОСТ НА ПОДСВЕТКАТА За да се промени яркостта на подсветката трябва да се завърти селектора в режим на подсветка БЛОКИРАНЕ НА КЛАВИША WINDOWS За да блокирате кл...

Page 12: ...nd all related product and service names design marks and slogans are the trademarks or registered trademarks of GENESIS All other product and service marks contained herein are the trademarks of their respective owners V 1240 PRODUCT SUPPORT INFORMATION PLEASE SCAN QRCODE ...

Reviews: