background image

Safety information

•  For intentional purpose only.
•  Non-authorized repairs or taking the device to pieces make the 

warranty void and may cause the product damage.

•  Avoid to hit or friction with a hard object, otherwise it will lead to 

grind surface or other hardware damage.

•  Do not use the product in low and high temperatures, in strong 

magnetic fields and in the damp or dusty atmosphere.

•  Do not drop, knock, or shake the device. Rough handling 

can break it.

•  Slots and openings in the case are provided for ventilation and 

should not be obscured. Blocking the vents can cause 

overheating of the device.

Warranty

•  2 years limited manufacturer warranty

EN

PL

DE

ES

CZ
SK

RO
HU
BG
RU

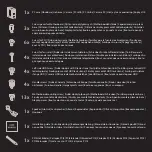
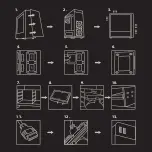
Fan control installation - plug 3-pin male fan connector to 3-pin 

female fan control connector. Plug in 4-pin male Molex PSU 

connector to 4-pin female Molex Fan control connector.

1-3. Fan/5,25" ODD device Installation: Remove front panel by 

gently pulling, and unscrew side pannel. Install fans/5,25" ODD 

device accordingly using screws. Fan airflow orientation as on 

picture 3.

4-6. SSD Installation: Put SSD in designated area, then fix it by 

screws. Side-cover is necessary to be removed.

7-10. HDD Installation: HDD designated area instalation. Fix 2 

supporting screws on left side of HDD. Install HDD in HDD tray. Fix 

right HDD side by screws.

11-13. Front panel I/O ports installation: Connect front panel I/O 

connectors to motherboard according to motherboard manual.

Installation

General

•  The safe product, conforming to the EU requirements
•  The product is made in accordance with RoHS European standard.
•  The WEEE symbol (the crossed-out wheeled bin) using indicates 

that this product in not home waste. Appropriate waste 

management aids in avoiding consequences which are harmful for 

people and environment and result from dangerous materials 

used in the device, as well as improper storage and processing. 

Segregated household waste collection aids recycle materials and 

components of which the device was made. In order to get 

detailed information about recycling this product please contact 

your retailer or a local authority.

Specification

• Material

SPCC Steel, ABS

• Motherboard Support

ATX, micro-ATX, mini-ITX

• 5,25" HDD Bays

2

• 3,5" SSD Bays

2

• 2,5" SSD Bays

2

• I/O Connectors

USB 3.0 x1, USB 2.0 x2, HD Audio Jack x2, 

2ch Fan Control

• Expansion Slots

7

• Front

120 mm x3 (2x installed), 

240 mm radiator support

• Top

120/140 mm (120 mm 1x installed), 

120 mm radiator support

• PSU Mounting / Standard Bottom, ATX 
• Max. CPU Cooler height 160 mm
• Max. GPU Length

380 mm

• Dust Filters

Bottom, Top

• Weight

4,5 kg

• Dimensions (LxWxH)

477 x 207 x 470 mm

• Rear

120 mm x1 (1x installed)

• Cooling Support

Max 5 fans

Summary of Contents for Titan660+

Page 1: ...www genesis zone com Quick installation guide GAMING PC CASE Titan660 EN PL DE ES CZ SK RO HU BG RU...

Page 2: ...hez 4x Left side HDD Screw rubki do dysku HDD lewa strona Festplatte Schrauben links Tornillos para el disco HDD lado izquierdo rouby pro mont HDD lev strana Skrutky pre mont HDD lav strana Surub pen...

Page 3: ...1 2 3 11 12 13 7 8 9 10 4 5 6...

Page 4: ...rea instalation Fix 2 supporting screws on left side of HDD Install HDD in HDD tray Fix right HDD side by screws 11 13 Front panel I O ports installation Connect front panel I O connectors to motherbo...

Page 5: ...kontrolera obrot w pod czy z cze 3 pin m skie wentylatora do z cza 3 pin e skiego kontrolera Pod czy z cze 4 pin m skie Molex od zasilacza do z cza 4 pin e skiego Molex zasilaj cego kontroler Instalac...

Page 6: ...em der Anleitung f rs Motherboard Installation des Drehzahlstellers verbinden Sie den 3 poligen Stecker des L fters mit der 3 poligen Buchse des Controllers Verbinden Sie den 4 poligen Molexstecker de...

Page 7: ...uciones conecte el conector macho de 3 pines del ventilador al conector hembra de 3 pines del controlador Conecte el conector macho Molex de 4 pines de la fuente de alimentaci n al conector Molex de 4...

Page 8: ...mce s 3kol kov m konektorem ovlada e samic Spojte 4kol kov konektor Molex nap jec ho zdroje samce se 4kol kov m konektorem Molex nap jen ovl da e samic Instalace OBECN Bezpe n v robek spl uj c po adav...

Page 9: ...r ventil tora pripojte k trojkol kov mu sami iemu konektoru ovl da a tvorkol kov sam konektor Molex pripojte od nap jacieho zdroja k tvorkol kov mu sami iemu konektoru Molex nap jaj cemu ovl da In tal...

Page 10: ...y ul HDD Fixati partea dreapta a HDD ului cu suruburi 11 13 Instalarea porturilor I O ale panoului frontal conectati mufele I O ale panoului frontal la placa de baza in conformitate cu manualul placii...

Page 11: ...or 3 f rfi pinj nek a csatlakoz j t a szab lyoz 3 n i pinj nek a csatlakoz j val Csatlakoztatni kell a t pegys g Molex 4 f rfi pinj nek a csatlakoz j t a szab lyoz t meghajt Molex 4 n i pinj nek a csa...

Page 12: ...SSD SSD 7 10 2 HDD 11 13 I O I O 3 3 4 Molex PSU 4 Molex Fan RoHS WEEE SPCC ABS AXT micro ATX mini ITX 5 25 ODD 2 3 5 HDD 2 2 5 SSD 2 I O USB3 0x1 USB2 0x2 HDAudioJackx2 2ch 7 120 x3 x2 240 120 140 1...

Page 13: ...U 1 3 3 4 6 SSD SSD 7 10 HDD HDD 11 13 3 3 4 Molex 4 Molex RoHS WEEE ABS ATX micro ATX mini ITX ODD5 25 2 HDD3 5 2 SSD2 5 2 USB3 0x1 USB2 0x2 HDAudioJackx2 2ch 7 120 x3 2x 240 120 140 1x 120 ATX 160 3...

Page 14: ...IS All rights reserved GENESIS name and logo and all related product and service names design marks and slogans are the trademarks or registered trademarks of GENESIS All other product and service mar...

Reviews: