Air Handler
11
4.5 Drain Pan Refit
Based upon the actual conditions, if the unit is installed as per Fig.3, there is no need to adjust
the drain pan; otherwise, the auxiliary drain pan is required to be refitted on the opposite side.
The following instruction shows how to refit the auxiliary drain pan from left to right side of the
unit. As the auxiliary drain pan is universally used on both sides, only change the position of plastic
drain pan cap for replacement.
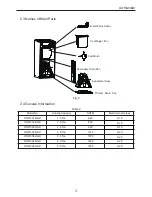
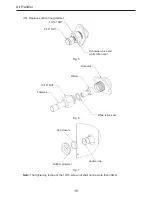
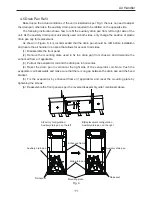
As shown in Figure 8, it is recommended that the drain pan should be refit before installation
and locate the air handler in an area that allows for access to all sides.
(1) Disassemble the front panel.
(2) Remove the mounting plate used to fix the drain pan from chassis. And dismantle the
enhanced frame, if applicable.
(3)
Pull out the evaporator coil and the drain pan in horizontal.
(4) Reset the drain pan in vertical at the right side of the evaporator coil. Note: Push the
evaporator coil backwards and make sure that there is no gap between the drain pan and the fixed
bracket.
(5) Fix the evaporator by enhanced frame (if applicable) and reset the mounting plate by
tightening the screws.
(6) Reassemble the front panel as per the reverse disassembly order mentioned above.
A)Factory configuration:
Auxiliary drain pan on the left
B)Replacement configuration:
Auxiliary drain pan on the right
Enhanced frame
Main drain pan
Mounting plate
Auxiliary drain pan
Rainspout
Rainspout
Auxiliary drain pan
Fig. 8


