Section 4 • Repair Procedures
November 2014
Part No. 229753
GS-2669 RT • GS-3369 RT • GS-4069 RT
4 - 41
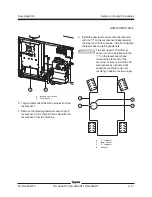
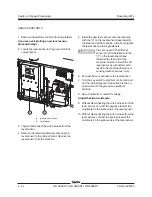
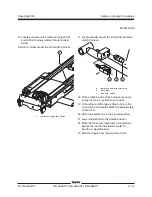
a
ground control box
b
level sensor
3 Tag and disconnect the wire harness from the
level sensor.
4 Remove the retaining fasteners securing the
level sensor to the compartment. Remove the
level sensor from the machine.
5 Install the new level sensor onto the machine
with the "Y" on the level sensor base towards
the steer end of the machine. Install and tighten
the level sensor retaining fasteners.
Tip-over hazard. The tilt level
sensor must be installed with the
"Y" on the level sensor base
towards the steer end of the
machine. Failure to install the tilt
level sensor as instructed will
cause the machine to tip over
resulting in death or serious injury.
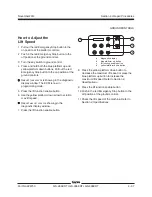
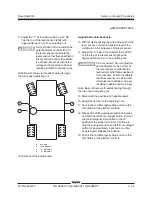
a
"Y" indicator
b
level sensor
c
"X" indicator
d
chassis
GROUND CONTROLS
b
a
Y
X
c
a
b
d
Summary of Contents for GS-2669 RT
Page 169: ...Section 6 Schematics November2014 6 9 Control Panel Circuit Diagram 6 10 ...
Page 235: ...Section 6 Schematics November2014 6 75 6 76 Electrical Schematic GS 4069 RT Gas LPG Models AS ...
Page 238: ...November2014 Section 6 Schematics 6 78 Electrical Schematic GS 4069 RT Gas LPG Models AS 6 77 ...
Page 243: ...Section 6 Schematics November2014 6 83 Electrical Schematic GS 4069 RT Diesel Models AS 6 82 ...
Page 246: ...November2014 Section 6 Schematics 6 86 Electrical Schematic GS 4069 RT Diesel Models AS 6 85 ...
Page 251: ...Section 6 Schematics November2014 6 91 Electrical Schematic GS 4069 RT Gas LPG Models CE 6 92 ...
Page 254: ...November2014 Section 6 Schematics 6 94 Electrical Schematic GS 4069 RT Gas LPG Models CE 6 93 ...
Page 259: ...Section 6 Schematics November2014 6 99 6 100 Electrical Schematic GS 4069 RT Diesel Models CE ...
Page 267: ...Section 6 Schematics November2014 6 107 Hydraulic Schematic GS 2669 RT and GS 3369 RT 6 108 ...
Page 270: ...November2014 Section 6 Schematics 6 110 Hydraulic Schematic GS 4069 RT 6 109 ...


