Section 4 • Repair Procedures
November 2014
4 - 46
GS-2669 RT • GS-3369 RT • GS-4069 RT
Part No. 229753
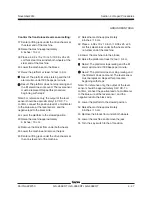
Confirm the side-to-side level sensor setting:
20 Center a lifting jack under the drive chassis at
the ground control side of the machine.
21 Raise the machine approximately
6 inches / 15 cm.
22
Models with RT tires:
Place a
2.15 x 10 x 10 inch / 5.46 x 25 x 25 cm thick
steel block under both wheels at the ground
controls side of the machine.
23 Lower the machine onto the blocks.
24 Pull out the red Emergency Stop button to the
on position at platform controls. Start the
engine.
25 Raise the platform at least 12 feet / 3.6 m.
Result: The platform stops raising and the tilt
alarm will sound at 180 beeps per minute.
Result: The platform does not stop raising and
the tilt alarm does not sound. The level sensor
must be replaced. Repeat this procedure
beginning with step 2.
Note: For reference only, the output of the level
sensor should be approximately 1.7V DC. To
confirm, connect the positive lead of a multimeter
to the yellow wire at the level sensor, and the
negative lead to the black wire.
26 Raise the machine approximately
6 inches / 15 cm.
27 Remove the blocks from under both wheels.
28 Lower the machine and remove the jack.
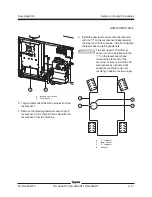
GROUND CONTROLS
29 Center a lifting jack under the drive chassis at
the tank side of the machine.
30 Raise the machine approximately
6 inches / 15 cm.
31
Models with RT tires:
Place a
2.15 x 10 x 10 inch / 5.46 x 25 x 25 cm thick
steel block under both wheels at the ground
controls side of the machine.
32 Raise the platform at least 12 feet / 3.6 m.
Result: The platform stops raising and the tilt
alarm will sound at 180 beeps per minute.
Result: The platform does not stop raising and
the tilt alarm does not sound. The level sensor
must be replaced. Repeat this procedure
beginning with step 2.
Note: For reference only, the output of the level
sensor should be approximately 3.3V DC. To
confirm, connect the positive lead of a multimeter
to the yellow wire at the level sensor, and the
negative lead to the black wire.
33 Lower the platform to the stowed position.
34 Raise the machine approximately
6 inches / 15 cm.
35 Remove the blocks from under both wheels.
36 Lower the machine and remove the jack.
Summary of Contents for GS-2669 RT
Page 169: ...Section 6 Schematics November2014 6 9 Control Panel Circuit Diagram 6 10 ...
Page 235: ...Section 6 Schematics November2014 6 75 6 76 Electrical Schematic GS 4069 RT Gas LPG Models AS ...
Page 238: ...November2014 Section 6 Schematics 6 78 Electrical Schematic GS 4069 RT Gas LPG Models AS 6 77 ...
Page 243: ...Section 6 Schematics November2014 6 83 Electrical Schematic GS 4069 RT Diesel Models AS 6 82 ...
Page 246: ...November2014 Section 6 Schematics 6 86 Electrical Schematic GS 4069 RT Diesel Models AS 6 85 ...
Page 251: ...Section 6 Schematics November2014 6 91 Electrical Schematic GS 4069 RT Gas LPG Models CE 6 92 ...
Page 254: ...November2014 Section 6 Schematics 6 94 Electrical Schematic GS 4069 RT Gas LPG Models CE 6 93 ...
Page 259: ...Section 6 Schematics November2014 6 99 6 100 Electrical Schematic GS 4069 RT Diesel Models CE ...
Page 267: ...Section 6 Schematics November2014 6 107 Hydraulic Schematic GS 2669 RT and GS 3369 RT 6 108 ...
Page 270: ...November2014 Section 6 Schematics 6 110 Hydraulic Schematic GS 4069 RT 6 109 ...


