Section 4 • Repair Procedures
November 2014
Part No. 229753
GS-2669 RT • GS-3369 RT • GS-4069 RT
4 - 65
MANIFOLDS
9-6
Valve Coils
How to Test a Coil
A properly functioning coil provides an
electromagnetic force which operates the solenoid
valve. Critical to normal operation is continuity
within the coil. Zero resistance or infinite resistance
indicates the coil has failed.
Since coil resistance is sensitive to temperature,
resistance values outside specification can
produce erratic operation. When coil resistance
decreases below specification, amperage
increases. As resistance rises above specification,
voltage increases.
While valves may operate when coil resistance is
outside specification, maintaining coils within
specification will help ensure proper valve function
over a wide range of operating temperatures.
Electrocution/burn hazard. Contact
with electrically charged circuits
could result in death or serious
injury. Remove all rings, watches
and other jewelry.
Note: If the machine has been in operation, allow
the coil to cool at least 3 hours before performing
this test.
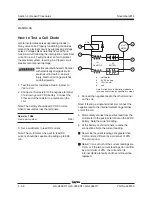
1 Tag and disconnect the wiring from the coil to
be tested.
2 Test the coil resistance using a multimeter set
to resistance (
Ω)
. Refer to the Valve Coil
Resistance Specification table.
Result: If the resistance is not within the
adjusted specification, plus or minus 10%,
replace the coil.
Valve Coil Resistance
Specification
Note: The following coil resistance specifications
are at an ambient temperature of 68°F / 20°C. As
valve coil resistance is sensitive to changes in air
temperature, the coil resistance will typically
increase or decrease by 4% for each 18°F / 20°C
that your air temperature increases or decreases
from 68°F / 20°C.
Description
Specification
Proportional valve,
7.1
Ω
12V DC with diode (schematic item FL)
Solenoid valve, 2 position 2 way
8.8
Ω
12V DC with diode (schematic item FB)
Solenoid valve, 2 position 2 way
7.1
Ω
12V DC with diode (schematic item TJ, TK)
Solenoid valve, 2 position 3 way
8.8
Ω
12V DC with diode (schematic item FO, FP, TL, TT)
Solenoid valve, 2 position 3 way
7.1
Ω
12V DC with diode (schematic item FD)
Solenoid valve, 2 position 4 way
7.1
Ω
12V DC with diode (schematic items TB)
Solenoid valve, 3 position 4 way
7.1
Ω
12V DC with diode (schematic items BA)
Solenoid valve, 3 position 4 way
5.1
Ω
12V DC with diode (schematic items TE)
Solenoid valve, 3 position 5 way
8.8
Ω
12V DC with diode (schematic item FK)
Summary of Contents for GS-2669 RT
Page 169: ...Section 6 Schematics November2014 6 9 Control Panel Circuit Diagram 6 10 ...
Page 235: ...Section 6 Schematics November2014 6 75 6 76 Electrical Schematic GS 4069 RT Gas LPG Models AS ...
Page 238: ...November2014 Section 6 Schematics 6 78 Electrical Schematic GS 4069 RT Gas LPG Models AS 6 77 ...
Page 243: ...Section 6 Schematics November2014 6 83 Electrical Schematic GS 4069 RT Diesel Models AS 6 82 ...
Page 246: ...November2014 Section 6 Schematics 6 86 Electrical Schematic GS 4069 RT Diesel Models AS 6 85 ...
Page 251: ...Section 6 Schematics November2014 6 91 Electrical Schematic GS 4069 RT Gas LPG Models CE 6 92 ...
Page 254: ...November2014 Section 6 Schematics 6 94 Electrical Schematic GS 4069 RT Gas LPG Models CE 6 93 ...
Page 259: ...Section 6 Schematics November2014 6 99 6 100 Electrical Schematic GS 4069 RT Diesel Models CE ...
Page 267: ...Section 6 Schematics November2014 6 107 Hydraulic Schematic GS 2669 RT and GS 3369 RT 6 108 ...
Page 270: ...November2014 Section 6 Schematics 6 110 Hydraulic Schematic GS 4069 RT 6 109 ...

