background image

10

Jump Starting Procedure

NOTE: Do not charge the ReliaVolt™ unit or USB devices while jump 

starting a vehicle.

1.  Ensure vehicle ignition is turned OFF and all accessories such as 

AC, radio, defroster, etc... are also turned off.

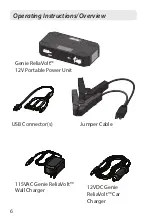
2.  Plug jumper cable into Genie ReliaVolt™. (Fig. 1)

3.  Clamp RED jump starter cable to the RED POSITIVE (+) terminal 

post of the vehicle battery. (Fig. 2)

4.  Clamp BLACK jump starter cable to the BLACK NEGATIVE (-) 

terminal post of the vehicle battery or chassis ground. (Fig. 2)

5.  Press the Power button on the Genie ReliaVolt™ to check power 

level (Power Button will illuminate). Charge level should be 

over 11.5V for best results.

6.  The display will also indicate current charge level of the vehicle 

battery. (Fig. 3) 

• If no charge level is shown, battery level is under 2V. See page 14 

for override function.

• If the LCD flashes and Jump Start button is RED, reverse polarity of 

the clamps to the battery.

7.  When the LCD screen indicates “READY…GO”, press JUMP 

START button on the Genie ReliaVolt™.   Button will flash and 

power will then flow to the vehicle battery.

8.  Start Vehicle.

• Display will read voltage after vehicle is running. (Fig. 4)

NOTE:


If vehicle does not start, allow Genie ReliaVolt™ to rest 10 

seconds before attempting to start vehicle again. When the Jump Start 

button is green, it is ready for your next attempt. Try this process up to 

two additional times with at least 10 seconds in between attempts.  

If vehicle fails to start after 3 attempts, discontinue use of the Genie 

ReliaVolt™ and seek other methods to start vehicle.

Summary of Contents for ReliaVolt GPCD-R

Page 1: ...so can result in serious injury SAVE THIS MANUAL Jump starts vehicles up to 4 0L V8 Charges USB devices LED worklight with SOS strobe functions For use on 12VDC systems only 3 in 1 Portable PowerPack...

Page 2: ...l to avoid possible injury or death Indicates a hazardous situation which if not avoided will result in serious injury or death Indicates a hazardous situation which if not avoided could result in ser...

Page 3: ...Temperature safety lock out prevents use in dangerously high temperatures Overload protection prevents battery damage if stressed Anti spark and short circuit prevention systems prevent sparking and f...

Page 4: ...disconnecting the unit Do not use a battery pack or appliance that is damaged or modified Damaged or modified batteries may exhibit unpredictable behavior resulting in fire explosion or risk of injur...

Page 5: ...king on these products and on engine Do not sit unit on flammable materials such as carpeting upholstery paper cardboard etc Do not jumpstart a vehicle while charging the internal battery Never place...

Page 6: ...minutes and get medical attention immediately If battery acid is ingested do not induce vomiting and seek medical attention immediately NEVER smoke or allow a spark or flame in vicinity of battery or...

Page 7: ...r excessive temperature Exposure to fire or temperature above 131 F may cause explosion Have servicing performed by a qualified repair person using only identical replacement parts This will ensure th...

Page 8: ...6 Operating Instructions Overview Genie ReliaVolt 12V Portable Power Unit USB Connector s Jumper Cable 115VAC Genie ReliaVolt Wall Charger 12VDC Genie ReliaVolt Car Charger...

Page 9: ...tions Overview Fully charge Genie ReliaVolt prior to use WARNING Charge on a non flammable surface Unit Charging Port Jumper Cable Port LED Worklight SOS Strobe Power Button Jump Start Button Workligh...

Page 10: ...ll stop blinking and the word CHARGING will disappear from the LCD display NOTE The Genie ReliaVolt contains a charge safety circuit to prevent overcharging of unit Initial charging can take up to 6 8...

Page 11: ...fter each use and every 3 6 months to keep internal battery fully charged and prolong battery life Store in case provided in a cool dry place NOTE There are no serviceable parts within this unit DO NO...

Page 12: ...ate current charge level of the vehicle battery Fig 3 If no charge level is shown battery level is under 2V See page 14 for override function If the LCD flashes and Jump Start button is RED reverse po...

Page 13: ...K NEG 9 Once vehicle has started press POWER button on the side of unit to turn unit OFF 10 Remove BLACK NEGATIVE jump starter clamp from vehicle battery post or chassis ground 11 Remove RED POSITIVE...

Page 14: ...empt to start vehicle NOTE If vehicle does not start allow Genie ReliaVolt to rest 10 seconds before attempting to start vehicle again When the Jump Start button is green it is ready for your next att...

Page 15: ...ss POWER button on Genie ReliaVolt Charging will begin 5 Once hand held device is fully charged press POWER button on Genie ReliaVolt and remove USB connectors Flashlight Mode 1 Press POWER button on...

Page 16: ...ties so this may not apply to you ALL EXPRESS AND IMPLIED WARRANTIES FOR THE PRODUCT INCLUDING BUT NOT LIMITED TO ANY IMPLIED WARRANTIES OF MERCHANTABILITY AND FITNESS FOR A PARTICULAR PURPOSE ARE LIM...

Reviews: