background image

11

6.1 Network Configuration & Adding IP Camera

After you finish adding IP cameras, you can see the live images through the monitor of the 
NVR. The following will mainly introduce how to add the IP cameras via LAN/WAN.

LAN

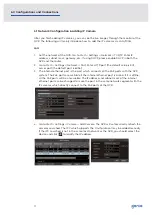
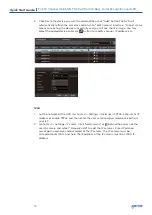
1.  Set the network of the NVR. Go to Start → Settings → Network → TCP/IP. Enter IP 

address, subnet mask, gateway, etc. If using DHCP, please enable DHCP in both the 
NVR and the router.

2.  Go to Start → Settings → Network → Port. Enter HTTP port (the default value is 80), 

server port (the default port is 6036).

3.  The internal ethernet port is the port which connects all the PoE ports with the NVR 

system. The PoE ports are available if the internal ethernet port is online. If it is offline, 
all the PoE ports will be unavailable. The IP address and subnet mask of the internal 
ethernet port can be changed to make the port in the same network segment with the 
IP cameras which directly connect to the PoE ports of the NVR.

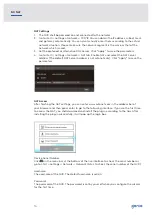
4.  Go to Start → Settings → Camera → Add Camera. The NVR will automatically refresh the 

cameras searched. The IPC which supports the Onvif protocol may be added manually. 
If the IPC searched is not in the same local network as the NVR, you should select the 
device and click       to modify the IP address.

6.0 Configurations and Connections

Summary of Contents for WNVR432P5OAI

Page 1: ...Quick Start Guide Please read these instructions carefully before operating the unit and keep for further reference PoE 32 Channel H 265 12MP NVR with 4HDD Bays Facial Recognition and LPR WNVR432P5OAI...

Page 2: ...urther reference All examples and pictures used here are for reference only The contents of this manual are subject to change without notice CAUTION Please check the device and the accessories after g...

Page 3: ...1 3 Specification 6 2 0 HDD Installation 7 3 0 Rear Panel Instruction 8 4 0 Start Up and Shut Down 9 5 0 Login 10 6 0 Configurations and Connections 11 6 1 Network Configuration Adding IP Camera 11 7...

Page 4: ...ion sensor POS AI recording Playback 16 CH simultaneous playback Search time slice time event tag and smart search Support face detection and comparison Support POS information overlay on live view an...

Page 5: ...by Device 2 CH 2MP Face Match Performance 6 CH Comparison Capability 18 pictures second Face Picture Database 32 libraries 10000 Face Pictures Face Picture Search Search by picture is supported Datab...

Page 6: ...ompatible browser support with firmware version 1 4 5 and above Backup Storage Local Backup USB stick USB mobile HDD Network Backup Yes Storage HDD SATA 4 max 10TB for each HDD E SATA 1 Port RS485 Yes...

Page 7: ...over the machine and place the HDD with two screws onto the bottom of the case Then lock the screws according to the order of the marks 4 Install the other three HDDs according to above mentioned met...

Page 8: ...ect to PoE IP camera LAN Network port VGA Connect to monitor HDMI Connect to high definition display device USB Connect to USB storage device or USB mouse AUDIO OUT Audio output AUDIO IN Audio input P...

Page 9: ...oot and the power indicator will display blue 3 A wizard window will pop up Shutdown Click Start and then select Shutdown icon This will bring up a shutdown window The device will shut down by clickin...

Page 10: ...the NVR for the first time and you may change the password when you configure the wizard for the first time You can skip the settings wizard next time Click Start and select Login This will take you...

Page 11: ...thernet port is the port which connects all the PoE ports with the NVR system The PoE ports are available if the internal ethernet port is online If it is offline all the PoE ports will be unavailable...

Page 12: ...added device and click button to modify channel IP address etc WAN 1 Set the network of the NVR Go to Start Settings Network PPPoE Enter static IP address or enable PPPoE and then enter the user name...

Page 13: ...UPnP and then click Apply button to save 2 Enable the UPnP function in the router 3 Click Refresh button to refresh the UPnP status If the UPnP status were still Invalid UPnP after refreshing it for...

Page 14: ...m Click Apply to save the parameters NAT Access After finishing the NAT settings you can enter www autonat com in the address bar of your browser and then press enter to go to the following interface...

Page 15: ...to select or drag the playback progress bar to change the playback time to play back the record General Playback Click on the tool bar at the bottom of the live preview interface or click Start Playba...

Page 16: ...Sales 44 0 1707 330541 Enquiries sales genieproducts co uk Website www genieproducts co uk...

Reviews: