Part No. 139378
Z-30/20N • Z-30/20N RJ • Z-34/22 • Z-34/22N
4 - 3
June 2011
Section 4 • Repair Procedures
REV A
PLATFORM CONTROLS
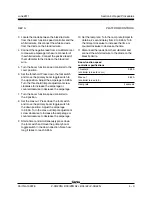
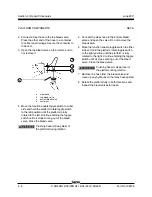
3 Locate the diode between the black/red wire
from the boom function speed controller and the
white/red wire. Disconnect the white/red wire
from the diode on the black/red wire.
4 Connect the negative lead from a multimeter set
to measure amperage to the wire connector of
the white/red wire. Connect the positive lead of
the multimeter to the diode on the black/red
wire.
5 Turn the boom function speed controller to the
CREEP
position.
6 Set the threshold: Press down the foot switch
and move the primary boom toggle switch to
the up position. Adjust the amperage to 0.28A.
Turn the threshold trimpot adjustment screw
clockwise to increase the amperage or
counterclockwise to decrease the amperage.
7 Turn the boom function speed controller to
the 9 position.
8 Set the max out: Press down the foot switch
and move the primary boom toggle switch to
the down position. Adjust the amperage
to 0.65A.
Turn the max out trimpot adjustment
screw clockwise to increase the amperage or
counterclockwise to decrease the amperage.
9 Start a timer and simultaneously press down
the foot switch and move the primary boom
toggle switch in the down direction. Note how
long it takes to reach 0.65A.
10 Set the ramp rate: Turn the ramp rate trimpot to
obtain a 2 second delay from 0 to 0.65A. Turn
the trimpot clockwise to increase the time or
counterclockwise to decrease the time.
11 Disconnect the leads from the multimeter and
connect the white/red wire to the diode on the
black/red wire.
Boom function speed
controller specifications
Threshold
0.28A
(controller turned to
CREEP
)
Max out
0.65A
(controller turned to 9)
Ramp rate
2 seconds
Summary of Contents for Z-30/20N
Page 1: ......
Page 148: ...6 46 June2011 Section 6 Schematics 6 45 Power Cable Wiring Diagram...
Page 149: ...6 47 Section 6 Schematics June2011 6 48 Drive Contactor Panel Wiring Diagram...
Page 152: ...6 50 June2011 Section 6 Schematics Manifold and Limit Switch Wiring Diagram 6 49...
Page 153: ...6 51 Section 6 Schematics June2011 6 52 LVI BCI Option Wiring Diagram...
Page 156: ...6 54 June2011 Section 6 Schematics 6 53 Charger Interlock Option...
Page 157: ...6 55 Section 6 Schematics June2011 6 56 CTE Option CE Models...
Page 160: ...6 58 June2011 Section 6 Schematics Hydraulic Schematic 6 57...


