background image

Part No. 75861

Genie Z-60/34

4 - 31

November 2003

 Section 4 • Repair Procedures

REV A

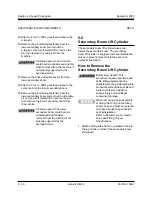
2 Tag, disconnect and plug the secondary boom

lift cylinder hydraulic hoses. Cap the fittings on
the cylinder.

Bodily injury hazard. Spraying
hydraulic oil can penetrate and
burn skin. Loosen hydraulic
connections very slowly to allow
the oil pressure to dissipate
gradually. Do not allow oil to
squirt or spray.

3 Remove the mounting fasteners from

the secondary boom lift cylinder rod-end pivot
pin mounting bracket.

4 Remove the retaining fasteners from the

secondary boom lift cylinder pivot pins. Use a
slide hammer to remove the pins, then remove
the cylinder from the machine.

Crushing hazard. The secondary
boom lift cylinder could become
unbalanced and fall when
removed from the machine if not
properly supported by the
overhead crane.

SECONDARY BOOM COMPONENTS

Summary of Contents for Z-60/34

Page 1: ...Part No 75861 November 2003 Rev A Service Manual Refer to inside cover for serial number information ...

Page 2: ...d at an authorized Genie dealer service center Technical Publications Genie Industries has endeavored to deliver the highest degree of accuracy possible However continuous improvement of our products is a Genie policy Therefore product specifications are subject to change without notice Readers are encouraged to notify Genie of errors and send in suggestions for improvement All communications will...

Page 3: ...rds identified in the operator s manual are also safety hazards when maintenance and repair procedures are performed Do Not Perform Maintenance Unless You are trained and qualified to perform maintenance on this machine You read understand and obey manufacturer s instructions and safety rules employer s safety rules and worksite regulations applicable governmental regulations You have the appropri...

Page 4: ... result in property damage Green used to indicate operation or maintenance information Workplace Safety Be sure to wear protective eye wear and other protective clothing if the situation warrants it Be aware of potential crushing hazards such as moving parts free swinging or unsecured components when lifting or placing loads Always wear approved steel toed shoes Be sure to keep sparks flames and l...

Page 5: ...e Specifications 2 5 Deutz F3L 1011F Engine Specifications 2 7 Machine Torque Specifications 2 8 Hydraulic Hose and Fitting Torque Specifications 2 9 Section 3 Scheduled Maintenance Procedures Introduction 3 1 Pre Delivery Preparation 3 3 Maintenance Inspection Report 3 5 Checklist A Procedures Rev A A 1 Perform Pre operation Inspection 3 7 A 2 Perform Engine Maintenance Deutz Models 3 7 A 3 Perfo...

Page 6: ...rator Deutz Models 3 13 A 13 Grease the Turntable Rotation Bearing and Rotate Gear 3 15 A 14 Replace Drive Hub Oil 3 15 A 15 Perform Engine Maintenance Ford Models 3 16 Checklist B Procedures Rev A B 1 Inspect the Battery 3 17 B 2 Inspect the Electrical Wiring 3 18 B 3 Test the Key Switch 3 19 B 4 Perform Engine Maintenance Ford Models 3 19 B 5 Check the Exhaust System 3 20 B 6 Check the Oil Coole...

Page 7: ... 17 Test the Drive Speed Stowed Position 3 30 B 18 Test the Drive Speed Raised or Extended Position 3 30 B 19 Test the Alarm Package if equipped 3 31 B 20 Perform Hydraulic Oil Analysis 3 32 B 21 Replace the Hydraulic Filters 3 33 B 22 Perform Engine Maintenance Deutz Models 3 34 B 23 Perform Engine Maintenance Ford Models 3 35 Checklist C Procedures Rev A C 1 Perform Engine Maintenance Deutz Mode...

Page 8: ...ist E Procedures Rev A E 1 Test or Replace the Hydraulic Oil 3 47 E 2 Change the Fuel Hoses Ford Models 3 48 E 3 Perform Engine Maintenance Deutz Models 3 50 E 4 Grease the Steer Axle Wheel Bearings 2WD Models 3 50 Section 4 Repair Procedures Introduction 4 1 Platform Controls 1 1 ALC 500 Circuit Board 4 2 1 2 Joysticks 4 3 Platform Components 2 1 Platform Leveling Slave Cylinder 4 7 2 2 Platform ...

Page 9: ...Lift Cylinder 4 20 4 4 Primary Boom Extension Cylinder 4 21 4 5 Platform Leveling Master Cylinder 4 23 Secondary Boom Components 5 1 Secondary Boom 4 25 5 2 Secondary Boom Lift Cylinders 4 30 Engines 6 1 RPM Adjustment 4 32 6 2 Flex Plate 4 32 6 3 Engine Fault Codes Ford Models 4 33 Hydraulic Pumps 7 1 Lift Steer Pump 4 35 7 2 Drive Pump 4 35 ix TABLE OF CONTENTS ...

Page 10: ...anifold Components 4 47 8 6 Brake Two Speed Manifold Components before serial number 4461 4 48 8 7 Brake Two Speed Manifold Components after serial number 4460 4 49 8 8 Directional Valve Manifold Components 4 50 8 9 2WD Drive Manifold Components 4 52 8 10 Valve Adjustments 2WD Drive Manifold 4 54 8 11 4WD Drive Manifold Components 4 55 8 12 Valve Adjustments 4WD Drive Manifold 4 57 8 13 Valve Coil...

Page 11: ...gram Deutz F4L 1011F Models 6 5 Platform Control Box Wiring Diagram Deutz F4L 1011F Models 6 6 Electrical Schematic Ford LRG 425 EFI Models 6 7 Ground Control Box Wiring Diagram Ford LRG 425 EFI Models 6 9 Platform Control Box Wiring Diagram Ford LRG 425 EFI Models 6 10 Hydraulic Symbols Legend 6 12 Hydraulic Schematic 2WD Models before sn 4461 6 13 Hydraulic Schematic 4WD Models before sn 4461 6 ...

Page 12: ...Genie Z 60 34 Part No 75861 November 2003 This page intentionally left blank ...

Page 13: ...ameter 40 1 in 102 cm Tire pressure air filled tires 65 psi 4 48 bar Tires and wheels High flotation Wheel lugs 9 5 8 18 Lug nut torque dry 210 ft lbs 284 7 Nm Lug nut torque lubricated 170 ft lbs 230 4 Nm Tire ply rating 14 Tire contact area 79 sq in 200 7 sq cm Overall tire diameter 41 in 104 cm Tire pressure air filled tires 60 psi 4 13 bar Fluid capacities Fuel tank 33 gallons 124 9 kg LPG tan...

Page 14: ...te 360 boom fully stowed 130 to 140 seconds Turntable rotate 360 boom raised or extended 170 to 180 seconds Platform rotate 180 8 to 12 seconds Platform level up 30 to 40 seconds Platform level down 15 to 25 seconds Continuous improvement of our products is a Genie policy Product specifications are subject to change without notice Performance Specifications Drive speeds maximum Stowed high range 4...

Page 15: ...gradable Petro Canada Premium ECO 46 Statoil Hydra Way Bio Pa 32 BP Biohyd SE S Fire resistant UCON Hydrolube HP 5046 Quintolubric 822 Mineral based Shell Tellus T32 Shell Tellus T46 Chevron Aviation A Genie specifications require additional equipment and special installation instructions for the approved optional fluids Consult the Genie Industries Service Department before use Drive pump Type bi...

Page 16: ...lter Beta 3 200 Medium pressure filter 51 psi bypass pressure 3 5 bar Hydraulic tank circuit 10 micron with return line filter 25 psi 1 7 bar bypass SPECIFICATIONS Function pump Type gear pressure balanced Displacement 1 37 cu in 22 5 cc Flow rate 2500 rpm 14 8 gpm 56 L min Auxiliary pump Type gear fixed displacement Displacement static 0 151 gpm 2 47 L min Auxiliary pump relief pressure 2400 psi ...

Page 17: ...AE No 6 18 ft lbs 24 Nm SAE No 8 50 ft lbs 68 Nm SAE No 10 55 ft lbs 75 Nm SAE No 12 75 ft lbs 102 Nm Valve coil resistance specifications Description Specification Proportional solenoid valve 12V DC 4 to 5Ω schematic items AB AC and AG before serial number 4461 Proportional solenoid valve 12V DC 3 to 4Ω schematic items HM HO and HR after serial number 4460 SPECIFICATIONS ...

Page 18: ...rs Oil viscosity requirements Below 60 F 15 5 C 5W 30 10 F to 90 F 23 C to 32 C 10W 30 Above 10 F 23 C 10W 40 to 10W 50 Above 20 F 6 6 C 20W 40 or 20W 50 Use oils meeting API classification SG labeled SG CC or SG CD as they offer improved wear protection Units ship with 10W 40 SG CC Oil pressure switch specifications Torque 8 18 ft lbs 11 24 Nm Oil pressure switch point 3 5 psi 0 21 0 34 bar Start...

Page 19: ... Fuel pressure static 64 psi 4 4 bar Fuel flow rate 0 58 gpm 2 18 L min Ignition System Spark plug type Motorcraft AWSF 52C Spark plug gap 0 042 to 0 046 in 1 07 to 1 18 mm Spark plug torque 5 to 10 ft lbs 7 to 14 Nm Engine coolant Capacity 111 2 quarts 10 9 liters Coolant temperature switch Torque 8 18 ft lbs 11 24 Nm Temperature switch point 230 F 112 C Alternator Output 95A 14 5V DC SPECIFICATI...

Page 20: ...6 0 bar Oil capacity 11 quarts including filter 10 5 liters Oil viscosity requirements Temperature below 60 F 15 5 C synthetic 5W 30 10 F to 90 F 23 C to 32 C 10W 40 Temperature above 4 F 34 C 15W 40 Engine oil should have properties of API classification CC SE CD SE CC SF or CD SF grades Injection system Injection pump make OMAP Injection pump pressure 4351 psi 300 bar Injector opening pressure 3...

Page 21: ...lbs 651 Nm 3 8 16 bolts 47 ft lbs 63 7 Nm Drive motor and hubs Drive hub mounting bolts dry 220 ft lbs 299 Nm Drive hub mounting bolts lubricated 170 ft lbs 231 Nm Drive motor mounting bolts dry 25 ft lbs 34 Nm Drive motor mounting bolts lubricated 18 ft lbs 25 Nm Turntable bearing Turntable bearing mounting bolts 210 ft lbs 285 Nm SPECIFICATIONS ...

Page 22: ...Seal Lok Fittings hose end SAE Dash size Torque 4 18 ft lbs 24 4 Nm 6 27 ft lbs 36 6 Nm 8 40 ft lbs 54 2 Nm 10 63 ft lbs 85 4 Nm 12 90 ft lbs 122 Nm 16 120 ft lbs 162 7 Nm 20 140 ft lbs 190 Nm 24 165 ft lbs 223 7 Nm Seal Lok fittings 1 Replace the O ring The O ring must be replaced anytime the seal has been broken The O ring cannot be re used if the fitting or hose end has been tightened beyond fi...

Page 23: ...removed The red Emergency Stop button in the OFF postion at both ground and platform controls Wheels chocked All external AC power supply disconnected from the machine About This Section This section contains detailed procedures for each scheduledmaintenanceinspection Each procedure includes a description safety information and step by step instructions Symbols Legend Safety alert symbol used to a...

Page 24: ...tion Make copies of the Pre delivery Preparation report to use for each inspection Store completed forms asrequired Maintenance Schedule There are five types of maintenance inspections that must be performed according to a schedule daily quarterly six months annual and two years TheScheduledMaintenanceProceduresSection and the Maintenance Inspection Report have been divided into five subsections A...

Page 25: ... appropriate box after each part is completed Follow the instructions in the operator s manual If any inspection receives an N remove the machine from service repair and re inspect it After repair place a check in the R box Legend Y yes completed N no unable to complete R repaired Comments Fundamentals It is the responsibility of the dealer to perform the Pre deliveryPreparation The Pre delivery P...

Page 26: ...3 4 GenieZ 60 34 Part No 75861 November 2003 Section 3 Scheduled Maintenance Procedures This page intentionally left blank ...

Page 27: ...A B C D 2 Year or 2000 hour Inspection A B C D E Place a check in the appropriate box after each inspection procedure is completed If any inspection receives an N tag and remove the machine from service repair and re inspect it After repair place a check in the R box Legend Y yes acceptable N no remove from service R repaired Comments Model Serial number Date Hour meter Machine owner Inspected by ...

Page 28: ...ORT Instructions Make copies of both pages to use for each inspection Select the appropriate checklist s for the type of inspection to be performed Daily or 8 hour Inspection A Quarterly or 250 hour Inspection A B Six Month or 500 hour Inspection A B C Annual or 1000 hours Inspection A B C D 2 Year or 2000 hour Inspection A B C D E Place a check in the appropriate box after each inspection procedu...

Page 29: ...cklist A Procedures A 2 Perform Engine Maintenance Deutz Models Engine specifications require that this procedure be performed daily or every 10 hours whichever comes first Properenginemaintenance followingtheengine manufacturer s maintenance schedule is essential to good engine performance and service life Failure to perform the maintenance procedures can lead to poorengineperformanceandcomponent...

Page 30: ... moving could result in death or serious injury A 4 Check for Fuel Leaks Failure to detect and correct fuel leaks will result in an unsafe condition An explosion or fuel fire may cause death or serious injury Explosion and fire hazard Engine fuels are combustible Inspect the machine in an open well ventilated area away from heaters sparks flames and lighted tobacco Always have an approved fire ext...

Page 31: ...nctions are discovered the machine must be tagged and removed from service Complete information to perform this procedure is available in the Genie Z 60 34 Operator s Manual on your machine A 6 Perform Drive Hub Maintenance Rexroth drive hub specifications require that this procedure be performed after 10 hours of full loadoperation Requiredmaintenanceproceduresandadditional drive hub information ...

Page 32: ...Valve Linkage 4 Drive both steer tires up onto a 6 inch 15 2 cm block or curb Result The non steer tires should stay in firm contact with the ground A 7 Check the High Pressure Hydraulic Filter Condition Indicator if equipped Maintaining the high pressure hydraulic filter in good condition is essential to good system performance and safe machine operation The filter condition indicator will show w...

Page 33: ...EDURES A 10 Perform Engine Maintenance Ford Models Engine specifications require that this procedure be performed every 100 hours Perform this procedure more often if dusty conditions exist or the machine is subjected to extended low idle operation Properenginemaintenance followingtheengine manufacturer s maintenance schedule is essential to good engine performance and service life Failure to perf...

Page 34: ...ctive clothing and eye wear 2 Open the tank side turntable cover and locate the fuel system components mounted to the tank plate 3 Remove the fuel system retaining fasteners 4 At the pre filter disconnect and plug the fuel hose that goes to the fuel tank 5 Disconnect the fuel hose from the fuel pre filter to the fuel pump Remove the pre filter 6 Install the new fuel pre filter and connect the fuel...

Page 35: ...nd do not operate the machine Repair the leak immediately A 12 Inspect the Fuel Filter Water Separator Deutz Models Engine specifications require that this procedure be performed every 100hours Proper maintenance of the fuel filter water separator is essential for good engine performance Failure to perform this procedure can lead to poor engine performanceandcomponentdamage Explosion and fire haza...

Page 36: ... separator b drain valve 5 Clean up any fuel that may have spilled 6 Start the engine from the ground controls and check the fuel filter water separator for leaks Explosion and fire hazard If a fuel leak is discovered keep any additionalpersonnelfromentering the area and do not operate the machine Repair the leak immediately 7 Swing the engine pivot plate in towards the machine 8 Install the bolts...

Page 37: ...10 to 13 cm at a time and repeat this step until the entire bearing has been greased 4 Apply grease to each tooth of the drive gear located under the turntable A 14 Replace Drive Hub Oil Rexroth drive hub specifications require that this procedure be performed after 150 hours Replacing the drive hub oil is essential for good machine performance and service life Failure to replace the torque hub oi...

Page 38: ...perform the maintenance procedures can lead to poorengineperformanceandcomponentdamage Requiredmaintenanceproceduresandadditional engine information are available in the FordLRG 425EFIOperatorHandbook FordpartnumberFPP194 302 Ford LRG 425 EFI Operator Handbook Genie part number 77831 To access the engine 1 Remove the two engine pivot plate retaining bolts 2 Swing the engine pivot plate out away fr...

Page 39: ...free of corrosion 3 Be sure that the battery hold downs and cable connections are tight The battery is a maintenance free battery and does not require the replenishing of electrolyte Adding terminal protectors and a corrosion preventative sealant will help eliminate corrosion on the battery terminals and cables Checklist B Procedures 4 Be sure that the battery separator wire connections are tight ...

Page 40: ...st removed into the original holes to secure the engine pivot plate Crushing hazard Failure to install the bolts into the engine pivot plate to secure it from moving could result in death or serious injury B 2 Inspect the Electrical Wiring Maintaining electrical wiring in good condition is essential to safe operation and good machine performance Failure to find and replace burnt chafed corroded or...

Page 41: ...n from the platform controls Result All machine functions should not operate 6 Turn the key switch to the off position Result The engine should stop and no functions shouldoperate B 4 Perform Engine Maintenance Ford Models Ford engine specifications require that this procedure be performed every 250 hours Properenginemaintenance followingtheengine manufacturer s maintenance schedule is essential t...

Page 42: ... exhaust system is essential to good engine performance and service life Running the engine with a damaged or leaking exhaust system can cause component damage and unsafe operatingconditions Bodily injury hazard Do not inspect while the engine is running Remove the key to secure from operation Burn hazard Beware of hot engine components Contact with hot engine components may result in severeburns ...

Page 43: ...engine components Contact with hot engine components may result in severeburns Oil cooler 1 Remove the two engine pivot plate retaining bolts Swing the engine pivot plate out away from the machine and secure it from moving Crushing hazard Failure to secure the engine pivot plate from moving could result in death or serious injury CHECKLIST B PROCEDURES 2 Remove the fasteners from the engine side c...

Page 44: ...m filled and do not need air added to them 1 Check all tire treads and sidewalls for cuts cracks punctures and unusual wear 2 Check each wheel for damage bends and cracked welds 3 Check each lug nut for proper torque Refer to Section 2 Specifications 4 Check the pressure in each air filled tire Refer to Section 2 Specifications 7 Inspect the head cooling passages and fins for physical damage or fo...

Page 45: ...tion engaged position CHECKLIST B PROCEDURES B 9 Check the Oil Level in the Drive Hubs Failure to maintain proper drive hub oil levels may cause the machine to perform poorly and continued use may cause component damage 1 Drive the machine to rotate the hub until the plugs are located one on top and the other at 90 degrees 2 Remove the plug located at 90 degrees and check the oil level Result The ...

Page 46: ...0 Check and Adjust the Engine RPM Ford and Deutz Models Maintaining the engine rpm at the proper setting for both low and high idle is essential to good engine performance and service life The machine will not operate properly if the rpm is incorrect and continued use may cause component damage Ford models The engine rpm is controlled by the ECM and can only be adjusted by re programming the ECM I...

Page 47: ...etracts when activating high idle CHECKLIST B PROCEDURES B 11 Test the Ground Control Override A properly functioning ground control override is essential to safe machine operation The ground control override function is intended to allow ground personnel to operate the machine from the ground controls whether or not the red Emergency Stop button on the platform controls is in the on or off positi...

Page 48: ...evel position using the platform level toggle switch 3 Raise and lower the primary boom through a full cycle Result The platform should remain level at all times to within 5 degrees B 12 Check the Directional Valve Linkage Perform this test only on models equipped with a oscillating axle Proper axle oscillation is essential to safe machine operation If the directional valve linkage is not operatin...

Page 49: ...out the red Emergency Stop button to the on position at both the ground and platform controls 2 Start the engine from the ground controls then move the function enable toggle switch to the high idle rabbit symbol position and hold in the on position Result The engine should change to high idle 3 Release the function enable toggle switch Result The engine should return to low idle 4 Turn the key sw...

Page 50: ...m controls move the fuel select switch to gasoline and then move the engine idle control switch to foot switch activated high idle rabbit and foot switch symbol 2 Start the engine from the platform controls and allow it to run at low idle 3 Press down the foot switch to allow the engine to run at high idle Result The engine should start promptly and operate smoothly in low and high idle 4 Release ...

Page 51: ...a test area that is firm level and free of obstructions 1 Mark a test line on the ground for reference 2 Start the engine from the platform controls 3 Move the engine idle control switch to foot switch activated high idle rabbit and foot switch then lower the boom into the stowed position 4 Choose a point on the machine i e contact patch of a tire as a visual reference for use when crossing the te...

Page 52: ...e Begin timing when your reference point on the machine crosses the start line 6 Continue at full speed and note the time when the machine reference point crosses the finish line Refer to Section 2 Specifications B 18 Test the Drive Speed Raised or Extended Position Proper drive function movement is essential to safe machine operation The drive function should respond quickly and smoothly to opera...

Page 53: ...h line Refer to Section 2 Specifications B 19 Test the Alarm Package if equipped The alarm package includes Travelalarm Descentalarm Flashingbeacons Alarms and beacons are installed to alert operators and ground personnel of machine proximity and motion The alarm package is installed on the turntable rear cover Beacons are installed on both turntable covers The alarms and beacons will operate with...

Page 54: ...en release it Result The travel alarm should sound when the drive control handle is moved off center in either direction B 20 Perform Hydraulic Oil Analysis Replacement or testing of the hydraulic oil is essential for good machine performance and service life Dirty oil and a clogged suction strainer may cause the machine to perform poorly and continued use may cause component damage Extremely dirt...

Page 55: ...r the hydraulic tank return filter 3 Remove the filter with an oil filter wrench 4 Apply a thin layer of fresh oil to the gasket of the new oil filter 5 Install the new filter and tighten it securely by hand Clean up any oil that may have spilled duringtheinstallationprocedure 6 Use a permanent ink marker to write the date and number of hours from the hour meter on the oil filter Medium and high p...

Page 56: ... no leaks B 22 Perform Engine Maintenance Deutz Models Deutz engine specifications require that this procedure be performed every 400 hours Properenginemaintenance followingtheengine manufacturer s maintenance schedule is essential to good engine performance and service life Failure to perform the maintenance procedures can lead to poorengineperformanceandcomponentdamage Requiredmaintenanceprocedu...

Page 57: ...to perform the maintenance procedures can lead to poorengineperformanceandcomponentdamage Requiredmaintenanceproceduresandadditional engine information are available in the FordLRG 425EFIOperatorHandbook FordpartnumberFPP194 302 FordLRG 425EFIOperatorHandbook Genie part number 77831 To access the engine 1 Remove the two engine pivot plate retaining bolts Swing the engine pivot plate out away from ...

Page 58: ...e out away from the machine and secure it from moving Crushing hazard Failure to secure the engine pivot plate from moving could result in death or serious injury C 2 Grease the Platform Overload Mechanism if equipped Geniespecificationsrequire that this procedure be performed every 500 hours or 6 months whichever comes first Perform this procedure more often if dusty conditions exist Application ...

Page 59: ...ting in the machine tipping over Perform this procedure with the machine on a firm level surface 1 Turn the key switch to platform control Start the engine from the platform controls 2 Level the platform 3 Determine the maximum platform capacity Refer to the machine serial plate 4 Using a suitable lifting device place an appropriate test weight equal to that of the maximum platform capacity in one...

Page 60: ... the overload indicator light turns on and the alarmsounds 8 Test all machine functions from the platform controls Result All platform control functions should not operate 9 Turn the key switch to ground control 6 Add an additional 75 lbs 34 kg to the original test weight to overload the platform based on your maximum platform capacity Result The alarm should be sounding The platform overload indi...

Page 61: ...moving Crushing hazard Failure to secure the engine pivot plate from moving could result in death or serious injury 10 Test all machine functions from the ground controls Result All ground control functions should not operate Machine functions should still operate with auxiliary power at the groundcontrols 11 Lift the test weights off the platform floor using a suitable lifting device Result The p...

Page 62: ...f the wear pad is not less than 9 16 inch 14 3 mm shim as necessary to obtain zero clearance and zero drag 4 Extend and retract the primary boom through the entire range of motion to check for tight spots that may cause binding or scraping of the boom Always maintain squareness between the outer and inner boom tubes Wear pad specifications All wear pads 9 16 inch 14 3 mm D 2 Check the Turntable Ro...

Page 63: ...guration is used primarily for towing A machine configured to free wheel without operator knowledge may cause death or serious injury and propertydamage Collision hazard Select a work site that is firm and level Component damage hazard If the machine must be towed do not exceed 2 mph 3 2 km h All models 1 Chock the steer wheels to prevent the machine from rolling 2 Center a lifting jack of ample c...

Page 64: ...engage the drive hubs may cause death or serious injury and propertydamage 4WDmodels 7 Chock the non steer wheels to prevent the machine from rolling 8 Center a lifting jack of ample capacity under the drive chassis between the steer wheels 9 Lift the wheels off the ground and then place blocks under the drive chassis for support 10 Disengage the drive hubs by turning over the drive hub disconnect...

Page 65: ...t on the high idle mixture adjustment screw 4 Load the system by activating the primary boom retract function and moving the function enable toggle switch to the high idle rabbit symbol position 5 Adjust the high idle adjustment screw to obtain an air to fuel mixture ratio of 13 1 to 13 2 1 using an exhaust gas analyzer Preliminary setting is 1 4 inch 6 4 mm of threads showing Measure from the top...

Page 66: ... lifting device place an appropriate test weight equal to that of the maximum platform capacity at the center of the platform floor D 5 Perform Engine Maintenance Deutz Models Deutz engine specifications require that this procedure be performed every 1000 hours Properenginemaintenance followingtheengine manufacturer s maintenance schedule is essential to good engine performance and service life Fa...

Page 67: ...d the alarmsounds The platform will need to be moved up and down and allowed to settle in between adjustments Confirmthesetting 5 Turn the key switch to platform control Start the engine from the platform controls 6 Lift the test weight off the platform floor using a suitable lifting device 7 Place the test weight back onto the center of the platform floor using a suitable lifting device Result Th...

Page 68: ... the drive hub oil is essential for good machine performance and service life Failure to replace the torque hub oil may cause the machine to perform poorly and continued use may cause componentdamage 1 Select the drive hub to be serviced Drive the machine until one of the two plugs is at the lowest point 2 Remove both plugs and drain the oil into a suitablecontainer 3 Drive the machine until one p...

Page 69: ...he machine 11 Remove the suction strainers from the tank and clean them using a mild solvent 12 Rinse out the inside of the tank using a mild solvent E 1 Test or Replace the Hydraulic Oil Replacement or testing of the hydraulic oil is essential for good machine performance and service life Dirty oil and suction strainers may cause the machine to perform poorly and continued use may cause component...

Page 70: ...ondition is essential to safe operation and good engine performance Failure to detect a worn cracked or leaking fuel hose may cause an unsafe operating condition Explosion and fire hazard Engine fuels are combustible Replace the fuel lines in an open well ventilated area away from heaters sparks flames and lighted tobacco Always have an approved fire extinguisher within easy reach Componentdamageh...

Page 71: ...any fuel that may have spilled during thisprocedure 8 Start the engine from the ground controls then inspect the fuel filter and hoses for leaks Explosion and fire hazard If a fuel leak is discovered keep any additionalpersonnelfromentering the area and do not operate the machine Repair the leak immediately Explosion and fire hazard Fuel Injection systems operate at a very high pressure Fuel may b...

Page 72: ...oving Crushing hazard Failure to secure the engine pivot plate from moving could result in death or serious injury E 4 Grease the Steer Axle Wheel Bearings 2WD Models Maintaining the steer axle wheel bearings is essential for safe machine operation and service life Operating the machine with loose or worn wheel bearings may cause an unsafe operating condition and continued use may result in compon...

Page 73: ...on 2 Specifications 6 Remove the dust cap from the hub Remove the cotter pin from the castle nut 7 Tighten the castle nut to 35 ft lbs 47 Nm to seat the bearings 8 Loosen the castle nut and re tighten to 8 ft lbs 11 Nm 9 Check for wheel bearing wear by attempting to move the wheel hub side to side then up and down Result If there is side to side or up and down movement continue to step 11 and repl...

Page 74: ...3 52 GenieZ 60 34 Part No 75861 November 2003 Section 3 Scheduled Maintenance Procedures REV A This page intentionally left blank ...

Page 75: ...tion Most of the procedures in this section should only be performed by a trained service professional in a suitably equipped workshop Select the appropriate repair procedure after troubleshooting the problem Perform disassembly procedures to the point where repairs can be completed To re assemble perform the disassembly steps in reverse order Symbols Legend Safety alert symbol used to alert perso...

Page 76: ...motion a ALC 500 circuit board b drive steer joystick controller c secondary boom up down joystick controller d primary boom up down and turntable rotate left right joystick controller 1 1 ALC 500 Circuit Board Electrocution hazard Contact with electrically charged circuits could result in death or serious injury Remove all rings watches and other jewelry When the ALC 500 circuit board is replaced...

Page 77: ...l position pause for a moment then move the joystick full stroke in the opposite direction Hold for 5 seconds and return the joystick to the neutral position Result The alarm should sound indicating successful joystick calibration 6 Repeat this procedure for each joystick controlled machine function including the thumb rocker steer switch No machine fuction should operate while performing the joys...

Page 78: ...nable toggle switch in the right direction 4 times Result There should be a pause and the alarm should sound 4 times indicating that the machine is in max out calibration mode 8 Start the engine from the platform controls and press down the foot switch 9 Start a timer and activate the machine function that needs to be adjusted Record the time it takes for that function to complete a full cycle ie ...

Page 79: ...ly move the joystick in either direction full stroke Note how long it takes the function to reach maximum speed This is the ramp rate 10 Compare the function ramp rate time with the table below and determine whether the ramp rate time needs to increase or decrease 11 While the joystick is activated set the ramp rate Momentarily move the drive enable toggle switch in the right direction to increase...

Page 80: ...activate the drive enable toggle switch in the right direction 8 times Result There should be a pause and the alarm should sound 8 times indicating that the machine is in threshold calibration mode 8 Start the engine from the platform controls and press down the foot switch 9 Select a boom function joystick to set the threshold 10 Slowly move the joystick off center in either direction just until ...

Page 81: ...atform is resting on the blocks just enough to support the platform Do not rest the entire weight of the boom on the blocks Platform Components 4 Tag disconnect and plug the hydraulic hoses from the slave cylinder and connect the hoses together using a connector Cap the fittings on the cylinder Bodily injury hazard Spraying hydraulic oil can penetrate and burn skin Loosen hydraulic connections ver...

Page 82: ...ner to collect any drainage Secure the container to the boom 3 Open the top bleed valve on the rotator but do not remove it a top bleed valve b bottom bleed valve c container d clear hose PLATFORM COMPONENTS How to Bleed the Slave Cylinder Do not start the engine Use auxiliary power for this procedure 1 Connect a hydraulic hose between the two test ports at the barrel end of the slave cylinder 2 R...

Page 83: ...g rotation 5 Connect the clear hose to the bottom bleed valve and open the valve Do not remove the bleed valve 6 Activate auxiliary power and hold the platform rotate toggle switch to the right position until the platform is fully rotated to the right Continue holding the toggle switch until air stops coming out of the bleed valve Close the bleed valve Crushing hazard Keep clear of the platform du...

Page 84: ...rm pivot weldment may become unbalanced and fall when removed from the machine if not properly supported 5 Tag disconnect and plug the jib boom lift cylinder hydraulic hoses Cap the fittings on the cylinder Bodily injury hazard Spraying hydraulic oil can penetrate and burn skin Loosen hydraulic connections very slowly to allow the oil pressure to dissipate gradually Do not allow oil to squirt or s...

Page 85: ...rod end pivot pin then remove the jib boom lift cylinder from the primary boom Crushing hazard The jib boom lift cylinder may become unbalanced and fall when it is removed from the machine if it is not properly attached to the overhead crane 3 2 Jib Boom Lift Cylinder How to Remove the Jib Boom Lift Cylinder Perform this procedure with the boom in the stowed position When removing a hose assembly ...

Page 86: ... not allow oil to squirt or spray 6 Attach a lifting strap from an overhead crane to the lug on the rod end of the jib boom lift cylinder 7 Remove the pin retaining fasteners from the jib boom lift cylinder barrel end pivot pin Use a soft metal drift to remove the barrel end pivot pin 8 Use a soft metal drift to remove the jib boom lift cylinder rod end pivot pin Remove the jib boom lift cylinder ...

Page 87: ... Index Schematic No Description Item Function Torque 1 Solenoid valve 2 position 2 way BA Platform rotate 20 25 ft lbs 27 34 Nm 2 Solenoid valve 2 position 2 way BB Jib boom up down 20 25 ft lbs 27 34 Nm 3 Orifice 0 031 inch 0 787 mm BC Platform rotate circuit 4 Orifice 0 031 inch 0 787 mm BD Platform rotate circuit JIB BOOM COMPONENTS 3 4 1 2 BA BB BC BD ...

Page 88: ...onents after serial number 4460 Index Schematic No Description Item Function Torque 1 Solenoid valve 2 position 2 way BE Platform rotate Jib boom up down 20 25 ft lbs 27 34 Nm 2 Orifice 0 030 inch 0 762 mm BF Platform rotate circuit 3 Orifice 0 030 inch 0 762 mm BG Platform rotate circuit JIB BOOM COMPONENTS 3 1 2 BE BF BG ...

Page 89: ...control box Number each cable and its entry location at the platform control box 3 Disconnect the cables from the platform control box If your machine is equipped with an air line to platform option the air line must be disconnected from the platform before removal 4 Tag disconnect and plug the hydraulic hoses from the platform leveling slave cylinder Cap the fittings on the slave cylinder Bodily ...

Page 90: ... If the lower cable track and upper cable track tube are not properly secured together the cable track could become unbalanced and fall when removed from the machine 15 Attach a lifting strap from an overhead crane to the cable track 16 Remove the cable track guide fasteners from the platform end of the primary boom 17 Remove the cable track mounting fasteners that attach the lower cable track to ...

Page 91: ...Refer to Section Two Hydraulic Hose and Fitting Torque Specifications 1 Remove the platform 2 Remove the platform rotator and platform mounting weldment 3 Remove the jib boom See 3 1 How to Remove the Jib Boom 4 Remove cable track See 4 1 How to Remove the Cable Track 5 Remove the hose and cable clamp from the upper mid pivot How to Repair the Primary Boom Cable Track Component damage hazard The p...

Page 92: ... the center point of the primary boom Lift the primary boom enough to access the primary boom lift cylinder rod end pivot pin 12 Attach a similar lifting device to the primary boom lift cylinder 13 Place a 24 inch 61 cm long block of wood across the lower secondary boom leveling links to support the primary boom lift cylinder 14 Remove the pin retaining fasteners from the primary boom lift cylinde...

Page 93: ...from the platform end of the primary boom Pay careful attention to the location and amount of shims used with each wear pad 5 Support and slide the extension boom and extension cylinder out of the platform end of the primary boom Crushing hazard The primary boom extension tube could become unbalanced and fall when removed from the primary boom tube if not properly supported During removal the over...

Page 94: ...nks to support the primary boom lift cylinder when the rod end pivot pin is removed 4 Support the rod end of the primary boom lift cylinder with an appropriate lifting device 5 Remove the pin retaining fasteners from the primary boom lift cylinder rod end pivot pin Then use a soft metal drift to remove the pin 6 Lower the rod end of the cylinder onto the block that was placed on the lower secondar...

Page 95: ...oom Extension Cylinder The primary boom extension cylinder extends and retracts the primary boom extension tube It can only be removed from the platform end of the primary boom The extension cylinder is equipped with counterbalance valves to prevent movement in the event of a hydraulic line failure How to Remove the Primary Boom Extension Cylinder Bodily injury hazard This procedure requires speci...

Page 96: ...on tube 8 Tag disconnect and plug the extension cylinder hydraulic hoses Cap the fittings on the cylinder Bodily injury hazard Spraying hydraulic oil can penetrate and burn skin Loosen hydraulic connections very slowly to allow the oil pressure to dissipate gradually Do not allow oil to squirt or spray 9 Place blocks under the barrel end of the extension cylinder for support 10 Remove the cotter p...

Page 97: ...in the stowed position When removing a hose assembly or fitting the O ring on the fitting and or hose end must be replaced and then torqued to specification during installation Refer to Section Two Hydraulic Hose and Fitting Torque Specifications 1 Remove the pin retaining fasteners from the master cylinder rod end pivot pin Use a soft metal drift to remove the pin 2 Raise the secondary boom until...

Page 98: ...Remove the pin retaining fasteners from the master cylinder barrel end pivot pin Use a soft metal drift to remove the pin 7 Lower the master cylinder down and out of the upper pivot and remove it from the machine Crushing hazard The master cylinder could become unbalanced and fall when removed from the machine if not properly attached to the overhead crane PRIMARY BOOM COMPONENTS ...

Page 99: ... and tools could result in death or serious injury and significant component damage Dealer service is required Follow the disassembly steps to the point required to complete the repair Then re assemble the secondary boom by following the disassembly steps in reverse order Secondary Boom a jib boom b extension tube c primary boom d upper leveling link e upper secondary boom f upper pivot g turntabl...

Page 100: ... Attach a securing strap from the upper pivot to upper leveling link pivot pin mounting tube to secure the upper pivot from moving 8 Attach a 5 ton 5 000 kg overhead crane to the center of the upper secondary boom 9 Remove the mounting fasteners from the secondary boom lift cylinder rod end pivot pin mounting bracket 10 Remove the pin retaining fasteners from both upper pivot to upper secondary bo...

Page 101: ...r hydraulic hoses Cap the fittings on the cylinder 22 Remove the pin retaining fasteners from the primary boom lift cylinder barrel end pivot pin Use a soft metal drift to remove the pin then remove the cylinder from the machine Crushing hazard The primary boom lift cylinder could become unbalanced and fall when removed from the machine if not properly supported by the overhead crane 23 Tag discon...

Page 102: ... hazard Spraying hydraulic oil can penetrate and burn skin Loosen hydraulic connections very slowly to allow the oil pressure to dissipate gradually Do not allow oil to squirt or spray 33 Attach a lifting strap from an overhead crane to the lug on the rod end of the master cylinder 34 Remove the pin retaining fasteners from the master cylinder barrel end pivot pin Use a soft metal drift to remove ...

Page 103: ... boom leveling link could become unbalanced and fall when removed from the machine if not properly supported by the overhead crane 44 Attach a lifting strap from an overhead crane to the center of the ground controls side lower secondary boom leveling link 45 Remove the pin retaining fasteners from the ground controls side lower leveling link pivot pin at the mid pivot 46 Use a soft metal drift to...

Page 104: ...rom the machine Crushing hazard The lower secondary boom could become unbalanced and fall when removed from the machine if not properly supported by the overhead crane 5 2 Secondary Boom Lift Cylinder The secondary boom lift cylinder raises and lowers the secondary boom The secondary boom lift cylinder is equipped with counterbalance valves to prevent movement in the event of a hydraulic line fail...

Page 105: ...pressure to dissipate gradually Do not allow oil to squirt or spray 3 Remove the mounting fasteners from the secondary boom lift cylinder rod end pivot pin mounting bracket 4 Remove the retaining fasteners from the secondary boom lift cylinder pivot pins Use a slide hammer to remove the pins then remove the cylinder from the machine Crushing hazard The secondary boom lift cylinder could become unb...

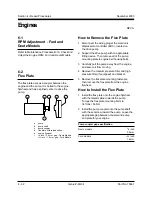
Page 106: ...he drive pump 2 Support the drive pump with an appropriate lifting device Then remove all of the pump mounting plate to engine bell housing bolts 3 Carefully pull the pump away from the engine and secure it from moving 4 Remove the medium pressure filter and high pressure filter if equipped and bracket 5 Remove the flex plate mounting fasteners then remove the flex plate from the engine flywheel H...

Page 107: ...toggle switch inside of the ground control box 3 Pull out the red Emergency Stop button to the on position at the ground controls 4 Hold the run test toggle switch to the test position and turn the key switch to the ground controls position Result The check engine light should turn on The check engine light should begin to blink The check engine light will blink a 123 code three times before blink...

Page 108: ...lear Engine Fault Codes How to Clear Engine Fault Codes from the ECM Perform this procedure with the engine off and the key switch in the off position 1 Open the engine side turntable cover and locate the battery 2 Disconnect the negative battery cable from the battery for a minimum of 5 minutes Electrocution hazard Contact with electrically charged circuits could result in death or serious injury...

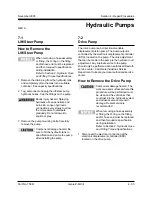
Page 109: ...c tank to specification and prime the pump after installing the pump 7 2 Drive Pump The drive pump is a bi directional variable displacement piston pump The pump output is controlled by the electronic displacement controller EDC located on the pump The only adjustment that can be made to the pump is the neutral or null adjustment Any internal service to the pump should only be performed at an auth...

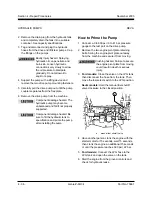
Page 110: ...ge hazard Be sure to fill the hydraulic tank to specification and prime the pump after installing the pump How to Prime the Pump 1 Connect a 0 to 600 psi 0 to 41 bar pressure gauge to the test port on the drive pump 2 Remove the two engine pivot plate retaining bolts Swing the engine pivot plate out away from the machine and secure it from moving Crushing hazard Failure to secure the engine pivot ...

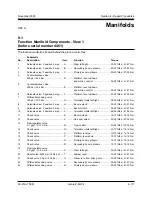
Page 111: ... position 3 way H Boom extend 30 35 ft lbs 41 47 Nm 9 Solenoid valve 2 position 3 way I Boom retract 30 35 ft lbs 41 47 Nm 10 Solenoid valve 3 position 4 way J Turntable rotate left right 20 25 ft lbs 27 34 Nm 11 Check valve K Boom extend 10 12 ft lbs 14 16 Nm 12 Check valve L Jib boom select 20 25 ft lbs 27 34 Nm 13 Flow regulator valve 0 1 gpm 0 37 L min M Flow control 20 25 ft lbs 27 34 Nm 14 C...

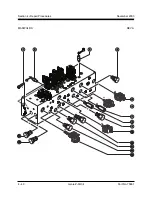
Page 112: ...4 38 Genie Z 60 34 Part No 75861 November 2003 Section 4 Repair Procedures REV A MANIFOLDS H I A B C D E F G L M N O P Q R K J S T U V W ...

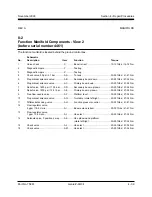
Page 113: ...4 Nm 7 Relief valve 1600 psi 110 3 bar AD Secondary boom up down 20 25 ft lbs 27 34 Nm 8 Relief valve 1800 psi 124 1 bar AE Primary boom up down 20 25 ft lbs 27 34 Nm 9 Free flow needle valve AF Platform level 20 25 ft lbs 27 34 Nm 10 Proportional solenoid valve AG Turntable rotate left right 20 25 ft lbs 27 34 Nm 11 Differential sensing valve AH Function pressure control 30 35 ft lbs 41 47 Nm 12 ...

Page 114: ...4 40 Genie Z 60 34 Part No 75861 November 2003 Section 4 Repair Procedures REV A MANIFOLDS 1 Z AA AB AC AD AE AF AG AH AI AJ AK AM AL X Y 1 2 3 8 9 11 12 13 15 16 14 5 7 6 4 10 ...

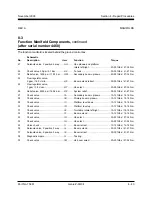
Page 115: ...Testing 9 Flow regulator valve 3 5 gpm 13 2 L min HI Steer left right 30 35 ft lbs 41 47 Nm 10 Differential sensing valve HJ Secondary boom up down 30 35 ft lbs 41 47 Nm 11 Differential sensing valve HK Primary boom up down 30 35 ft lbs 41 47 Nm 12 Counterbalance valve 500 psi 34 4 bar HL Platform level up down and motion control 30 35 ft lbs 41 47 Nm 13 Proportional solenoid valve HM Secondary bo...

Page 116: ...w 37 39 36 38 5 6 7 8 9 10 11 34 35 33 31 30 32 29 28 27 26 25 24 22 23 12 14 13 15 16 17 18 19 21 20 1 2 3 4 Front View Front View Valves hidden from above view Valves hidden from above view HA HC HD HB HE HF HH HI HJ HK HL HM HN HG HP HQ HV HS HR HT HU HO HW HX HY HZ IA IC ID IE IF IG IH II IL IM IK IJ IB ...

Page 117: ...25 ft lbs 27 34 Nm 26 Relief valve 2400 psi 165 4 bar HZ System relief 30 35 ft lbs 41 47 Nm 27 Check valve IA Secondary boom up down 10 12 ft lbs 14 16 Nm 28 Check valve IB Primary boom up down 10 12 ft lbs 14 16 Nm 29 Check valve IC Platform level down 10 12 ft lbs 14 16 Nm 30 Check valve ID Platform level up 10 12 ft lbs 14 16 Nm 31 Check valve IE Turntable rotate left right 10 12 ft lbs 14 16 ...

Page 118: ...39 36 38 5 6 7 8 9 10 11 34 35 33 31 30 32 29 28 27 26 25 24 22 23 12 14 13 15 16 17 18 19 21 20 1 2 3 4 Front View Front View Valves hidden from above view Valves hidden from above view HA HC HD HB HE HF HH HI HJ HK HL HM HN HG HP HQ HV HS HR HT HU HO HW HX HY HZ IA IC ID IE IF IG IH II IL IM IK IJ IB MANIFOLDS ...

Page 119: ... Do not adjust the relief valve higher than specified 7 Repeat steps 2 through 5 and recheck relief valve pressure 8 Remove the pressure gauge How to Adjust the Primary Boom Down Relief Valve Perform this procedure with the boom in the stowed position 1 Connect a 0 to 5000 psi 0 to 345 bar pressure gauge to the test port item Z on the function manifold 2 Start the engine from the ground controls 3...

Page 120: ... high rpm position and activate and hold the secondary boom down switch with the secondary boom fully lowered 4 Observe the pressure reading on the pressure gauge Refer to Section 2 Specifications 5 Turn the engine off Use a wrench to hold the relief valve and remove the cap item AD 6 Adjust the internal hex socket Turn it clockwise to increase the pressure or counterclockwise to decrease the pres...

Page 121: ...compartment Index Schematic No Description Item Function Torque 1 Shuttle valve 2 position 3 way CA Turntable rotation brake release 10 13 ft lbs 14 18 Nm 2 Counterbalance valve CB Turntable rotate right 35 40 ft lbs 47 54 Nm 3 Counterbalance valve CC Turntable rotate left 35 40 ft lbs 47 54 Nm 3 2 1 LL MM NN 123 123 123 12345 12345 12345 12345 123456 123456 123456 123456 123456 123456 123456 1234...

Page 122: ... Two speed manifold is mounted inside the drive chassis Index Schematic No Description Item Function Torque 1 Solenoid valve 2 position 3 way DA Brake 20 25 ft lbs 37 34 Nm 2 Solenoid valve 2 position 3 way DB 2 speed 20 25 ft lbs 37 34 Nm 3 Orifice 0 042 inch 1 066 mm DC To tank 4 Check valve DD Pressure 10 12 ft lbs 14 16 Nm MANIFOLDS 1 2 3 4 DA DB DC DD ...

Page 123: ...Two speed manifold is mounted inside the drive chassis Index Schematic No Description Item Function Torque 1 Solenoid valve 2 position 3 way EA Brake 20 25 ft lbs 37 34 Nm 2 Solenoid valve 2 position 3 way EB 2 speed 20 25 ft lbs 37 34 Nm 3 Check valve EC Pressure 10 12 ft lbs 14 16 Nm 4 Orifice 0 042 inch 1 066 mm ED To tank MANIFOLDS 4 3 1 2 EA EB EC ED ...

Page 124: ...rocedures REV A MANIFOLDS 8 8 Directional Valve Manifold Components The directional valve manifold is mounted inside the drive chassis at the non steer end Index No Description Function Torque 1 Cap Breather 20 25 ft lbs 27 33 Nm 2 Spool valve Directional control 1 2 ...

Page 125: ...a bubble type level across the drive chassis non steer end Check to be sure the drive chassis is completely level 6 To level the drive chassis start the engine and loosen the lock nuts on both sides of the urethane cushions 7 Push up or pull down on the threaded rod until the machine is completely level 8 Verify that the ground and drive chassis are completely level 9 Tighten the nuts on both side...

Page 126: ...bs 41 47 Nm 2 Check valve FB Divider bypass circuit 30 35 ft lbs 41 47 Nm 3 Flow divider combiner valve FC Controls flow to drive motors in 90 100 ft lbs forward and reverse 120 133 Nm 4 Orifice 0 079 in 2 01 mm FD Drive circuit 5 Orifice 0 079 in 2 01 mm FE Drive circuit 6 Relief valve 300 psi 20 6 bar FF Charge pressure circuit 20 25 ft lbs 27 34 Nm 7 Diagnostic nipple FG Testing 8 Shuttle valve...

Page 127: ...Part No 75861 Genie Z 60 34 4 53 November 2003 Section 4 Repair Procedures REV A MANIFOLDS FC FB 8 2 5 6 1 3 4 7 9 FA FD FE FF FG FH FI ...

Page 128: ... to 41 bar pressure gauge to the diagnostic nipple on the drive pump 2 Start the engine from the platform controls and allow the engine to run at high idle Note the pressure reading on the pressure gauge 3 Turn the engine off and connect a 0 to 600 psi 0 to 41 bar pressure gauge to the diagnostic nipple located on the drive manifold 4 Start the engine from the platform controls and drive the machi...

Page 129: ...gets hot oil out of low pressure side of drive pump 50 55 ft lbs 67 73 Nm 8 Check valve 5 psi 0 34 bar GH Drive motor anti cavitation 20 25 ft lbs 27 34 Nm 9 Flow divider combiner valve GI Controls flow to steer end drive motors in forward and reverse 90 100 ft lbs 120 133 Nm 10 Check valve 5 psi 0 34 bar GJ Drive motor anti cavitation 20 25 ft lbs 27 34 Nm 11 Flow regulator valve 2 gpm 7 6 L min ...

Page 130: ...4 56 Genie Z 60 34 Part No 75861 November 2003 Section 4 Repair Procedures REV A MANIFOLDS STEER END NON STEER END 15 14 13 12 11 9 10 8 7 6 5 4 3 2 1 GA GB GC GD GE GF GG GH GI GJ GK GL GM GN GO ...

Page 131: ...nipple on the drive pump 2 Start the engine from the platform controls and allow the engine to run at high idle Note the pressure reading on the pressure gauge 3 Turn the engine off and connect a 0 to 600 psi 0 to 41 bar pressure gauge to the diagnostic nipple located on the drive manifold 4 Start the engine from the platform controls and drive the machine slowly in the forward direction Note the ...

Page 132: ... specifications Description Specification Proportional solenoid valve 12V DC 4 to 5Ω schematic items AB AC and AG before serial number 4461 Proportional solenoid valve 12V DC 3 to 4Ω schematic items HM HO and HR after serial number 4460 How to Test a Coil Diode Genie incorporates spike suppressing diodes in all of its directional valve coils except proportional valves and coils with a metal case P...

Page 133: ...e of reading up to 800 mA 9V BATTERY 10 RESISTOR W AMMETER COIL e b a c c d d 4 Connect the negative lead to the other terminal on the coil If testing a single terminal coil connect the negative lead to the internal metallic ring at either end of the coil 5 Momentarily connect the positive lead from the multimeter to the positive terminal on the 9V DC battery Note and record the current reading 6 ...

Page 134: ...hing hazard The turntable rotation assembly could become unbalanced and fall when removed from the machine if not properly supported by the overhead crane Turntable Rotation Components 9 1 Turntable Rotation Assembly How to Remove the Turntable Rotation Assembly When removing a hose assembly or fitting the O ring on the fitting and or hose end must be replaced and then torqued to specification dur...

Page 135: ...eal out of the hub 8 Remove the rear bearing How to Install the Hub and Bearings 2WD Models When replacing a wheel bearing both the inner and outer bearings including the pressed in races must be replaced 1 Be sure that both bearings are packed with clean fresh grease 2 Place the large inner bearing into the rear of the hub 3 Press the bearing seal evenly into the hub until it is flush 4 Slide the...

Page 136: ...chassis cover at the steer end Remove the cover 3 Tag disconnect and plug the oscillating axle cylinder hydraulic hoses Cap the fittings on the oscillate cylinder Bodily injury hazard Spraying hydraulic oil can penetrate and burn skin Loosen hydraulic connections very slowly to allow the oil pressure to dissipate gradually Do not allow oil to squirt or spray 4 Remove the pin retaining fasteners fr...

Page 137: ... hazard Spraying hydraulic oil can penetrate and burn skin Loosen hydraulic connections very slowly to allow the oil pressure to dissipate gradually Do not allow oil to squirt or spray Perform all troubleshooting on a firm level surface Two persons will be required to safely perform some troubleshooting procedures Fault Codes Observe and Obey Troubleshootingandrepairproceduresshallbe completed by ...

Page 138: ...printed circuit board components If the circuit board does need to be handled maintain firm contact with a metal part of the machine that is grounded at all times when handling the printed circuit board OR use a grounded wrist strap 3 Determine the error source The red LED indicates the error source and will flash two separate codes The first code will indicate the first digit of the two digit cod...

Page 139: ...d speed and direction frozen at zero and neutral Alarm sounds indicating fault Power up controller with problem corrected 17 Not calibrated Calibrate valve thresholds 23 Boom 1 flow control valve 18 Just calibrated Normal function except threshold for one or both directions is zero Self clearing transient 11 12 15 16 Value at 5V Value too high Value too low Value at 0V Limited speed and direction ...

Page 140: ...17 Not calibrated Joystick speed and direction frozen at zero and neutral Calibrate joystick 41 Turntable rotate joystick 18 Just calibrated Initiate 1 second beep of alarm Self clearing transient 42 Turntable rotate directional valves 21 Fault Limited speed and direction frozen at zero and neutral Alarm sounds indicating fault Power up controller with problem corrected 12 15 Value too high Value ...

Page 141: ...ted Normal function except threshold for one or both directions is zero Self clearing transient 54 Drive brake valve 21 Fault Limited speed and direction frozen at zero and neutral Alarm sounds indicating fault Power up controller with problem corrected 55 High speed drive motor Valve 21 Fault Motor speed frozen in the low state Alarm sounds indicating fault Power up controller with problem correc...

Page 142: ...g fuel delivery and throttle position to maintain the engine s running condition at its highest efficiency while at the same time keeping exhaust emissions to a minimum When a sensor fails or returns signals that are outside of set parameters the ECM will store a fault code in memory that relates to the appropriate sensor and will turn on the Check Engine Light Refer to Repair Procedure 6 4 How to...

Page 143: ...pen or shorted OR sensor is faulty OR there are vacuum leaks or exhaust leaks OR fuel pressure is low OR the fuel injectors need cleaning or replacing Repair wiring and or connections OR replace sensor OR repair any vacuum and exhaust leaks OR test the fuel pressure OR clean or replace the fuel injectors 122 Closed Loop Multiplier Low Gasoline MAP IAT or ECT sensors not in correct position OR wiri...

Page 144: ...faulty crankshaft and or camshaft Adjust or replace sensors OR clean or repair fuel injectors 143 Adaptive Learn High LPG Heated Oxygen Sensor wiring and or connections open or shorted OR sensor is faulty OR there are vacuum leaks or exhaust leaks OR fuel quality is poor OR fuel system components may be faulty Repair wiring and or connections OR replace sensor OR repair any vacuum and exhaust leak...

Page 145: ... 2 Air intake temperature is greater than 210 F with the engine greater than 1000 rpm OR air intake system as leaks OR IAT sensor is faulty Check air intake system for damage and proper routing of air intake components OR replace the IAT sensor 215 Oil Pressure Low Faulty oil pressure sensor OR sensor wiring and or connections open or shorted OR engine oil level too low Replace oil pressure sensor...

Page 146: ...P High Pressure Open or shorted wiring and or connections to MAP sensor OR sensor is faulty Repair wiring and or connections to sensor OR replace MAP sensor 232 MAP Low Voltage Open or shorted wiring and or connections to MAP sensor OR sensor is faulty Repair wiring and or connections to sensor OR replace MAP sensor 234 BP High Pressure MAP sensor is faulty OR ECM is faulty Replace MAP sensor OR r...

Page 147: ...pair wiring and or connections to knock sensor OR replace knock sensor 254 Excessive Knock Signal Knock sensor wiring and or connections open or shorted OR there is excessive engine vibration OR sensor is faulty Check for excessive engine vibration OR repair wiring and or connections to knock sensor OR replace knock sensor 311 Injector Driver 1 Open Open wiring and or connections to fuel injector ...

Page 148: ...lty Repair wiring and or connections to fuel injector 4 OR replace fuel injector 4 OR replace the ECM 322 Injector Driver 4 Shorted Wiring and or connections to fuel injector 4 shorted OR fuel injector 4 is faulty OR ECM is faulty Repair wiring and or connections to fuel injector 4 OR replace fuel injector 4 OR replace the ECM 351 Fuel Pump Loop Open or High Side Short To Ground Open wiring and or...

Page 149: ...tage Not used If this fault appears on your machine contact Genie Industries Service Department 512 FPP1 Low Voltage Not used If this fault appears on your machine contact Genie Industries Service Department 513 FPP1 Higher than IVS Limit Not used If this fault appears on your machine contact Genie Industries Service Department 514 FPP1 Lower than IVS Limit Not used If this fault appears on your m...

Page 150: ...throttle position sensor wiring and or connections open or shorted OR there is a poor system ground connection OR throttle position sensor 2 is faulty Be sure system ground connections are in place and secure OR repair wiring and or connections to sensor OR replace throttle position sensor 2 534 TPS2 Signal Voltage Low The 2 throttle position sensor wiring and or connections open or shorted OR the...

Page 151: ...ernor actuator OR replace the governor actuator 545 Governor Interlock Failure Engine harness wiring and or connections open or shorted OR there is a poor system ground connection OR ECM is faulty Repair wiring and or connections in engine harness OR replace the ECM 551 Max Governor Speed Override ECM needs to be re programmed OR throttle is sticking open OR there are air leaks between the throttl...

Page 152: ...e ECM 614 RTI 1 Loss Loose wire connections to ECM OR ECM is faulty Locate and repair any engine harness wiring damage or shorts to ECM to be sure they are secure OR replace ECM 615 Flash Checksum Invalid Loose wire connections to ECM OR ECM is faulty Locate and repair any engine harness wiring damage or shorts to ECM to be sure they are secure OR replace ECM 616 RAM Failure Loose wire connections...

Page 153: ...Locate and repair any engine harness wiring damage or shorts OR locate and troubleshoot or repair faulty engine sensor OR replace ECM 655 RTI 2 Loss Loose wire connections to ECM OR ECM is faulty Locate and repair any engine harness wiring damage or shorts to ECM to be sure they are secure OR replace ECM 656 RTI 3 Loss Loose wire connections to ECM OR ECM is faulty Locate and repair any engine har...

Page 154: ...5 18 GenieZ 60 34 PartNo 75861 November 2003 Section 5 Fault Codes This page intentionally left blank ...

Page 155: ...ection There are two groups of schematics in this section An illustration legend precedes each group of drawings ElectricalSchematics Electrocution hazard Contact with electrically charged circuits could result in death or serious injury Remove all rings watches and otherjewelry HydraulicSchematics Bodily injury hazard Spraying hydraulic oil can penetrate and burn skin Loosen hydraulic connections...

Page 156: ...GROUND PLATFORM Power relay PR1 Toggle switch SPDT TS2 START ENGINE Toggle switch DPDT TS6 UP DOWN PLATFORM LEVEL Gauge sending unit HM Hour meter N O OTS2 Oil temperature switch normally open N O CTS1 Coolant temperature switch normally open Oil pressure switch normally closed N C OPS1 BLK FS1 Foot switch Pump Aux Auxiliary pump FAN Hydraulic oil cooling fan G1 Gauge Tilt sensor LED L3 Limit swit...

Page 157: ......

Page 158: ...C1 1 TS1 C9 1 BK RD FS WH FS BK FS FS1 C9 2 C9 3 C33STR BK TB33 4 3 5 2 1 AUX ON GROUND TACHOMETER START INPUT IGN START MODULE START RELAY BK TS52 C1 7 C45GEN GR WH TB45 C2 7 TS2 P24FS WH P25FS RD P26ESTP BK BRN C35ESPD BK RD HIGH RPM LOW RPM TB35 TS55 RD RD WH BK OR BK TS17 TS4 C1 9 GENERATOR HIGH RPM FS G2 G3 G1 VOLT METER OIL PRESSURE GAUGE WATER TEMP GAUGE TB43 OPTION COOLING FAN TEMP SWITCH ...

Page 159: ... C41RPM OR BK 16 15 19 20 17 18 11 10 C30EDC WH C32BRK WH RD C6TRF WH RD C36STC BL C37STCC BL BK C31EDC WH BK C5TRR WH BK TB6 TB3 TB1 TB2 TB5 TB4 TB32 TB37 TB36 TB31 TB30 C1PBU RD TS61 C4TRL WH TS62 C3P 1 C3P 6 C3P 4 C3P 5 C1P 6 C1P 11 C1P 10 C1P 4 C1P 5 BRN 2 C2P 3 RD BK BRN OR J2 6 J1 12 1 11 2 9 7 PRI UP DN TT ROTATE YOUT XOUT GND 1 2 4 3 5 6 PWR JC2 DRE A BL WH DRE B BL BK BRN OR BL WH DRE LED...

Page 160: ...Electrical Schematic Deutz F4L 1011F Models November 2003 Section 6 Schematics ...

Page 161: ...ED UP DOWN HARNESS ENGINE 4 CABLE 3 CABLE CABLE 2 1 CABLE CABLE 5 CABLE 6 7 CABLE CABLE 8 BR C23 4 BK ISM 3 RD S P GROUND STUD RD 4 BL WH C23 3 BL WH 1 RD H6 RD KS1 GN BK C23 8 GN BK H6 C133PLT C132PLI OR RD 3 BR 2 BR BK H C BR H C PLATFORM LOAD U33 C23 GN BK 16B C23 8 BK C7 1 C23 5 BK 22C C23 4 RD TS14 C23 7 RD H6 C23 1 BR GND C23 12 RD TS11 C23 6 BL WH 38D C23 3 GN BK 16A GN BK L45 RD C23 1 RD 4...

Page 162: ...Ground Control Box Wiring Diagram Deutz F4L 1011F Models November 2003 Section 6 Schematics ...

Page 163: ...25 BK 33 WH 23 P26BAT BK C9P 1 P22BAT BK C7P 1 RD LS18 RD P2 WH BK WH 8 BL RD DE3 J1 16 BL WH DE1 J1 6 BK 7 C29MS RD WH J1 8 WH WH BK RD 35 BL BK DE2 J1 7 4 2 1 3 5 6 7 4 2 1 3 5 6 7 OR J1 13 BRN J1 14 BL J1 4 WH J1 5 BRN J1 10 YEL J1 3 OR J1 11 BRN J1 12 BK J1 2 RD J1 1 JC3 JC1 JC2 WH 24 4 2 1 3 5 6 7 WH 24 BK 22 WH 24 WH J1 5 L4 GN BK H1 RD BK H1 L48 RD P3 RD P3 RD P3 C34SA BK WH C1P 8 TS6 GLOW ...

Page 164: ...Platform Control Box Wiring Diagram Deutz F4L 1011F Models November 2003 Section 6 Schematics ...

Page 165: ......

Page 166: ... 3 C33STR BK TB33 BK TS52 C1 7 C45GEN GR WH TB45 C2 7 TS2 P24FS WH P25FS RD P26ESTP BK BRN C35ESPD BK RD HIGH RPM LOW RPM TB35 TS55 RD RD WH BK OR BK TS17 TS4 C1 9 GENERATOR HIGH RPM FS G2 G3 G1 VOLT METER OIL PRESSURE GAUGE WATER TEMP GAUGE TB24 TB43 OPTION COOLING FAN TEMP SWITCH HYDRAULIC OIL NO OTS CR17 NO CR17 CB3 20AMP TB134 P1 RD TB22 PLAT GRD KS1 RD C134PWR OR RD C2 4 P22BAT BK HORN C7 1 H...

Page 167: ...2 TB5 TB4 TB32 TB37 TB36 TB31 TB30 C1PBU RD TS61 C4TRL WH TS62 C3P 1 C3P 6 C3P 4 C3P 5 C1P 6 C1P 11 C1P 10 C1P 4 C1P 5 BRN 2 C2P 3 RD BK BRN OR J2 6 J1 12 1 11 2 9 7 PRI UP DN TT ROTATE YOUT XOUT GND 1 2 4 3 5 6 PWR JC2 DRE A BL WH DRE B BL BK BRN OR BL WH DRE LED BL RD J1 13 14 5 4 6 J1 7 16 8 15 RKOUT YOUT 3 1 2 4 5 PWR GND 7 6 DRIVE STEERING JC3 5 C31EDC WH BK C30EDC WH C32BRK WH RD C37STCC BL ...

Page 168: ...Electrical Schematic Ford LRG 425 EFI Models November 2003 Section 6 Schematics ...

Page 169: ...S1 STOWED LIMIT SWITCH J1 LIMIT SWITCH J2 C134PWR OIL TEMP SENDER OIL PRESSURE SENDER RD 4 RD 4 BK 5 BK 4 BL 4 BK WH 4 WH 4 RD WH 4 RD BK 4 WH BK 4 WH RD 4 BL BK 4 GR 4 RD E H WH CR2 87 GR BK 4 OR 4 OR BK 4 WH E H RD BK 4 WH BK E H RD 4 WH RD E H GR WH 4 OR BK E H RD WH E H WH RD E H WH BK E H BL WH 4 WH 8 WH 7 WH 6 RD 4 BK 6 BL BK 4 BL WH C23 3 BL WH 1 OR RD 3 RD H6 RD KS1 C132PU GN BK C23 8 GN B...

Page 170: ...Ground Control Box Wiring Diagram Ford LRG 425 EFI Models November 2003 Section 6 Schematics ...

Page 171: ...D DRIVE ENABLE LED AUXILIARY SWITCH AUXILIARY SWITCH GENERATOR SWITCH OPTION GENERATOR SWITCH OPTION START ENGINE SWITCH START ENGINE SWITCH PLATFORM ROTATE SWITCH PLATFORM ROTATE SWITCH PLATFORM LEVEL SWITCH PLATFORM LEVEL SWITCH JIB UP DOWN SWITCH JIB UP DOWN SWITCH DRIVE SPEED SWITCH DRIVE SPEED SWITCH PRIMARY BOOM EXTEND RETRACT SWITCH PRIMARY BOOM EXTEND RETRACT SWITCH HI L0 RPM SWITCH HI L0 ...

Page 172: ...Platform Control Box Wiring Diagram Ford LRG 425 EFI Models November 2003 Section 6 Schematics ...

Page 173: ...November2003 Section 6 Schematics PartNo 75861 GenieZ 60 34 6 11 ...

Page 174: ...ting 25 psi 1 7 bar Motor 2 speed bi directional Pump bi directional variable displacement E Pump prime mover engine or motor Directional valve mechanically activated o Relief valve with pressure setting 200 psi 13 8 bar Orifice with size 035 0 89 mm Solenoid operated 3 position 4 way directional valve Directional valve pilot operated 2 position 2 way Flow divider combiner valve with pressure bala...

Page 175: ... 9 bar 5 15 1 5 25 psi 1 7 bar 3 psi 3 psi 0 20 bar 0 20 bar 4200 psi 289 5 bar E LS TEST ø 030 1 5 gpm 5 7 L min 2SPEED M ST1 ST2 042 BRAKE 10 1 2500 PSI TANK RET SW1 SW2 PR1 PR2 P1 P2 PL2 PL1 CP T2 AUX T2 V1 V2 J1 PR1 PR2 J2 T1 2400 psi 165 4 bar 3500 PSI 3 1 1 5 1 3000 PSI 2000 PSI 3 1 2500 PSI 4 5 1 1 7 6 3 8 2 9 4 TEST TEST PRESS 0 1 gpm 0 37 L min OUT 87 psi 5 9 bar 3000 PSI 3 1 30 psi 2 1 b...

Page 176: ...Hydraulic Schematic 2WD Models before serial number 4461 November 2003 Section 6 Schematics ...

Page 177: ...1 ST2 042 BRAKE TANK RET SW1 SW2 PR1 PR2 P1 P2 PL2 PL1 CP T2 AUX T2 V1 V2 J1 PR1 PR2 J2 T1 2400 psi 165 4 bar 1 7 6 3 8 2 9 4 TEST TEST PRESS 0 1 gpm 3 7 L min OUT 87 psi 5 9 psi 2 1 bar 30 psi 30 psi 2 1 bar 30 psi 2 1 bar O C IN O C OUT 25 psi 2 bar TEST IN CDR CDL LEFT REAR RIGHT REAR T 250 psi 17 2 bar M3 M1 50 2 0 gpm 7 5 L min 50 50 50 2 0 gpm 2 0 gpm 7 5 L min 7 5 L min 50 M5 M7 TEST A B M4...

Page 178: ...Hydraulic Schematic 4WD Models before serial number 4461 November 2003 Section 6 Schematics ...

Page 179: ...in 2SPEED M ST1 ST2 042 BRAKE TANK RET SW1 SW2 PR1 PR2 P1 P2 PL2 PL1 CP T2 AUX T2 V1 V2 J1 PR1 PR2 J2 T1 2400 psi 165 4 bar 1 7 6 3 8 2 9 4 TEST TEST PRESS 0 1 gpm 0 37 L min OUT 87 psi 5 9 bar 30 psi 2 1 bar 30 psi 2 1 bar 2 1 bar 30 psi O C IN O C OUT 25 psi 1 7 bar 3 psi 0 20 bar TEST IN CDR CDL LEFT REAR RIGHT REAR B A S2 S1 1600 psi 110 3 bar 5 gpm 18 9 bar 700 psi 51 7 bar M1B P1 P2 T TEST 2...

Page 180: ...Hydraulic Schematic 2WD Models after serial number 4460 November 2003 Section 6 Schematics ...

Page 181: ...2 042 BRAKE TANK RET SW1 SW2 PR1 PR2 P1 P2 PL2 PL1 CP T2 AUX T2 V1 V2 J1 PR1 PR2 J2 T1 2400 psi 165 4 bar 1 7 6 3 8 2 9 4 PTEST TEST PRESS 0 1 gpm 0 37 L min OUT 87 psi 5 9 bar 30 psi 2 1 bar 30 psi 2 1 bar 30 psi 2 1 bar O C IN O C OUT 25 psi 1 7 bar 3 psi 0 20 bar TEST IN CDR CDL LEFT REAR RIGHT REAR T 250 psi 17 2 bar M3 M1 50 2 0 gpm 7 6 L min 50 50 2 0 psi 7 6 L min 50 50 2 0 gpm 7 6 L min 50...

Page 182: ...Hydraulic Schematic 4WD Models after serial number 4460 November 2003 Section 6 Schematics ...

Page 183: ...3 27 11 455 0355 55 11 4055 2499 55 11 4043 1661 Distributed By California Proposition 65 WARNING The exhaust from this product contains chemicals known to the State of California to cause cancer birth defects or other reproductive harm Genie Holland Genie Scandinavia Genie France Genie Iberica Genie Germany Genie U K Genie Mexico City Phone Fax Phone Fax Phone Fax Phone Fax Phone Fax Phone Fax Ph...

Reviews: