background image

©

Gennum Corporation

All rights reserved

2005

Page 34

Can my Digital Wireless Headset talk to several other devices at
the same time?

What is that beeping sound?

The phone or headset does not respond at all when I press the
PINCH button.What's going on?

What is voice activation?

No. It will only “pair” and work with one phone or device at a time. If you
want to pair it with another device, you must perform the pairing process
again. Future models will allow multiple concurrent pairings.

Beeping sounds alert you that you are requesting a change in how the
headset is working (by pressing the PINCH button), or that a phone call is
waiting or that you've placed a call on “mute”.

You may need to reset your phone by turning off the power and then
turning it back on again.You may also need to turn the Digital Wireless
Headset off and then back on.

For those mobile phones that support voice activation, it is possible for
the mobile phone user to dial phone numbers and access other calling

Summary of Contents for DIGITAL WIRELESS HEADSET

Page 1: ...DIGITAL WIRELESS HEADSET USER S MANUAL with HearPhone Technology...

Page 2: ...p 9 Connecting a custom earmold 9 Positioning the Headset 10 Positioning Hints 12 Turning the headset on or off 12 Volume Control 13 Storage Position 13 Operating Modes Universal Directional Bluetooth...

Page 3: ...Pair your Headset to your Cell Phone 20 Features for phones supporting the BLUETOOTH Headset Profile only 22 To answer a call 22 To end a call 22 To make a call 22 To transfer a call 22 To Mute Unmute...

Page 4: ...a call from the headset to the phone 26 To transfer a call from the phone to the headset 26 Call Waiting 27 Mute Unmute 28 Care and Maintenance of your headset 29 Eartips 29 Cleaning the eartips 29 C...

Page 5: ...ow to charge the headset 32 Replacing the battery 32 Frequently Asked Questions FAQs 33 Limited Warranty 36 Trademarks and Registered Trademarks 38 FCC Notice 39 EU Notice 40 Contact Information 42 HA...

Page 6: ...eedback cancellation This headset can be custom programmed to satisfy the user s hearing needs and listening preferences Any device that supports the headset or HandsFree Bluetooth profile may be pair...

Page 7: ...Gennum Corporation All rights reserved 2005 Page 7...

Page 8: ...l medical devices should consult with their physicians before using cellular phones or a headset The use of wireless devices and their accessories may be prohibited or restricted in certain areas Alwa...

Page 9: ...reverse this procedure by aligning the hole in the ear tip and pushing it on the end of the flexible arm until it is firmly seated in position Connecting a custom earmold For improved comfort and sou...

Page 10: ...t kit to the hearing healthcare provider at the time the earmold impression is made The tubing will be incorporated into your custom earmold and will be compatible with your headset Positioning the He...

Page 11: ...r Adjust the flexible arm until the ear tip is comfortably positioned in your ear This is just one suggestion for putting it on and you may find a more convenient way of doing it We encourage you to t...

Page 12: ...g your headset only manipulate the area of the headset arm as shown here Note flexible Turning the headset on or off To turn on the headset Press and hold the MODE button and you will see 2 flashes of...

Page 13: ...y Do not initially turn the volume control to maximum until you become familiar with the volume levels and determine what is most comfortable for you 1 Rotate the flexible arm upwards into the upright...

Page 14: ...l This mode keeps you in touch with what s happening around you allowing you to hear sound from all around you in front to the side and behind you However if you find yourself in a challenging listeni...

Page 15: ...ation features below for more information about customizing sound to suit your hearing preferences Your hearing healthcare provider can customize your headset to suit your preferences In addition to t...

Page 16: ...diate vicinity To switch to Directional Mode from Universal Mode Press the Mode Button When you press the Mode Button you will hear 2 beeps which indicates that you are in Directional Mode To switch t...

Page 17: ...ou will hear 1 beep which indicates that you are in Universal Mode Remember If you decide to initiate or accept a cellular phone call or connect wirelessly to your computer then you will only hear the...

Page 18: ...Digital Wireless Headset 1 Your headset and cell phone must have been paired see How to Pair your Headset to your Cell Phone below 2 They must both be turned on and 3 They must be within 10m of each o...

Page 19: ...ith HearPhone Technology can be programmed using HearPhone software the Hi Pro programming box and the CS44 cable Your headset can be programmed to provide you with the balance of bass mid frequency a...

Page 20: ...devices are switched on the two devices will be able to communicate with each other Pairing is done once and normally there is no need to repeat this 1 Turn on the Bluetooth function on your phone re...

Page 21: ...light will turn off If you are wearing the headset you will hear a pairing success melody 9 Depending on your phone model you may have to initiate a Bluetooth Connection This can be achieved by select...

Page 22: ...series of ring tones in the earpiece of the headset 1 the MODE button 1 the MODE button 1 Dial the number you are calling on your phone s keypad and the call will be transferred automatically to the h...

Page 23: ...ps that remind you that your voice cannot be heard by the caller To mute the call 1 the PINCH button You will hear periodic beeps indicating the headset has been muted To unmute the call 1 the PINCH b...

Page 24: ...eadset however you can still transfer the incoming call to your headset at any time by by the PINCH button for It may take a few seconds longer to transfer You can create a link to your phone at any t...

Page 25: ...ll will be transferred automatically to the headset If your headset is to your phone no headset icon you can still transfer the call to your headset at any time 1 the PINCH button until you hear 1 bee...

Page 26: ...hear 2 beeps then immediately release the button 2 Refer to the Call Waiting section below for call control 1 the PINCH button until you hear 3 beeps then immediately release the button If you are on...

Page 27: ...notifies you of an incoming call while you already engaged in a call To accept the waiting call 1 the PINCH button until you hear 1 beep 2 Release the button immediately This will place the first cal...

Page 28: ...1 the PINCH button until you hear 4 beeps 2 Release the button immediately To mute the call To unmute the call Press and hold Press and hold Mute Unmute 1 the PINCH button You will hear indicating th...

Page 29: ...e a small brush to brush wax dirt and dust out of the eartip If you wish you may also clean the eartip using mild soap and water Be sure to remove the eartip from the headset before any cleaning begin...

Page 30: ...adset and place the headset in a clean dry location Debris can be brushed or blown out of the tubing and around the canal portion of the earmold Be careful not to allow a water drop to clog the tubing...

Page 31: ...and hold the PINCH button until you hear a single beep 2 Release the PINCH button immediately A fully recharged headset will provide 8 hours of cell phone talk time or approximately 150 hours of use i...

Page 32: ...ert the headset charging plug into the charging port of the headset 3 Plug the AC power adapter into an electrical wall outlet 4 The blue indicator light will turn on indicating charging is in progres...

Page 33: ...ptops PCs and PDAs These numbers are noted on the inside of the flexible arm The pass code or PIN used for pairing your Bluetooth headset to your mobile phone is 0000 This pass code cannot be changed...

Page 34: ...ust perform the pairing process again Future models will allow multiple concurrent pairings Beeping sounds alert you that you are requesting a change in how the headset is working by pressing the PINC...

Page 35: ...the ear The eartip should fit snugly but be comfortable too A snug fit will restore proper volume and tonal balance to the incoming sound The range is generally determined by the location of both the...

Page 36: ...the headset it may at its sole option refund the purchase price paid for the headset THESE ARE THE SOLE AND EXCLUSIVE REMEDIES FOR BREACH OF WARRANTY BY GENNUM IN NO EVENT SHALL GENNUM BE LIABLE FOR D...

Page 37: ...unauthorized installation or service unauthorized removal or repairs failure to follow instructions fire floods acts of God or spills of food or liquids EXCEPT FOR THE EXPRESS LIMITED WARRANTY PROVIDE...

Page 38: ...rein In no event shall Gennum s liabilities exceed the cost of correcting defects as provided herein and any such liabilities will terminate upon expiration of the warranty period This warranty is val...

Page 39: ...the equipment This equipment has been tested and found to comply with the limits for a Class B digital device pursuant to part 15 of the FCC Rules These limits are designed to provide reasonable prote...

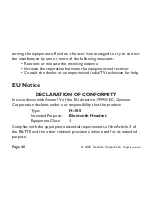
Page 40: ...uipment and receiver Consult the dealer or an experienced radio TV technician for help In accordance with Annex IV of the EU directive 1999 5 EC Gennum Corporation declares under our responsibility th...

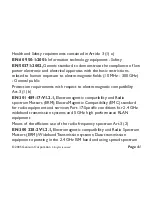
Page 41: ...tromagnetic compatibility Art 3 1 b Electromagnetic compatibility and Radio spectrum Matters ERM ElectroMagnetic Compatibility EMC standard for radio equipment and services Part 17 Specific conditions...

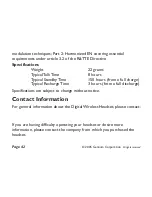
Page 42: ...rs Typical Standby Time 150 hours from a full charge Typical Recharge Time 3 hours from a full discharge Specifications are subject to change without notice For general information about the Digital W...

Page 43: ...Gennum Corporation All rights reserved 2005 Page 43...

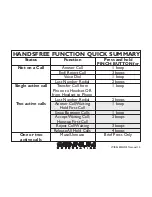
Page 44: ...d First Call Swap Between Calls 1 beep Accept Waiting Call 2 beeps Reject Call Waiting 3 beeps Release All Held Calls 4 beeps Status Function Press and hold PINCH Not on a Call Single active call BUTT...

Reviews: