23
First check if the correct installation file for your system type
(32 or 64bit) was downloaded.
To determine the system type:
Click
Start
Right click
Computer
Properties
System Type
First run the installation file genucard-setup.
This will start the setup wizard and display the intended system
type in the title bar (32 bit -> "x86", 64 bit -> "x64").
If the type matches, click on
Next
.
In the next window, select the
installation target
and
options
.
To initialize a connection via genucard before Windows login,
select the option
genucard Credential Provider
.
Deactivate
Fast User-Switching
to prevent multiple user logins at
the same time.
Then click
Next
.
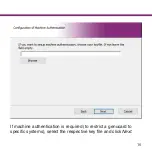
If machine authentication is required (to restrict a genucard to
specific systems), select the respective key file and click
Next
.
Click
Install
to start the setup, then
Yes
in the user account
window.
Finish the installation by clicking
Finish
.
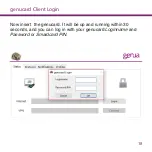
Now insert the genucard. It will be up and running within 30
seconds, and you can log in with your genucard
Loginname
and
Password
or
Smardcard PIN
.
Click the genucard client icon to open the menu:
Webinterface: Opens the default browser with the genucard
Web interface, as described on page 7ff.
Change
smartcard PIN: Opens a window to edit the smartcard PIN if a
smartcard is used.
Status: Status information about the current connection,
and options for establishing/closing Internet and
VPN
connections.
Protocol: Displays genucard client protocol information.
Notifications: Opens the genucard client message tab.
Profiles: Displays available profiles and any modification
options.
About: Displays genucard client information.
Close: Closes the genucard client.
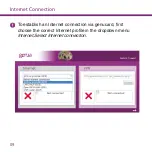
The
Internet
field in the Status tab lists available preconfigured
profiles for Internet connections. Select a profile and click
Connect
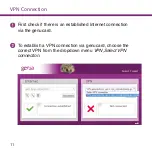
. Once a connection is established, a VPN can be initiali-
zed.
To do so, select a
VPN
from the predefined list and click
Connect
.
If you need an individual profile, and the administrator has
activated permission to do so, you can create one in the
Profiles
tab.
Click on
Create Profile
to start a wizard for the various connection
options.
The icons on the
Status
tab show the status of machine
authentication, connection to the genucard, as well as the Internet
and VPN connections.
Hover over over the icons with the mouse for more information.
If a connection is required before Windows login (e.g. for Active
Directory authentication) the Credential Provider must be installed
when setting up the genucard.
See
Installation genucard Client for Windows
.
Subsequently, network authentication can selected at Windows
login. (See arrow.)
First log in at the genucard.
Enter your genucard
Username
(german:
Benutzername
) and
Password
(german:
Kennwort
)
In the next dialog, select the
connection
(german:
Verbindung
) to
access the target network.
Once the connection has been established, you can log on
Windows as usual.
To log in to a hotspot, select the Internet connection option
Open
WiFi
in the
Status
tab.
This will open a hotspot login dialog.
genucard Client - Hotspot Login
Summary of Contents for genucard
Page 1: ...genucard Quickstart Guide ...
Page 2: ......
Page 7: ...02 1 x genucard Scope of delivery 2 x USB cable Micro USB to Type A ...
Page 8: ...03 Ports 1 2 3 4 5 6 7 8 9 ...
Page 50: ......
Page 51: ...www genua de ...

