6
Optima 300
4. Operating
Optima 300
All Genvex heat pumps of type GE VP/VPC and GE
Premium for houses and are delivered with Optima 300
control systems, which have default settings so that the
unit can be put into operation. The default setting is only
a basic setting that should be changed to the operating
wishes and requirements of the house in question and
will thereby achieve optimal utilisation and operation of
the device.
After the device has been started, the control panel
will be in stand-by and will display one of the screen
savers (can be changed in the main menu under the
item ‘display’). Pass your hand over the control panel to
bring up the symbols on the screen that show the daily
operating options.
4.1 Operating and changing data in
the operating menu
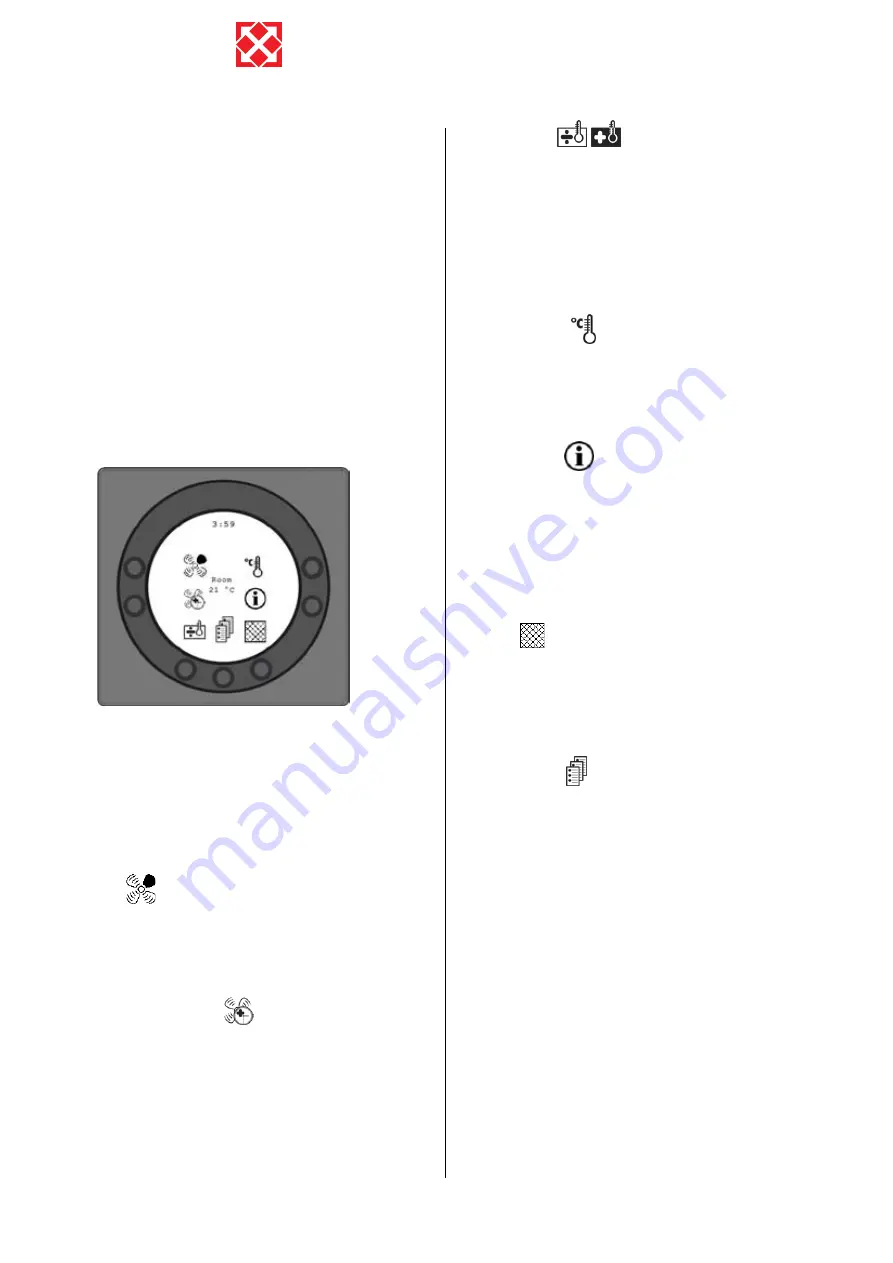
The display normally shows the screen with symbols for
daily operations, where the following buttons can be seen
in connection with daily operation.
Speed (1)
Use this function to set the fan speed to levels 0-1-2-3-4.
The button beside the speed symbol changes between
the 4 speeds. The installation can also be stopped by
holding down the button for 3-4 seconds.
Extended operation (2)
Use this function to set the timer to forced operation
from 0 to 9 hours Use the button next to the symbol for
extended operation to change from 0 to 9 hours. If the
timer is set to 0, speeds 3 and 4 will run until the speed is
changed manually. If the timer is set for between 1 and 9
hours, speeds 3 and 4 will automatically be linked back to
speed 2 after the number of hours the symbol was set at.
After-heat (3)
Use this function to turn on or off the supplementary after-
heat.
Use the button beside the after-heat symbol to change
between ON or OFF. If the symbol is set at ON and the
device is equipped with an after-heat surface, the after-
heat will commence as required. If, on the other hand, the
symbol is set to OFF, the after-heat will not commence,
even if it is required.
Temperature (7)
Use this function to set the room temperature.
Use the button next to the temperature symbol to set
the required temperature from 10-30°C. The current
temperature will be displayed at the centre of the screen.
Information (6)
Use this function to get a good overview of the device’s
current operating condition, e.g. temperature, fan setting,
relay status/functions, alarm, timer etc.
Use the button beside the info symbol to read the
installation’s operating condition (more information can be
found in the main menu section under the info operation
item).
Filter (5)
Use this function to un-set the filter alarm. The button
beside the filter symbol un-sets the alarm for filter
change. To un-set the filter alarm, change the filters
hold down the button with the filter symbol until the
exclamation mark in the symbol disappears.
Main menu (4)
Use this function to enter the main menu and access the
sub-items date, calendar, user menu, display, information
menu and service menu.
Press help to see a guide for the item that is marked.
Press the exit to return to the previous display screen.
The setting will not be saved when you press here. Use
the arrow buttons to navigate in the menus. The two
arrow buttons will change to plus and minus when you
change the setting.
Use the Enter button to proceed through the menus. If a
menu item has been changed, finish by pressing Enter
and the change will be saved.


