7
Selection PRO
C
BEDIENUNG
Gerät aufstellen
1. Wand-/Stativkonsole des Gerätes
auf handelsübliches Baustativ oder
Klemmsäule schrauben (5/8“-Ad-
apter).
2. Auf dem Fußboden: Ministativ ein-
schrauben und Gerät aufstellen.
Gerät immer möglichst waagerecht
aufstellen, damit die Selbstnivellierung
des Gerätes einwandfrei arbeitet.
OPERATION
Setting up the instrument
1. Set up the tripod/wall mount
of the instrument to a builder‘s
tripod or floor-to-ceiling pillar (5/8“
thread).
2. On the floor: Screw in floor tripod
into bottom thread of instrument
and set it up.
Set up instrument in the most horizon-
tal position to allow the self-levelling
system to function within its range.
EINSCHALTEN
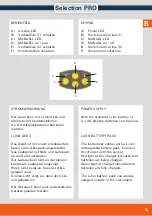
An-/Aus-Schalter (1) in Position „ON“
bringen. Das Gerät ist nun betriebs-
bereit (Power-LED leuchtet). Steht
das Gerät zu schräg (außerhalb des
Selbstnivellierbereiches), ertönt ein
akustisches Warnsignal. Eingeschal-
tete Laserlinien blinken als zusätzliche
Warnung.
Zum Ausschalten An-/Aus-Schalter
wieder in Position „OFF“ stellen. Das
Gerät ist nun ausgeschaltet, und
der Kompensator wird blockiert, um
Beschädigungen während des Trans-
portes zu vermeiden.
Bevor das Gerät in den Koffer gepackt
wird, An-/Aus-Schalter immer in Po-
sition „OFF“ stellen! Ein akustisches
Warnsignal ertönt, wenn dies einmal
übersehen wurde.
SWITCH ON
Set On/Off knob (1) in position „ON“.
Instrument is now ready for use
(Power LED is illuminated). An audible
and optical (flashing lines) alarm
indicates if the instrument was set up
outside of compensator range. Set up
instrument on a more even surface.
To switch off instrument bring On/Off
knob in position „OFF“. Instrument is
now switched off and the compensator
is blocked to avoid damages during
transport.
During transport On/Off knob
(compensator clamp) must be set to
„OFF“. Disregard may lead to damages
of the compensator.


