background image

   TECHNISCHE DATEN

   Selbstnivellierbereich 

± 3,5°

   Genauigkeit 

± 3 mm / 10 m

   Arbeitsbereich 

     ohne Empfänger 

20 m*

     mit Empfänger 

40 m

   Betriebsdauer Akkus 

12 h**

   Stromversorgung 

3 x 1,5V NiMH

     oder    

Alkaline-Batterien

   Ladegerät dient auch als

     Netzgerät 

ja

   Sichtbare Laserdioden 

4 x 635 nm

   Laserklasse 

3R

   Gewicht 

0,9 kg

   *abhängig von der Raumhelligkeit

   ** je nach Anzahl der geschalteten Dioden

   TECHNICAL DATA

   Self-levelling range 

± 3,5°

   Accuracy 

± 3 mm / 10 m

   Working range 

     without receiver 

20 m* 

     with receiver 

40 m

   Operating time rechar- 

     geable batteries 

12 h**

   Power supply 

3 x 1,5V NiMH

     or      

Alkaline batteries

   Charger = power supply  yes

   Visible laser diodes 

4 x 635 nm

   Laser class 

3R 

   Weight  

0,9 kg

   *depending on room illumination

   ** depends on numbers of switched diodes

   BEDIENUNG

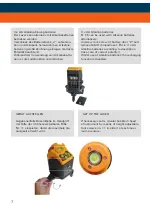
     Gerät aufstellen

  1)  Auf Stativ: Gerät mit der 5/8“-Stativanzugs 

     schraube eines handelsüblichen Baustativs  

     verbinden.

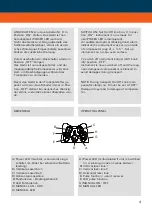
  2)  Auf dem Fußboden: Bodenstativ Nr. 5 unten 

     in das Gerät hinein schrauben. 

   Durch Lösen „ON“ der Klemme Nr. 6 kann 

   das Gerät über einem definierten Boden- 

   punkt ausgerichtet werden.  

   Gerät immer möglichst gerade aufstellen,  

   damit  die Selbstnivellierung des Gerätes ein- 

   wandfrei arbeitet.

   OPERATION

     Set up the laser

  1)  On a tripod: Connect laser to 5/8“ retaining 

     bolt of builders‘ tripod.

  2)  On the floor: Screw in floor tripod no. 5  

     into  bottom thread of instrument. 

   Laser plumb can be adjusted as follows: Set  

   lever of locking device no. 6 in position „ON“ 

   - move instrument on floor tripod to desired 

   point - fix by moving lever to position „OFF.“

   Set up instrument as upright as possible to  

   allow the self-levelling system to function  

   within range.

3

   MERKMALE

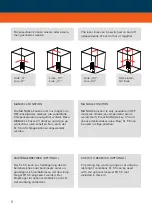
   3 Laserkreuze im rechten Winkel zueinander

   Laserkreuz an der Decke

   Verstellbarer Lotpunkt zum Boden

   Abschaltbare Selbstnivellierfunktion für ma- 

   nuelle Anwendungen

   Optionaler Einsatz mit Empfänger FR 55

   CHARACTERISTICS

   3 laser crosses at 90° to each other

   Laser cross to the ceiling

   Adjustable plumb beam down

   Self-levelling function can be switched off 

   for manual use

   Optional use of receiver FR 55

Summary of Contents for MULTI-LINER FL 55

Page 1: ...Bedienungsanleitung Users manual Vollautomatischer Linienlaser Fully Automatic Laser Cross Level MULTI LINER FL 55...

Page 2: ...lders tripod 11 Adjustable leg 12 Circular bubble LIEFERUMFANG Linienlaser FL 55 Bodenstativ magn Ziel tafel Lasersichtbrille Akkusatz Ladeger t Kunststoffkoffer Bedienungsanleitung KIT CONSISTS OF La...

Page 3: ...unten in das Ger t hinein schrauben Durch L sen ON der Klemme Nr 6 kann das Ger t ber einem definierten Boden punkt ausgerichtet werden Ger t immer m glichst gerade aufstellen damit die Selbstnivellie...

Page 4: ...blinking lines alarm indicates the instrument was set up outside of compensator rage of 3 5 Set up instrument on a more even surface To switch off instrument bring On Off knob into position OFF Instr...

Page 5: ...im Lieferumfang enthalten USE WITH RECEIVER OPTIONAL To prolong the working range or at unfavou rable light conditions FL 55 can be used with the optional receiver FR 55 not included in this kit MANUE...

Page 6: ...ht at laser indicates that batteries are fully charged The working time with fully charged battery pack is approx 12 hrs ACHTUNG Bitte das Ger t nicht ber einen l ngeren Zeitraum z B Wochenende un kon...

Page 7: ...alinebatterien betrieben werden Verschluss des Batteriefachs 2 aufschrau ben und Akkupack herausnehmen Alkaline batterien gem Zeichnung einlegen korrekte Polarit t beachten W hrend der Verwendung von...

Page 8: ...ken ist Transport nur in Originalbeh lter oder tasche CARE AND CLEANING Please handle measuring instruments with care Clean with soft cloth only after any use If necessary damp cloth with some water I...

Page 9: ...all and mark laser cross Repeat measurements with distance of about 0 6 m to one wall and about 4 4 m to second wall Devi ation between two measurements taken from the centre and two measurements take...

Page 10: ...irs should be carried out by authorized work shops only Please contact your local dealer Do not remove warning labels or safety instructions Keep instrument away from children Do not use instrument in...

Page 11: ...wie die Nichterf llung zugesicherter Eigenschaf ten Ein Garantieanspruch besteht nur bei bestim mungsgem er Verwendung Mechanischer Verschlei und u erliche Zerst rung durch Gewaltanwendung und Sturz u...

Page 12: ...S FROM RESPONSIBILITY The user of this product is expected to follow the instructions given in operators manual Although all instruments left our warehouse in perfect condition and adjustment the user...

Reviews: