background image

17

Product Use

Parked Surveillance Mode

- To enter into the “Parking Mode” recording, push and hold the [PLAY] button for more 
   than 3 seconds when the system is recording and a voice notification will be  announced 
   that the parking mode has been initiated.

- The system automatically rearranges its impact sensing sensitivity to most sensitive in 
   order to register the slightest impacts.

- While no impacts, the system records 4 frames/second to save the SD space and return to 
   normal full frame recording mode making an EVENT file when it receives a certain impact 
   to car. After making an EVENT file, it returns to 4 frame recording mode again.

- No audio is recorded while parking mode is on.

- In parking mode, the system repeats “Parking mode is on” every 2 minutes.

- To return to normal (driving) recording mode, press and hold the [PLAY] button for more 
   than 3 seconds to hear the “Driving mode on” announcement.  

- To use the parking mode, the product has to be connected to the power source directly. 
   In regards to direct wiring to the vehicle’s power source, we recommend using 
   professional help.

- Extensive and continuous use of the vehicle’s power source may exhaust the performance 
   of the product. The company is not liable for the damages from continuous use of the 
   product more than 24 hours. We recommend the full power to be off after use of 2~3 days 
   to maintain the product for longer use.

Voice Recording

- During the system records, when the [SHOT] button is pressed and held for more than 3 
   seconds, the voice notification will announce that the voice recording will initiate and the 
   voice recording will start or stop.

- The initial audio recording setting can be changed in the analysis program.

Summary of Contents for VisionDrive VD-5000

Page 1: ......

Page 2: ...5 6 7 8 9 10 15 19 27 INDEX Before Use Caution Components Part Names Product Specifications Installation Precautions Installation Sequence Installation Procedure Product Use Analysis Program Use Warra...

Page 3: ...recorded by user s discretion However it is not assured that the product will record video in every instance Furthermore under circumstances where the impact is too weak the vibration sensor may not b...

Page 4: ...ken the adhesive strength and can damage the product if it drops due to weak adhesion This product is not waterproof Do not allow liquids and impurities to enter the product Where the product is wired...

Page 5: ...s may result in defection of the product Also do not expose the product to direct fire or water Do not disassemble the product Disassembly without caution may result in product defect Keep the SD card...

Page 6: ...Components Components are subject to change without prior notice Main Unit Attachment Bracket Mount SD card Wire holders Cigar Power Adaptor 5...

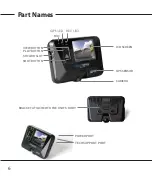
Page 7: ...6 Part Names MIC VIEW BUTTON PLAY BUTTON SHOT BUTTON LCD SCREEN GPS SENSOR CAMERA SD CARD SLOT BRACKET ATTACHED TO THE UNIT S BODY POWER PORT TECH SUPPORT PORT...

Page 8: ...dule Sirf III G sensor Built in 3 Axis Sensor x y z Storage SD memory card SDHC compatible 1G 32G Audio Recording built in MIC One touch recording Voice Announcement Built in Speaker Event Recording B...

Page 9: ...Install the product after parking your vehicle in a bright and safe area Install the system when ignition is off especially after the power source has been turned off completely Use the power cable p...

Page 10: ...the bracket and the main unit Insert SD card into the unit Connect cable and attach on windshield Connect to power source and turn on the unit Adjust the camera angle Check LED lamps Arrange wires us...

Page 11: ...cket to direction 2 to release the bracket 1 2 Insert the SD card as shown in the picture When ejecting the SD card from the unit turn off the main power When ejecting the SD card from the unit turn o...

Page 12: ...oatings shielding which may affect camera visibility The adhesive on the bracket is very strong Partially remove the cover of the adhesive and then use the full adhesive surface area for final install...

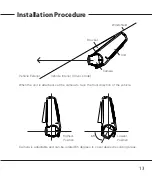
Page 13: ...st the camera angle Move the camera top to bottom to fix it to a recordable position while checking the LCD For better images and operation of the analysis program ensure that the horizon meets 1 2 of...

Page 14: ...le Exterior Highest Position Lowest Position Vehicle Interior Driver s Side Windshield When the unit is attached set the camera to face the front direction of the vehicle Camera is adjustable and can...

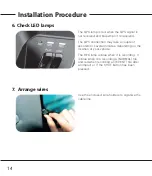
Page 15: ...on may take a couple of seconds to several minutes depending on the location of your vehicle The REC lamp is blue when it is recording It is blue when it is recording a NORMAL file and red when record...

Page 16: ...he memory is full while in normal or event recording mode the program will erase the oldest recorded data then record a new file The management is based on First In First Out FIFO In the case of an im...

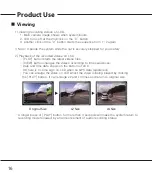
Page 17: ...button starts the latest videos files VIEW button changes the videos according to time sequences Date and time data shows on the bottom of LCD There is no time sign on LCD when no GPS data registered...

Page 18: ...ery 2 minutes To return to normal driving recording mode press and hold the PLAY button for more than 3 seconds to hear the Driving mode on announcement To use the parking mode the product has to be c...

Page 19: ......

Page 20: ...n the analyzer number date time type vd eg 124537834 20090102 120102 1 vd No GPS Registered number NOGPS number type vd eg 124537834 20090102 124537834 1 vd date time type vd eg 20090102 120102 1 vd N...

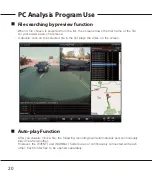
Page 21: ...f the file for your easier ease of reference A double click on the selected file in the list plays the video on the screen After you double click a file the following recordings will automatically and...

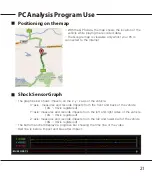
Page 22: ...pacts on the x y z axis of the vehicle X axis measures and records impacts from the front and back of the vehicle 0G 3G is registered Y axis measures and records impacts from the left and right sides...

Page 23: ...ile from the list to play the file When you press the pause button the viewing video will be paused When the previous frame or the latter frame button is pressed it will move backward or forward betwe...

Page 24: ...options of Audio GPS Date Time CarInfo to be included to the avi file Press the Start button again and then the data being previewed will be converted from the point you specified When you press the p...

Page 25: ...resolution and quality settings can be modified If the resolution is high the file size also becomes larger and will take more memory on the SD card The sensor can be configured If the number is larg...

Page 26: ...e here but regardless of this setting you can immediately change the audio recording status by pushing the SHOT button on the main unit Impact sound volume can be modified Each of Sound Option can mak...

Page 27: ...ct your location and time zone and the GPS will register your local time with your video You can select your local speed type as Km h or mile h in the tap You can select your vehicle type as Car or Tr...

Page 28: ...provided only if expenses paid by the customer In cases below repairs may require expense payment by the customer If the product has been reassembled or disassembled or has been damaged by the custome...

Page 29: ...ilable The manufacturer will follow Consumer Protection Act 1006 36 to give warranty to all the products sold to consumers in the available regions All A S services are given by either the manufacture...

Page 30: ...art 15 of the FCC Rules These limits are designed to provide reasonable protection against harmful interference when the equipment is operated in a commercial environment This equipment generates uses...

Page 31: ...CAR BLACK BOX...

Reviews: