background image

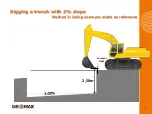
Digging a trench with 2% slope 

using a rotating slope laser 


Method 1: Knowing the laser height 

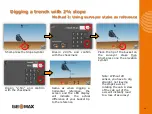
Short-press the Slope Symbol 

Dial-in  2.00%  and  confirm 

with the checkmark 

Short-press  the  Laser  Catch 

Symbol. 

NB: 

A warning will pop 

up to use a slope laser with the 

same slope set. Confirm with OK 

Short-press  the  Laser  Height 

Symbol 

Dial-in  4.71m  and  confirm 

with the checkmark. 
Then catch the Laser Beam. 

The set Laser Height (4,71m) 

and the resulting distance to 

the sloped reference will be 

shown on the screen. 

   20 

Summary of Contents for EZDig T

Page 1: ...Manual Version 2 00 Software Version 3 5 1 User Manual EZDig T Menu Language English 1 ...

Page 2: ...Not knowing the laser height VI Digging a trench with 2 slope a Method 1 Using the ground as reference b Method 2 Using surveyor stake as reference VII Digging a trench with 2 slope using a rotating slope laser a Method 1 Knowing the laser height b Method 2 Not knowing the laser height VIII Changing the elevation a Method 1 Working without a rotating laser b Method 2 Working with a rotating laser ...

Page 3: ...e where the bucket tip is in relation to the target depth Excavator rotation and movement With EzDig 1D the operator has to dig straight ahead only moving the booms bucket in and out After the target depth has been set the chassis has to stay stable Any rotation of it may produce an error depending on the inclination For a leveled plane rotation of the chassis can be compensated by using a fourth ...

Page 4: ...ttings Fast Elevation Reset Set Elevation Move Reference Set Slope Catch Laser Delete 1st Laser Catch Set Laser Height Show Hide Reach Measure mode with slope Elevation Alarm Bucket orientation Zoom Out Set back Zoom to Default Zoom In Swap Views Laser Reference Optional view Current Elevation 4 ...

Page 5: ...Digging a hole Method 1 Using the ground as reference 5 ...

Page 6: ...ground and Short press one the elevation symbol The screen and the LED display will indicate the actual difference of your bucket tip to the reference 2 Dial in 0 and confirm with the checkmark NB To redial the previous elevation you can user button fast elevation setting which redial the previous elevation 6 ...

Page 7: ...Digging a hole Method 2 Using surveyor stake as reference 2 50m Surveyor Stake 7 ...

Page 8: ...ground and Short press one the elevation symbol The screen and the LED display will indicate the actual difference of your bucket tip to the reference Dial in 2 5m and confirm with the checkmark NB To redial the previous elevation you can user button fast elevation setting which redial the previous elevation 8 ...

Page 9: ...Digging a 5m wide hole 5m Surveyor Stake 9 ...

Page 10: ...ve 1 Click on the button Reach Enable at the left side of the screen 2 Align your cab along the axis of the hole and click on the Align button 2D only 3 Leave the tip of the bucket on the surveyor stake 4 Short press the reach button 5 Possibility 1 Dialin 5m Possibility 2 Dialin 5m 10 ...

Page 11: ...Digging a hole using a rotating laser Method 1 Knowing the laser height 4 71m Laser Receiver Surveyor Stake 2 50m 2 21m Laser Height 2 21m 2 50m 11 ...

Page 12: ...press the 1st Laser Catch Symbol Short press the Laser Height Symbol Dial in 4 71m and confirm with the checkmark The set Laser Height 4 71m and the resulting distance to the reference will be shown on the screen Every time you ve moved the machine 1 Short press Laser Catch 2 Catch the laser beam 12 ...

Page 13: ...Digging a hole using a rotating laser Method 2 Not knowing the laser height Surveyor Stake 2 50m Laser Receiver 13 ...

Page 14: ...ymbol Short press the Elevation Symbol Leave the tip of the bucket on the surveyor stake then dial in 2 5m and confirm with the checkmark The set actual distance 2 50m to the reference and the resulting Laser Height will be shown on the screen Every time you ve moved the machine 1 Short press Laser Catch 2 Catch the laser beam 14 ...

Page 15: ...Digging a trench with 2 slope Method 1 Using the ground as reference 15 ...

Page 16: ... as reference Short press the Slope Symbol Dial in 2 00 and confirm with the checkmark Place the tip of the bucket on your final elevation ground then Short press one the elevation symbol Dial in 0 and confirm with the checkmark Note Without 2D sensor you have to dig straight not leaving the slope s axis by rotating the cab A slew of the cab out of the axis will instantly lead to a loss of accurac...

Page 17: ...Surveyor Stake 2 50m Digging a trench with 2 slope Method 2 Using surveyor stake as reference 17 ...

Page 18: ...p to the reference Short press the Slope Symbol Dial in 2 00 and confirm with the checkmark Place the tip of the bucket on the surveyor stake then Short press one the elevation symbol Dial in 2 5m and confirm with the checkmark Note Without 2D sensor you have to dig straight not leaving the slope s axis by rotating the cab A slew of the cab out of the axis will instantly lead to a loss of accuracy...

Page 19: ... slope laser 4 92m Laser Receiver Note If you re using a rotating laser to dig a trench with slope it s mandatory that it s a slope laser and to set the same slope on the laser as in the trench Surveyor Stake 2 50m 2 42m Laser Height 2 42m 2 50m 19 ...

Page 20: ...h the checkmark Short press the Laser Catch Symbol NB A warning will pop up to use a slope laser with the same slope set Confirm with OK Short press the Laser Height Symbol Dial in 4 71m and confirm with the checkmark Then catch the Laser Beam The set Laser Height 4 71m and the resulting distance to the sloped reference will be shown on the screen 20 ...

Page 21: ...slope laser Method 2 Not knowing the laser height Laser Receiver Note If you re using a rotating laser to dig a trench with slope it s mandatory that it s a slope laser and to set the same slope on the laser as in the trench Surveyor Stake 2 50m 21 ...

Page 22: ... with the checkmark Short press the Laser Catch Symbol NB A warning will pop up to use a slope laser with the same slope set Confirm with OK Short press the elevation Symbol Dial in 2 5m and confirm with the checkmark Then Catch the Laser Beam The set actual distance to the reference 2 50m and the resulting Laser Height will be shown on the screen 22 ...

Page 23: ...Changing the elevation Method 1 Working without a rotating laser 0 10m 2 50m Surveyor Stake 2 40m 23 ...

Page 24: ...Change the elevation The elevation changed from 2 50m to 2 40m Short press the Elevation Button Dial in a new height which is 10cm 0 1m lower than the actual here 2 40m and Confirm with the checkmark Note INCREASE the Elevation to dig DEEPER DECREASE the Elevation to dig HIGHER 24 ...

Page 25: ...tion Method 1 Working without a rotating laser Possibility 2 Move the reference The elevation changed from 2 50m to 2 40m Short press the Reference Move Button Press Move up Dial in 0 1 and confirm with the checkmark 25 ...

Page 26: ...Changing the elevation Method 2 Working with a rotating laser 0 10m 4 71m 4 61m 26 ...

Page 27: ... press the Elevation Button The elevation changed from 1 40m to 1 30m and the laser height changed from 4 71m to 4 61m Dial in a new height which is 10cm 0 1m lower than the actual here 1 30m and confirm with the checkmark Note INCREASE the Elevation to dig DEEPER DECREASE the Elevation to dig HIGHER 27 ...

Page 28: ...ess the Laser Height Button The elevation changed from 1 40m to 1 30m and the laser height changed from 4 71m to 4 61m Dial in a new laser height which is 10cm 0 1m lower than the actual here 4 61m and confirm with the checkmark Note INCREASE the Elevation to dig DEEPER DECREASE the Elevation to dig HIGHER 28 ...

Page 29: ...ght changed from 4 71m to 4 61m Changing the elevation Method 2 Working with a rotating laser Possibility 3 Move the reference Short press the Move Reference Button Select Move up Dial in the desired offset which is 10cm 0 1m and Confirm with the checkmark 29 ...

Page 30: ...operation of such devices The strong magnetic fields of rare earth magnets can also damage magnetic media such as credit cards magnetic I D cards cassette tapes floppy disks video tapes or other such items They can also damage computer hard drives televisions VCRs computer monitors and other CRT displays Never place rare earth magnets near electronic appliances Children should not be allowed to ha...

Page 31: ...ly the equipment and accessories recommended by the manufacturer When combined with the product they meet the strict requirements stipulated by the guidelines and standards When using computers and two way radios pay attention to the information about electromagnetic compatibility provided by the manufacturer CAUTION Disturbances caused by electromagnetic radiation can result in erroneous measurem...

Page 32: ...dards Specification RSS 210 WARNING Changes or modifications not expressly approved by the manufacturer for compliance could void the user s authority to operate the equipment RESPONSIBILITIES Manufacturer of the product The manufacturer is responsible for supplying the product including the user manual and original accessories in a completely safe condition Person in charge of the product The per...

Page 33: ...e left attached on the machine over night as they are switched on 24 hours the situation may be more critical Then the energy balance is except if 4 5 hours of sunshine certainly negative and after some weeks the sensors are empty A chock full loaded sensor holds approx 50 hours in total darkness e g glued down solar cells So one sufficient jam packed charge per week is enough We recommend to put ...

Page 34: ...Try again after one hour If the sensor is ON LED is blinking but doesn t communicate with the system Remove the sensor from the sensor plate Assign the missing sensor to the system by entering the Add Sensor routine in the menu Follow the instructions on the screen Enter the sensor check menu through the Advanced Settings If the angle value doesn t flicker continuously but freezes shortly and come...

Page 35: ...you have to measure and dial in the height difference between the low and high setup after the lower line You may use the included magnetic L bar for the point laser s setup For the low line A attach the sandwich 5 8 to 5 8 adaptor 5 8 to 1 4 adaptor point laser on any tripod For the high line B put the two extension poles between the big and the small adaptor DO NOT change the tripod s location b...

Page 36: ...36 ...

Reviews: