background image

GeoMax Zenius5 Series

Quick Guide

Version 1.1

Summary of Contents for Zenius5 Series

Page 1: ...GeoMax Zenius5 Series Quick Guide Version 1 1 ...

Page 2: ......

Page 3: ...Quick Guide 5 Quick Guide 35 Guía Rápida 65 Guide abrégé 97 Guida rapida 129 Guia Rápido 159 Краткое руководство 191 en de es fr it pt br ru ...

Page 4: ......

Page 5: ...GeoMax Zenius5 Series Quick Guide Version 1 1 English ...

Page 6: ... the product This Quick Guide contains first use directions as well as initial basic instructions for setting up the product and operating it Keep all documentation for future reference Name Description Format Zenius5 Quick Guide Provides an overview of the product Intended as a quick reference guide ü ü Purchase Available docu mentation 6 en ...

Page 7: ...duct to a basic level are con tained in the User Manual Provides an overview of the product together with technical data and safety directions ü Refer to the GeoMax website for all Zenius5 documentation soft ware Remote control of product Data communication with external appliances Intended use 7 en ...

Page 8: ...d result in death or serious injury CAUTION Indicates a potentially hazardous situation or an unin tended use which if not avoided may result in minor or moderate injury NOTICE Indicates a potentially hazardous situation or an unin tended use which if not avoided may result in appre ciable material financial and environmental damage Important paragraphs which must be adhered to in practice as they...

Page 9: ...the device kept at 10 mm from the user s body Precautions Use the device at least 10 mm apart from the human body Protect the product against shock and vibration Periodically carry out functional tests particularly after the product has been dropped stored for long periods or transported The products of GeoMax are powered by Lithium batteries Care and trans port Dangerous Goods Regula tions 9 en ...

Page 10: ... products and How to ship GeoMax products with Lithium bat teries Before any transportation of a GeoMax product we ask you to consult these guidelines on our web page http www geomax positioning com dgr to ensure that you are in accordance with the IATA Dangerous Goods Regulations and that the GeoMax products can be transported correctly Damaged or defective batteries are prohibited from being car...

Page 11: ...ime The following advice is only valid for batteries power adapter or docking station The instrument has a SD card slot fitted as standard A SD card can be inserted and removed Refer to Insert and remove a SIM Card or a SD Card step by step Memory device 11 en ...

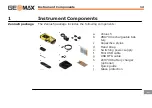
Page 12: ...s 0014001_001 a b c d f g e h i j e a Zenius5 b ZBA700 rechargeable bat tery c Capacitive stylus d Hand strap e Switching power supply f Mini USB cable g USB OTG cable h ZCH700 battery charger optional i Quick guide j Glass protection Zenius5 package Instrument Components 12 en ...

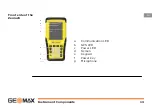
Page 13: ...013752_001 g f e d c b a a Communication LED b GPS LED c Power LED d Screen e Keypad f Power key g Microphone Front side of the Zenius5 Instrument Components 13 en ...

Page 14: ... e f a Camera b Speaker c Holder for hand strap d Release lever for battery compartment e Compartment with slots for battery SIM card and SD card f Hand strap fixation Back side of the Zenius5 Instrument Components 14 en ...

Page 15: ... 013764_001 a USB port b Hand strap holder c Serial connector d Power connector 013776_001 a b c a Communication LED b GPS LED c Power LED Bottom panel of the Zenius5 LED indicators Instrument Components 15 en ...

Page 16: ...g k l a Left softkey b Send key c Function key d Camera key e Power key f Numeric keys and alternative function keys g Right softkey h End key i Backspace key j Start key k Enter key l Collect key Keypad Instrument Components 16 en ...

Page 17: ...tion key Switches the alterative functions of the numeric keys on or off If the alternative functions are switched on the icon Fn appears in the navigation bar Camera key Press to open camera app If camera app is opened Press to take a picture Power key Turns the Zenius5 on or off Functions of the keys Instrument Components 17 en ...

Page 18: ...s the command shown on the bottom right corner of the screen End key Ends or rejects a call Returns to the start screen Backspace key Press to backspace over one character in a text editable field Windows key Press to open the start menu Instrument Components 18 en ...

Page 19: ...Key Function Enter key Press to confirm selections Collect key Press to record data during measurements Depending on 3rd party software implementation Instrument Components 19 en ...

Page 20: ...s5 on a flat and stable surface or hold the device in your hand 2 Ensure that either the device is connected with the AC power adapter or the batteries are charged up Turning on the Zenius5 step by step Instrument Components 20 en ...

Page 21: ...the main screen is displayed the Zenius5 is ready to use 1 Press the Power key for at least 3 seconds to open the Power Off menu Within the menu the following options are available OK The operating system shuts down and the device is turned off Cancel Close the Power Off menu and return to the main screen Turning off the Zenius5 step by step Instrument Components 21 en ...

Page 22: ...K After turning off the Zenius5 wait for at least 5 seconds before turning on the device again To activate the sleep mode of Zenius5 do the following The Zenius5 must be switched on Sleep mode acti vation step by step Instrument Components 22 en ...

Page 23: ...he Zenius5 enters the sleep mode The LED power indicator turns to green 2 Press the Power key again to resume operation The LED communication indicator stays green during sleep mode Any incoming call ends the sleep mode Instrument Components 23 en ...

Page 24: ...2 Operation 2 1 Inserting and Charging the Battery 100 240 V 5b 5a 4b 4b 4a 2a 2a 2a 2b 3b 5s OFF 1 3a 100 2 0014003_001 0014003_001 Inserting and charging step by step Operation 24 en ...

Page 25: ...ment attach the bottom side of the battery to the compartment at an angle and then lower the upper side to engage the connector 4 Reattach the compartment cover by inserting it bottom first Fit the latch handle into place Secure the latch by turning it clock wise to the horizontal lock position The IP rating is only ensured if the battery compart ment is attached correctly 5 Attach the AC Adapter ...

Page 26: ...initial charging takes approximately 6 hours 2 2 Inserting and Removing a SIM Card and SD Card Keep the card dry Use it only within the specified temperature range Do not bend the card Protect the card from direct impacts Failure to follow these instructions could result in data loss and or perma nent damage to the card Operation 26 en ...

Page 27: ...ive surface or static shielded bag when they are not in the chassis Apply general practice for working with static sensitive devices when you open the device insert the SIM or SD card and closing the device Discharge any static charge before opening the device and working with the SIM or SD card The device must not be subject to high electrostatic potentials when it is open Minimise contact with i...

Page 28: ...2a 2b 3 5s OFF 1 5 5 6 6 4b 4a 0014004_001 The slots for the SIM card and the SD card are inside the battery com partment of the Zenius5 Insert and remove a SIM Card or a SD Card step by step Operation 28 en ...

Page 29: ... Slide the SD card firmly into the upper slot b Slide the SIM card with the chip facing down firmly into the bottom slot Do not force the card into the slot The card should be held with the contacts facing the slot 5 Insert the battery back into the battery compartment 6 Reattach the compartment cover by inserting it bottom first Fit the latch handle into place Secure the latch by turning it clock...

Page 30: ...chnical Data Temperature Operating temperature 30 C to 60 C Storage temperature 40 C to 80 C Protection against water dust and sand IP65 IEC60529 Dust tight Environmental specifications Technical Data 30 en ...

Page 31: ...ation are to be effectively coun teracted by periodically drying out the device Vibration Protection Withstands strong vibration during operation compli ance with MIL STD 810G method 514 6E I Drops Protection Withstands 1 2 m drop Technical Data 31 en ...

Page 32: ...nsulted at http www geomax positioning com Downloads htm Class 1 equipment according European Directive 2014 53 EU RED can be placed on the market and be put into service with out restrictions in any EEA Member state The conformity for countries with other national regulations not covered by the FCC part 15 22 and 24 or European directive 2014 53 EU has to be approved prior to use and operation Co...

Page 33: ......

Page 34: ...GeoMax AG www geomax positioning com 853602 1 1 0en Original text 853602 1 1 0en 2018 GeoMax AG Widnau Switzerland ...

Page 35: ...GeoMax Zenius5 Serie Quick Guide Version 1 1 Deutsch ...

Page 36: ...ie das Produkt verwenden Dieser Quick Guide enthält Hinweise zur ersten Verwendung sowie Anweisungen zur Einrichtung und zum Betrieb des Geräts Bewahren Sie die Dokumentation auf Name Beschreibung Format Zenius5 Quick Guide Gibt einen Überblick über das Produkt Vorgesehen für einen schnellen Überblick ü ü Erwerb Verfügbare Dokumentation 36 de ...

Page 37: ... Produkts notwendigen Grund informationen Sie liefert einen Überblick über das Produkt die technischen Daten und Sicherheitshinweise ü Die vollständige Zenius5 Dokumentation Software finden Sie auf der GeoMax Website Fernbedienung des Produkts Datenübertragung mit externen Geräten Verwendungs zweck 37 de ...

Page 38: ...ation oder sachwidrige Verwendung die schwere Personenschäden oder den Tod zur Folge haben kann wenn sie nicht vermieden wird VOR SICHT Gebrauchsgefahr oder sachwidrige Verwendung die geringe bis mittlere Personenschäden bewirken kann HINWEIS Gebrauchsgefahr oder sachwidrige Verwendung die erhebliche Sach Vermögens oder Umweltschäden bewirken kann Nutzungsinformation die dem Benutzer hilft das Pro...

Page 39: ... Körper des Benutzers Gegenmaßnahmen Das Gerät muss in einem Abstand von wenigstens 10 mm zum Körper gehalten werden Schutz des Produkts gegen Erschütterung und Vibration Periodische Durchführung von funktionalen Tests besonders wenn das Produkt heruntergefallen ist für eine lange Periode gelagert wurde oder transportiert wurde Die Produkte von GeoMax werden durch Lithiumakkus mit Energie versorgt...

Page 40: ...n GeoMax hat Richtlinien bezüglich Transport und Versand von GeoMax Produkten mit Lithiumakkus erstellt Wir bitten Sie vor jedem Transport eines GeoMax Produkts die Richtlinien auf unserer Webseite http www geomax positioning com dgr zu konsultieren um sicherzugehen dass die GeoMax Produkte ent sprechend der IATA Gefahrgutvorschriften korrekt transportiert werden Beschädigte oder defekte Akkus dür...

Page 41: ... ist nur für Batterien Stromadapter oder Dockingsta tion gültig Das Instrument verfügt standardmäßig über einen SD Kartenschacht Eine SD Karte kann eingelegt und wieder entfernt werden Siehe Einsetzen und Entnehmen einer SIM bzw SD Karte Schritt für Schritt Speichermedium 41 de ...

Page 42: ...ten 0014001_001 a b c d f g e h i j e a Zenius5 b Wiederaufladbare Batterie ZBA700 c Eingabestift d Handriemen e Schaltnetzteil f Mini USB Kabel g USB OTG Kabel h Batterieladegerät ZCH700 optional i Quick Guide j Displayschutz Zenius5 Paket Komponenten des Produkts 42 de ...

Page 43: ...013752_001 g f e d c b a a Kommunikations LED b GPS LED c Strom LED d Bildschirm e Tastenfeld f Ein Aus Taste g Mikrofon Vorderseite des Zenius5 Komponenten des Produkts 43 de ...

Page 44: ..._001 c d a b e f a Kamera b Lautsprecher c Handriemenhalter d Hebel zum Lösen des Batteriefachs e Batterie SIM Karten und SD Karten fach f Handriemenhalter Rückseite des Zenius5 Komponenten des Produkts 44 de ...

Page 45: ...3764_001 a USB Anschluss b Handriemenhalter c Serieller Anschluss d Stromanschluss 013776_001 a b c a Kommunikations LED b GPS LED c Strom LED Unterseite des Zenius5 LED Indikatoren Komponenten des Produkts 45 de ...

Page 46: ...y b Send Taste c Funktionstaste d Kamerataste e Ein Aus Taste f Numerische Tasten und alternative Funk tionstasten g Rechter Softkey h End Taste i Zurück Taste j Start Taste k Eingabetaste l Aufzeichnungstaste Tastenfeld Komponenten des Produkts 46 de ...

Page 47: ... Schaltet die alternativen Funktionen auf den numerischen Tasten ein oder aus Wenn die alternativen Funktionen eingeschaltet sind erscheint das Symbol Fn in der Navigationsleiste Kamerataste Öffnet die Kamera App Wenn die Kamera App bereits geöffnet ist Nimmt ein Bild auf Ein Aus Taste Schaltet den Zenius5 ein oder aus Tastenfunktio nen Komponenten des Produkts 47 de ...

Page 48: ... Befehl in der unteren rechten Ecke des Bildschirms aus End Taste Beendet einen Anruf oder lehnt diesen ab Ruft den Start Bild schirm auf Zurück Taste Setzt ein Zeichen in einem editierbaren Textfeld zurück Start Taste Windows Taste Öffnet das Startmenü Komponenten des Produkts 48 de ...

Page 49: ...Tast e Funktion Eingabetaste Bestätigt eine Auswahl Aufzeichnungstaste Zeichnet während einer Messung Daten auf Abhängig von der Implementierung von Drittanbieter Software Komponenten des Produkts 49 de ...

Page 50: ...nd stabile Oberfläche legen oder das Gerät in der Hand halten 2 Sicherstellen dass das Gerät entweder mit einem AC Netzteil verbunden ist oder die Batterien geladen sind Einschalten des Zenius5 Schritt für Schritt Komponenten des Produkts 50 de ...

Page 51: ...ird ist der Zenius5 betriebsbereit 1 Die Ein Aus Taste wenigstens 3 Sekunden lang gedrückt halten um das Menü Power Off zu öffnen Im Menü sind folgende Optionen verfügbar OK Das Betriebssystem fährt herunter und das Gerät wird abgeschaltet Cancel Das Menü Power Off wird geschlossen und der Hauptbildschirm wird aufgerufen Ausschalten des Zenius5 Schritt für Schritt Komponenten des Produkts 51 de ...

Page 52: ...Ausschalten des Zenius5 wenigstens 5 Sekunden war ten bevor das Gerät wieder eingeschaltet wird Den Schlafmodus des Zenius5 wie folgt aktivieren Der Zenius5 muss eingeschaltet werden Aktivierung des Schlafmodus Schritt für Schritt Komponenten des Produkts 52 de ...

Page 53: ...alten Der Zenius5 wechselt in den Schlafmodus Die Strom LED wird grün 2 Zum Weiterarbeiten die Ein Aus Taste erneut drücken Die Kommunikations LED bleibt im Schlafmodus grün Einge hende Anrufe beenden den Schlafmodus Komponenten des Produkts 53 de ...

Page 54: ...2 Bedienung 2 1 Einsetzen und Laden der Batterie 100 240 V 5b 5a 4b 4b 4a 2a 2a 2a 2b 3b 5s OFF 1 3a 100 2 0014003_001 0014003_001 Einsetzen und Laden Schritt für Schritt Bedienung 54 de ...

Page 55: ...tere Ende der Bat terie im Winkel an das Fach anlegen und dann das obere Ende nach unten in den Anschluss einrasten lassen 4 Die Abdeckung wieder anbringen dabei zunächst das untere Ende ansetzen Den Hebel zum Lösen des Batteriefachs im Uhr zeigersinn bis in die horizontale verriegelte Stellung drehen Die Schutzart ist nur dann gewährleistet wenn das Batteriefach ordnungsgemäß geschlossen ist 5 Da...

Page 56: ...zu laden Der erste Ladevorgang dauert etwa 6 Stunden 2 2 Einsetzen und Entnehmen einer SIM oder SD Karte Karte vor Nässe schützen Karte nur im vorgeschriebenen Temperaturbereich verwenden Karte nicht verbiegen Karte vor direkten Stößen schützen Bei Nichtbeachtung dieser Hinweise können Datenverlust und oder dauer hafte Schäden der Karte auftreten Bedienung 56 de ...

Page 57: ...egenmaßnahmen 1 Das mechanisch verschlossene Gerätegehäuse sollte nur von erfahrenem Personal geöffnet werden 2 Verwenden Sie die ganze Zeit über ein Erdungsarmband 3 Legen Sie die elektronischen Bauteile auf eine elektrostatisch ableitfähige Oberfläche oder in einen elektrostatisch abgeschirm ten Beutel wenn die Bauteile sich nicht im Gehäuse befinden Bedienung 57 de ...

Page 58: ...ngen müssen vor dem Öffnen des Geräts und dem Arbeiten mit der SIM bzw SD Karte abgeleitet werden Das Gerät darf während es geöffnet ist keinen hohen elektrostati schen Potentialen ausgesetzt werden Das Berühren interner Komponenten des Geräts muss so weit wie möglich vermieden werden Entladungen statischer Elektrizität in der Nähe des Geräts während die SIM bzw SD Karte eingesetzt wird sind zu ve...

Page 59: ...b 3 5s OFF 1 5 5 6 6 4b 4a 0014004_001 Die Schächte für die SIM Karte und die SD Karte befinden sich im Batteriefach des Zenius5 Einsetzen und Entnehmen einer SIM bzw SD Karte Schritt für Schritt Bedienung 59 de ...

Page 60: ...D Karte fest in den oberen Schacht einschieben b Die SIM Karte mit dem Chip nach unten fest in den unteren Schacht einschieben Hierbei keine Gewalt anwenden Die Karte sollte so gehalten werden dass die Kontakte in Richtung des Schachts weisen 5 Die Batterie wieder in das Batteriefach einsetzen 6 Die Abdeckung wieder anbringen dabei zunächst das untere Ende ansetzen Den Hebel zum Lösen des Batterie...

Page 61: ...3 Technische Daten Temperatur Betriebstemperatur 30 C bis 60 C Lagertemperatur 40 C bis 80 C Schutzart IP65 IEC 60529 Staubdicht Umweltspezifika tionen Technische Daten 61 de ...

Page 62: ... Kondensation sollte durch regelmäßiges Austrocknen des Geräts entgegenge wirkt werden Vibration Schutz Widersteht starken Erschütterungen im Betrieb gemäß MIL STD 810G Methode 514 6E I Stürze Schutz Stoßfest aus 1 2 m Fallhöhe Technische Daten 62 de ...

Page 63: ... Downloads htm eingesehen werden Geräte der Klasse 1 entsprechend der Europäischen Richtlinie 2014 53 EU RED können ohne Einschränkung in jedem Mit gliedsstaat des EWR in den Verkehr gebracht und in Betrieb genommen werden In Ländern mit nationalen Vorschriften die nicht durch die Europä ische Richtlinie 2014 53 EU oder FCC Teil 15 22 und 24 abgedeckt sind sind die Bestimmungen und Zulassungen für...

Page 64: ...GeoMax AG www geomax positioning com 853602 1 1 0de Originaltext 853602 1 1 0en 2018 GeoMax AG Widnau Schweiz ...

Page 65: ...GeoMax Zenius5 Series Guía Rápida Versión 1 1 Español ...

Page 66: ...cto lea y siga las instrucciones del Manual de uso disponible en la página web de GeoMax Esta Guía Rápida contiene las primeras indicaciones de uso así como las instrucciones iniciales básicas para configurar el producto y utili zarlo Guarde toda la documentación para futuras consultas Adquisición 66 es ...

Page 67: ...iene todas las ins trucciones necesarias para manejar el pro ducto de forma básica Ofrece información general sobre el producto así como datos técnicos e instrucciones de seguridad ü Visite la página web de GeoMax para acceder a toda la documenta ción y el software del Zenius5 Control remoto del producto Comunicación de datos con equipos externos Documentación disponible Uso procedente 67 es ...

Page 68: ...uación de riesgo potencial o de uso ina decuado que en caso de no evitarse puede ocasio nar lesiones graves o incluso la muerte ATEN CIÓN Indica una situación de riesgo potencial o de uso ina decuado que en caso de no evitarse puede ocasio nar lesiones menores o moderadas AVISO Indica una situación de riesgo potencial o de uso ina decuado que en caso de no evitarse puede ocasio nar daños materiale...

Page 69: ...tener el dispositivo demasiado cerca del cuerpo durante el uso puede provocar riesgos para la salud Este dispositivo se ha probado para operaciones típicas cerca del cuerpo por ejemplo en modo portátil con el dispositivo a 10 mm del cuerpo del usuario Medidas preventivas Utilice el dispositivo a una distancia mínima de 10 mm del cuerpo 69 es ...

Page 70: ...ntados por baterías de litio Las baterías de litio pueden ser peligrosos en ciertas condiciones y pueden representar un peligro para la seguridad En ciertas condiciones las bate rías de litio pueden recalentarse y provocar un incendio Al llevar o enviar el GeoMax producto con baterías de litio a bordo de un avión comercial debe hacerlo de acuerdo con los IATA Dangerous Goods Regulations Cuidados y...

Page 71: ...itioning com dgr para asegurarse de que se ajustan los IATA Dangerous Goods Regula tions y que los GeoMax productos pueden ser transportados correctamente Baterías Dañadas o defectuosas están prohibidas de ser llevadas o transportadas a bordo de cualquier aeronave Por lo tanto asegúrese de que la condición de cualquier batería es segura para el transporte No deseche el producto con la basura domés...

Page 72: ...as el adaptador de ali mentación o la docking station El instrumento cuenta de serie con una ranura para una tarjeta SD Se puede insertar y extraer una tarjeta SD Consultar Introducir y extraer una tarjeta SIM o SD paso a paso Dispositivo de memoria 72 es ...

Page 73: ... 0014001_001 a b c d f g e h i j e a Zenius5 b Batería recargable ZBA700 c Puntero d Correa de mano e Fuente de alimentación f Cable mini USB g Cable USB OTG h Cargador de baterías ZCH700 opcional i Guía rápida j Protección de cristal Paquete Zenius5 Componentes del instrumento 73 es ...

Page 74: ...013752_001 g f e d c b a a LED de comunicación b LED de GPS c LED de energía d Pantalla e Teclado f Tecla de encendido g Micrófono Parte frontal del Zenius5 Componentes del instrumento 74 es ...

Page 75: ... c Enganche para correa de mano d Palanca de desbloqueo para comparti mento de batería e Compartimento con ranuras para batería tarjeta SIM y tarjeta SD f Fijación para correa de mano Parte trasera del Zenius5 Componentes del instrumento 75 es ...

Page 76: ...to USB b Enganche para correa de mano c Conector serie d Conector de alimentación 013776_001 a b c a LED de comunicación b LED de GPS c LED de energía Panel inferior del Zenius5 Indicadores LED Componentes del instrumento 76 es ...

Page 77: ...c Tecla de función d Tecla de cámara e Tecla de encendido f Teclas numéricas y teclas de funciones alternativas g Tecla de función derecha h Tecla End i Tecla de retroceso j Tecla de inicio k Tecla de introducción l Tecla de recopilación Teclado Componentes del instrumento 77 es ...

Page 78: ...iva las funciones alternativas de las teclas numéri cas Si las funciones alternativas están activadas el símbolo Fn se muestra en la barra de navegación Tecla de cámara Pulse para abrir la aplicación de la cámara Si la aplicación de la cámara está abierta pulse para tomar una imagen Tecla de encendido Enciende o apaga el Zenius5 Funciones de las teclas Componentes del instrumento 78 es ...

Page 79: ...strado en la parte inferior derecha de la pantalla Tecla End Finaliza o rechaza una llamada Regresa a la pantalla de inicio Tecla de retroceso Pulse para retroceder y eliminar un carácter en un campo de texto editable Tecla de Windows Pulse para abrir el menú de inicio Componentes del instrumento 79 es ...

Page 80: ...Tecla de introducción Pulse para confirmar selecciones Tecla de recopilación Pulse para registrar datos durante las mediciones En función de la implementación del software de terceros Componentes del instrumento 80 es ...

Page 81: ...cie estable y lisa o sostenga el dispositivo en sus manos 2 Asegúrese de que el dispositivo esté conectado al adaptador de alimentación CA o de que las baterías estén totalmente cargadas Encender el Zenius5 paso a paso Componentes del instrumento 81 es ...

Page 82: ... pantalla principal el Zenius5 ya está listo para usarse 1 Pulse la tecla de encendido durante al menos 3 segundos para abrir el menú de apagado Power Off Dentro del menú están disponibles las siguientes opciones OK el sistema operativo se apaga al igual que el disposi tivo Cancel el menú Power Off se cierra y se regresa a la pantalla principal Apagar el Zenius5 paso a paso Componentes del instrum...

Page 83: ...opción OK Después de apagar el Zenius5 espere al menos 5 segundos antes de encenderlo de nuevo Para activar el modo de ahorro del Zenius5 El Zenius5 debe estar encendido Activación del modo de ahorro paso a paso Componentes del instrumento 83 es ...

Page 84: ...horro El indicador LED de energía cambia a color verde 2 Pulse de nuevo la tecla de encendido para reanudar el funciona miento El indicador LED de comunicación permanece de color verde durante el modo de ahorro La entrada de una llamada finaliza el modo de ahorro Componentes del instrumento 84 es ...

Page 85: ...2 Funcionamiento 2 1 Inserción y carga de la batería 100 240 V 5b 5a 4b 4b 4a 2a 2a 2a 2b 3b 5s OFF 1 3a 100 2 0014003_001 0014003_001 Insertar y cargar la batería paso a paso Funcionamiento 85 es ...

Page 86: ...de la batería en el compartimento en ángulo y a conti nuación baje la parte superior para enganchar el conector 4 Vuelva a colocar la tapa del compartimento insertando la parte inferior primero Mueva la palanca de cierre a su posición Ase gure el cierre girando la palanca en sentido horario hasta la posi ción horizontal de bloqueo El índice IP67 se garantiza exclusivamente si el com partimento de ...

Page 87: ...i cial tarda aproximadamente 6 horas 2 2 Introducir y retirar una tarjeta SIM y una tarjeta SD Conserve seca la tarjeta Utilícela únicamente en el rango de temperatura especificado No doble la tarjeta Proteja la tarjeta de golpes directos No respetar estas instrucciones puede derivar en pérdida de datos y o en daños permanentes a la tarjeta Funcionamiento 87 es ...

Page 88: ... sensibles a la electricidad estática Medidas preventivas 1 Únicamente personal con experiencia deberá abrir la carcasa mecánica del dispositivo 2 Utilice una correa de muñeca a tierra todo el tiempo 3 Coloque todos los componentes electrónicos en una superficie de disipación estática o en una bolsa con protección estática si no están en el chasis Funcionamiento 88 es ...

Page 89: ...quier carga estática antes de abrir el dispositivo y tra bajar con la tarjeta SIM o SD El dispositivo no debe estar sometido a altos potenciales electrostáti cos cuando se encuentre abierto Minimice el contacto con los componentes internos del dispositivo Evite cualquier descarga de electricidad estática cerca del dispositivo al introducir la tarjeta SIM o SD Funcionamiento 89 es ...

Page 90: ... 5s OFF 1 5 5 6 6 4b 4a 0014004_001 Las ranuras para la tarjeta SIM y SD se encuentran dentro del com partimento de la batería del Zenius5 Introducir y extraer una tar jeta SIM o SD paso a paso Funcionamiento 90 es ...

Page 91: ...o de la ranura supe rior b Deslice firmemente la tarjeta SIM con el chip hacia abajo dentro de la ranura inferior No fuerce la tarjeta en la ranura Sostenga la tarjeta con los contactos apuntando hacia la ranura 5 Introduzca la parte trasera de la batería en el compartimento de la batería 6 Vuelva a colocar la tapa del compartimento insertando la parte inferior primero Mueva la palanca de cierre a...

Page 92: ...Funcionamiento 92 es ...

Page 93: ...atura Temperatura de funcio namiento De 30 C a 60 C Temperatura de alma cenamiento De 40 C a 80 C Protección contra el agua el polvo y la arena IP65 IEC60529 Estanco al polvo Especificaciones ambientales Datos técnicos 93 es ...

Page 94: ...contrarrestar de forma efectiva secando periódicamente el disposi tivo Vibración Protección Resiste vibraciones intensas durante el funciona miento cumple con las normativas MIL STD 810G método 514 6E I Caídas Protección Resiste una caída de 1 2 m Datos técnicos 94 es ...

Page 95: ... www geomax positioning com Downloads htm Un equipo de clase 1 según la Directiva comunitaria 2014 53 UE RED puede comercializarse y ponerse en servicio sin restriccio nes en cualquier estado miembro del EEE La conformidad para países con otras regulaciones nacionales que no estén cubiertas por la FCC parte 15 22 y 24 o la Directiva comunitaria 2014 53 UE debe ser aprobada antes del uso y funcio n...

Page 96: ...GeoMax AG www geomax positioning com 853602 1 1 0es Traducción de la versión original 853602 1 1 0en 2018 GeoMax AG Widnau Switzerland ...

Page 97: ...Série GeoMax Zenius5 Guide abrégé Version 1 1 Français ...

Page 98: ...e l utilisateur disponible sur le site Internet GeoMax avant d utiliser le produit Ce guide abrégé renferme des consignes d emploi ainsi que des ins tructions de base pour la mise en station du produit et son utilisation Conserver toute la documentation afin de pouvoir la consulter ulté rieurement Acquisition 98 fr ...

Page 99: ...5 Toutes les instructions nécessaires à une utilisation de base de l équipement sont regroupées dans le manuel de l utilisateur Il fournit également un aperçu général du produit ainsi que des informations techni ques et des avis de sécurité ü Consulter le site Internet GeoMax pour obtenir la documentation et les logiciels Zenius5 Documentation disponible 99 fr ...

Page 100: ...se entraî nant de graves blessures voire la mort si elle n est pas évitée AVERTIS SEMENT Indique une situation potentiellement périlleuse pou vant entraîner de graves blessures voire la mort si elle n est pas évitée ATTEN TION Indique une situation potentiellement dangereuse ou une utilisation non prévue qui si elle n est pas évitée peut entraîner des blessures légères ou moyennes Utilisation con ...

Page 101: ...e n est pas évitée peut causer des dommages matériels conséquents des atteintes sensibles à l environnement ou un pré judice financier important Paragraphes importants auxquels il convient de se référer en pratique car ils permettent au produit d être utilisé de manière efficace et techniquement correcte 101 fr ...

Page 102: ...re l appareil et le corps de l utilisateur Mesures préventives Utiliser l appareil en conservant une distance d au moins 10 mm avec le corps humain Protégez le produit contre les chocs et vibrations Effectuez régulièrement des tests de fonctionnement notamment après une chute du produit un stockage ou un transport de longue durée Les produits de GeoMax sont alimentés par des batteries au lithium E...

Page 103: ... a établi des consignes pour le transport des produits GeoMax et l expédition de produits GeoMax avec des batteries au lithium Avant de transporter un produit GeoMaxhttp www geomax positioning com dgr il convient de consulter ces consignes sur le site Internet afin de veiller au respect des dis positions IATA sur les matières dangereuses et au transport cor rect des produits GeoMax Le transport ou...

Page 104: ...lement aux batteries à l adaptateur d ali mentation et à la station d accueil L instrument est équipé de série d un emplacement pour carte SD Une carte SD peut être insérée et retirée Se reporter au paragraphe Procédure d insertion et de retrait d une carte SIM ou SD Périphérique mémoire 104 fr ...

Page 105: ... a b c d f g e h i j e a Zenius5 b Batterie rechargeable ZBA700 c Stylet capacitif d Sangle e Alimentation électrique variable f Câble mini USB g Câble OTG USB h Chargeur de batterie ZCH700 en option i Guide abrégé j Protection pour la vitre Pack Zenius5 Éléments d instrument 105 fr ...

Page 106: ...013752_001 g f e d c b a a LED de communication b LED GPS c LED d alimentation d Écran e Clavier f Touche Marche Arrêt g Microphone Face avant du Zenius5 Éléments d instrument 106 fr ...

Page 107: ...reil photo b Haut parleur c Support pour sangle d Fermoir du compartiment de batterie e Compartiment avec emplacements pour batterie carte SIM et carte SD f Fixation de la sangle Face arrière du Zenius5 Éléments d instrument 107 fr ...

Page 108: ... Port USB b Support de la sangle c Connecteur série d Connecteur d alimentation 013776_001 a b c a LED de communication b LED GPS c LED d alimentation Panneau infé rieur du Zenius5 Témoins LED Éléments d instrument 108 fr ...

Page 109: ...c Touche de fonction d Touche Appareil photo e Touche Marche Arrêt f Touches numériques et touches de fonc tion alternative g Touche de fonction droite h Touche End i Touche Retour arrière j Touche Démarrage k Touche Entrée l Touche Collecter Clavier Éléments d instrument 109 fr ...

Page 110: ...onctions alternatives des touches numéri ques Si les fonctions alternatives sont activées l icône Fn appa raît dans la barre de navigation Touche Appareil photo Appuyer pour ouvrir l application Appareil photo Si l application Appareil photo est ouverte appuyer pour prendre une photo Touche Marche Arrêt Appuyer pour allumer ou éteindre le Zenius5 Fonctions des touches Éléments d instrument 110 fr ...

Page 111: ...hée dans le coin inférieur droit de l écran Touche End Raccrocher ou rejeter un appel Retourner à l écran de démar rage Touche Retour arrière Appuyer sur la touche pour revenir en arrière d un caractère dans un champ de texte éditable Touche Windows Appuyer pour ouvrir le menu de démarrage Éléments d instrument 111 fr ...

Page 112: ...e Fonction Touche Entrée Appuyer pour confirmer les sélections Touche Collecter Appuyer pour enregistrer des données lors d une mesure Dépend de l implémentation du logiciel tiers Éléments d instrument 112 fr ...

Page 113: ...sur une surface plane et ferme ou tenir l appa reil à la main 2 S assurer que l appareil est raccordé à l aide de l adaptateur CA ou que les batteries sont chargées Procédure de mise en marche du Zenius5 Éléments d instrument 113 fr ...

Page 114: ...que l écran principal est affiché le Zenius5 est prêt à l emploi 1 Appuyer sur la touche Marche Arrêt pendant au moins 3 secon des pour ouvrir le menu Power Off Dans le menu sélectionner l une des options suivantes OK le système d exploitation s arrête et l appareil s éteint Cancel fermer le menu Power Off et retourner à l écran principal Procédure d ar rêt du Zenius5 Éléments d instrument 114 fr ...

Page 115: ...rès la mise hors tension du Zenius5 attendre au moins 5 secondes avant de le remettre sous tension Pour activer le mode veille du Zenius5 effectuer les opérations suivantes Le Zenius5 doit être allumé Procédure d acti vation du mode veille Éléments d instrument 115 fr ...

Page 116: ... passe en mode veille La LED d alimentation devient verte 2 Appuyer à nouveau sur la touche Marche Arrêt pour le remettre en marche La LED de communication reste verte en mode veille L appareil sort du mode veille lors de la réception d un appel Éléments d instrument 116 fr ...

Page 117: ...2 Utilisation 2 1 Insertion et charge de la batterie 100 240 V 5b 5a 4b 4b 4a 2a 2a 2a 2b 3b 5s OFF 1 3a 100 2 0014003_001 0014003_001 Procédure d in sertion et de charge Utilisation 117 fr ...

Page 118: ...terie au niveau d un angle du comparti ment puis abaisser la partie supérieure pour enclencher le con necteur 4 Reposer le couvercle du compartiment de batterie en insérant d abord la partie inférieure Remettre la patte de fixation en place Sécuriser la patte de fixation en la tournant dans le sens horaire jusqu à atteindre la position horizontale verrouillée L indice de protection est seulement a...

Page 119: ...s 2 2 Insertion et retrait d une carte SIM et d une carte SD Conservez la carte au sec Ne l utilisez que dans les limites de la plage de température prescrite Ne faites pas subir de flexion à la carte Protégez la carte de tout impact direct Le non respect de ces consignes peut entraîner des pertes de données et ou causer des dommages irréversibles à une carte Utilisation 119 fr ...

Page 120: ...ricité statique Mesures préventives 1 Seul un personnel expérimenté devrait ouvrir le boîtier mécani que de l appareil 2 Utiliser en permanence un bracelet de mise à la terre 3 Poser tous les composants électroniques sur une surface dissi pant les charges statiques ou dans un étui protégé contre les charges statiques s ils ne se trouvent pas dans le châssis Utilisation 120 fr ...

Page 121: ...l appa reil Décharger toute charge statique avant l ouverture de l appareil ou toute manipulation de la carte SIM ou SD L appareil ne doit pas être soumis à des potentiels électrostatiques élevés lorsqu il est ouvert Limiter au maximum le contact avec les composants internes de l ap pareil Éviter toute décharge d électricité statique près de l appareil lors de l introduction de la carte SIM ou SD ...

Page 122: ...1 5 5 6 6 4b 4a 0014004_001 Les emplacements de la carte SIM et de la carte SD se trouvent à l inté rieur du comparti ment de batterie du Zenius5 Procédure d in sertion et de retrait d une carte SIM ou SD Utilisation 122 fr ...

Page 123: ...Introduire la carte SIM fermement dans l emplacement infé rieur avec la puce orientée vers le bas Ne pas forcer la carte à pénétrer dans son emplace ment La carte doit être tenue de sorte que les con tacts soient tournés vers l emplacement 5 Réinsérer la batterie dans le compartiment correspondant 6 Reposer le couvercle du compartiment de batterie en insérant d abord la partie inférieure Remettre ...

Page 124: ...Utilisation 124 fr ...

Page 125: ...ques Température Température d utilisa tion 30 C à 60 C Température de stoc kage 40 C à 80 C Protection contre l eau la poussière et le sable IP65 CEI60529 Étanche à la poussière Environnement Caractéristiques techniques 125 fr ...

Page 126: ...la condensation en séchant régulièrement l appareil Vibration Protection Supporte de fortes vibrations pendant le fonctionne ment conforme à MIL STD 810G méthode 514 6E I Chutes Protection Résistance à une chute de 1 2 m Caractéristiques techniques 126 fr ...

Page 127: ...http www geomax positioning com Downloads htm Équipement de classe 1 selon la directive européenne 2014 53 UE RED pouvant être commercialisé et mis en service sans aucune restriction dans tout pays membre de l EEE La conformité pour des pays dont la réglementation nationale n est couverte ni par les règles FCC partie 15 22 et 24 ni par la directive européenne 2014 53 UE est à faire approuver préal...

Page 128: ...GeoMax AG www geomax positioning com 853602 1 1 0fr Traduction de la version originale 853602 1 1 0en 2018 GeoMax AG Widnau Suisse ...

Page 129: ...Serie GeoMax Zenius5 Guida rapida Versione 1 1 Italiano ...

Page 130: ...eggere e rispettare le indicazioni del Manuale d uso disponibile sul sito GeoMax La presente guida rapida contiene le prime indicazioni per l uso oltre alle istruzioni iniziali di base per l installazione e l utilizzo del prodotto Conservare tutta la documentazione per consultarla in futuro Acquisto 130 it ...

Page 131: ...ne tutte le istruzioni necessarie per utilizzare il pro dotto a un livello base Contiene una descrizione sintetica del sistema oltre ai dati tecnici e alle norme di sicurezza ü Per la documentazione completa e il software dello GeoMax consul tare il sito web di Zenius5 Comando a distanza dello strumento Trasmissione dei dati con apparecchiature esterne Documentazione disponibile Uso conforme 131 i...

Page 132: ...otrebbero causare morte o lesioni gravi ATTEN ZIONE Indica una situazione potenzialmente pericolosa o un uso improprio che se non evitati potrebbero causare lesioni non gravi o moderatamente gravi AVVISO Indica una situazione potenzialmente pericolosa o un uso improprio che se non evitati potrebbero compor tare danni materiali economici e ambientali rilevanti Importante paragrafo da seguire per un...

Page 133: ... distanza di 10 mm dal corpo dell utilizzatore Precauzioni Usare il dispositivo tenendolo almeno a 10 mm di distanza dal corpo Proteggere il prodotto dagli urti e dalle vibrazioni Eseguire periodicamente controlli funzionali in particolare se lo stru mento è caduto è rimasto inutilizzato per molto tempo o è stato tra sportato I prodotti GeoMax sono alimentati con batterie al Litio Cura e trasporto...

Page 134: ... guida su Come portare prodotti GeoMax e Come spedire prodotti GeoMax con batterie al litio Prima di ogni trasporto di un prodotto GeoMax vi chiediamo di consultare queste linee guida sulla nostra pagina web http www geomax positioning com dgr per garantire che siano in conformità con le IATA Dangerous Goods Regulations e che i prodotti GeoMax siano trasportati correttamente Su qualsiasi aereomobi...

Page 135: ...o solo per le batterie l alimentatore e la docking station Lo strumento è dotato di uno slot per scheda SD di serie È possibile inse rire e rimuovere una scheda SD Consultare la sezione Procedura detta gliata per l inserimento e la rimozione di una scheda SIM o SD Dispositivo di memoria 135 it ...

Page 136: ... 0014001_001 a b c d f g e h i j e a Zenius5 b Batteria ricaricabile ZBA700 c Stilo capacitivo d Cinturino e Alimentatore esterno f Cavo Mini USB g Cavo USB OTG h Caricabatterie ZCH700 opzionale i Guida rapida j Protezione schermo Confezione dello Zenius5 Componenti dello strumento 136 it ...

Page 137: ...752_001 g f e d c b a a LED di comunicazione b LED GPS c LED di alimentazione d Schermo e Tastierino f Pulsante di alimentazione g Microfono Parte anteriore dello Zenius5 Componenti dello strumento 137 it ...

Page 138: ...otocamera b Altoparlante c Supporto per il cinturino d Leva di rilascio del vano batteria e Vano con slot per batteria scheda SIM e scheda SD f Fissaggio cinturino Parte posteriore dello Zenius5 Componenti dello strumento 138 it ...

Page 139: ...SB b Supporto per cinturino c Connettore seriale d Connettore di alimentazione 013776_001 a b c a LED di comunicazione b LED GPS c LED di alimentazione Parte inferiore dello Zenius5 Indicatori LED Componenti dello strumento 139 it ...

Page 140: ...ante funzione d Pulsante fotocamera e Pulsante di alimentazione f Pulsanti numerici e pulsanti funzione alternativi g Pulsante destra h Pulsante End i Pulsante backspace j Pulsante di inizio k Pulsante Invio l Pulsante di acquisizione Tastierino Componenti dello strumento 140 it ...

Page 141: ...ttiva o disattiva le funzioni alternative dei pulsanti numerici Quando le funzioni alternative sono attive nella barra di naviga zione viene visualizzata l icona Fn Pulsante fotocamera Consente di aprire l app della fotocamera Quando l app della fotocamera è aperta Premere per scattare una foto Pulsante di alimentazione Consente di accendere e spegnere lo Zenius5 Funzioni dei pul santi Componenti ...

Page 142: ... angolo inferiore destro dello schermo Pulsante End Consente di terminare o rifiutare una chiamata Consente di tor nare alla schermata iniziale Pulsante backspace Consente di cancellare il carattere precedente in un campo di testo modificabile Pulsante Windows Consente di accedere al menu iniziale Componenti dello strumento 142 it ...

Page 143: ...ne Pulsante Invio Consente di confermare la selezione Pulsante di acquisizione Consente di registrare i dati durante le misurazioni Dipende dall implementazione di software esterno Componenti dello strumento 143 it ...

Page 144: ...su una superficie piana e stabile oppure tenerlo in mano 2 Verificare che il dispositivo sia collegato all alimentazione o che le batterie siano cariche Procedura detta gliata di accen sione dello Zenius5 Componenti dello strumento 144 it ...

Page 145: ...chermata principale lo Zenius5 è pronto per l uso 1 Tenere premuto il pulsante di alimentazione per almeno 3 secondi per accedere al menu Power Off Nel menu sono disponibili le seguenti opzioni OK il sistema operativo si chiude e lo strumento si spegne Cancel il menu Power Off si chiude e si torna alla scher mata principale Procedura detta gliata di spegni mento dello Zenius5 Componenti dello stru...

Page 146: ...nius5 attendere almeno 5 secondi prima di riaccendere il dispositivo Per attivare la modalità di sospensione dello Zenius5 procedere come segue Lo Zenius5 deve essere acceso Procedura detta gliata di attiva zione della modalità di sospensione del Componenti dello strumento 146 it ...

Page 147: ...one Il LED di alimen tazione si illumina in verde 2 Premere nuovamente il tasto di accensione per riprendere a lavo rare In modalità di sospensione il LED della comunicazione rimane verde Un eventuale chiamata in arrivo determinerà l uscita dalla modalità di sospensione Componenti dello strumento 147 it ...

Page 148: ...namento 2 1 Inserimento e caricamento della batteria 100 240 V 5b 5a 4b 4b 4a 2a 2a 2a 2b 3b 5s OFF 1 3a 100 2 0014003_001 0014003_001 Procedura detta gliata per l inse rimento e la carica Funzionamento 148 it ...

Page 149: ...nferiore della bat teria nel vano in posizione inclinata quindi abbassare la parte superiore per inserire il connettore 4 Riposizionare il coperchio del vano inserendo prima l estremità inferiore Riposizionare l anello di blocco Fissare il blocco ruotan dolo in senso orario fino alla posizione orizzontale di blocco Il grado di protezione IP indicato è garantito solo se il vano batteria è chiuso co...

Page 150: ...niziale richiede circa 6 ore 2 2 Inserimento e rimozione della scheda SIM e della scheda SD Tenere asciutta la scheda Usarla solo a temperature comprese entro i limiti indicati Non piegare la scheda Proteggere la scheda dagli urti diretti Il mancato rispetto di queste istruzioni può comportare la perdita dei dati e o il danneggiamento della scheda Funzionamento 150 it ...

Page 151: ...i all elettricità statica Precauzioni 1 Solo personale autorizzato dovrebbe aprire le parti meccaniche dello strumento 2 Utilizzare sempre polsini anti statici 3 Posizionare tutti i componenti elettronici in una superficie dissi pativa o in una borsa anti statica quando non sono nel loro telaio Funzionamento 151 it ...

Page 152: ...entuale elettricità statica prima di aprire il dispositivo e di manipolare la SIM card o la scheda SD Quando il dispositivo è aperto non deve essere sottoposto a forti potenziali elettrostatici Ridurre al minimo i contatti con i componenti interni del dispositivo Evitare qualsiasi scarica di elettricità statica nei pressi del dispositivo quando si inserisce la scheda SIM o la scheda SD Funzionamen...

Page 153: ...5 5 6 6 4b 4a 0014004_001 Gli slot per la scheda SIM e la scheda SD si tro vano all interno del vano batteria dello Zenius5 Procedura detta gliata per l inse rimento e la rimozione di una scheda SIM o SD Funzionamento 153 it ...

Page 154: ...rire a fondo la scheda SD nello slot superiore b Inserire completamente nello slot inferiore la scheda SIM con il chip rivolto verso il basso Non forzare la scheda nello slot La scheda deve essere tenuta con i contatti rivolti verso lo slot 5 Reinserire la batteria nel vano batteria 6 Riposizionare il coperchio del vano inserendo prima l estremità inferiore Riposizionare l anello di blocco Fissare...

Page 155: ...peratura Temperatura di eserci zio Da 30 C a 60 C Temperatura di stoc caggio Da 40 C a 80 C Protezione dall acqua dalla polvere e dalla sabbia IP65 IEC60529 Ermetico alla polvere Specifiche ambientali Dati tecnici 155 it ...

Page 156: ... contrastare in modo efficace asciugando periodicamente il disposi tivo Vibrazioni Protezione Resiste a vibrazioni intense durante il funzionamento in conformità allo standard MIL STD 810G metodo 514 6E I Cadute Protezione Resiste a cadute da 1 2 m Dati tecnici 156 it ...

Page 157: ...ttp www geomax positioning com Downloads htm Gli strumenti di classe 1 ai sensi della direttiva europea 2014 53 UE RED possono essere commercializzati e utilizzati senza limitazioni in qualsiasi stato membro del SEE La conformità per i paesi in cui vigono altre disposizioni nazionali non coperte dalla direttiva FCC parte 15 22 e 24 o dalla direttiva europea 2014 53 UE deve essere approvata prima d...

Page 158: ...GeoMax AG www geomax positioning com 853602 1 1 0it Traduzione dal testo originale 853602 1 1 0en 2018 GeoMax AG Widnau Switzerland ...

Page 159: ...GeoMax Série Zenius5 Guia Rápido Versão 1 1 Português Brasil ...

Page 160: ... Manual do Usuário disponível no site GeoMax antes de usar o produto Este Guia Rápido contém instruções para o primeiro uso bem como instruções básicas iniciais para instalação e operação do produto Guarde toda a documentação para referência futura Aquisição 160 pt br ...

Page 161: ...das as instruções requeridas na opera ção básica do instrumento estão contidas neste Manual do Usuário Fornece a visão geral do produto junto com dados técni cos e diretivas de segurança ü Consulte o site GeoMax para toda a documentação todo o software do Zenius5 Controle remoto do produto Comunicação de dados com aplicações externas Documentação disponível Uso 161 pt br ...

Page 162: ...igosa ou de uma utilização não recomendada que se não for evitada pode provocar morte ou lesões corporais graves CUIDADO Indicação de uma situação potencialmente perigosa ou de uma utilização não recomendada que se não for evitada pode provocar lesões corporais ligeiras ou moderadas AVISO Indica uma situação de possível risco ou um uso não premeditado que se não for evitada pode resultar em danos ...

Page 163: ...DO Manter o dispositivo próximo demais do corpo humano durante a operação pode representar um risco à saúde Este dispositivo foi testado para operações típicas próximas ao corpo humano por exemplo no modo portátil com o dispositivo mantido a 10 mm afastado do corpo do usuário Precauções Uso o dispositivo no mínimo a 10 mm afastado do corpo humano 163 pt br ...

Page 164: ...io As baterias de Lítio podem ser perigosas em determinadas condições e podem representar um risco de segurança Em determinadas condições as baterias de Lítio podem superaquecer e pegar fogo Ao carregar ou despachar o seu produto GeoMax com bateria de Lítio a bordo de um avião comercial você deve fazê lo de acordo com os Regulamentações Sobre Mercadorias Peri gosas IATA Cuidados e transporte Regul...

Page 165: ...certeza de que você cumpre com as Regulamentações Sobre Produtos Peri gosos IATA e que o produto GeoMax pode ser transportado cor retamente Baterias defeituosas ou danificadas são proibidas de serem transportadas a bordo de qualquer aeronave Potanto tenha a certeza de que as condições de qualquer bateria estão seguras para transporte O produto não deve ser descartado juntamente com o lixo doméstic...

Page 166: ...egador de bateria adaptador de energia e docking station O instrumento possui uma porta padrão para cartão SD Pode se inserir ou remover um cartão SD Veja Inserir e remover um cartão SIM ou um car tão SD passo a passo Dispositivo de memória 166 pt br ...

Page 167: ...a b c d f g e h i j e a Zenius5 b Bateria recarregável do ZBA700 c Caneta capacitiva d Alça de mão e Fonte de alimentação cha veada f Cabo mini USB g Cabo USB OTG h Carregador de bateria ZCH700 opcional i Guia Rápido j Proteção para o vidro Embalagem do Zenius5 Componentes do instrumento 167 pt br ...

Page 168: ...013752_001 g f e d c b a a LED de Comunicação b LED GPS c Luz de energia d Tela e Teclado f Tecla liga desliga g Microfone Parte frontal do Zenius5 Componentes do instrumento 168 pt br ...

Page 169: ...falante c Suporte para a alça de mão d Levante a alavanca para o comparti mento da bateria e Compartimento com slots para bateria cartão SIM e cartão SD f Fixação da alça de mão Parte traseira do Zenius5 Componentes do instrumento 169 pt br ...

Page 170: ...Porta USB b Suporte da alça de mão c Conector serial d Conector de energia 013776_001 a b c a LED de Comunicação b LED GPS c Luz de energia Painel inferior do Zenius5 Luzes indicado ras Componentes do instrumento 170 pt br ...

Page 171: ...cla Enviar c Tecla de função d Tecla da câmera e Tecla liga desliga f Teclas numéricas e teclas de função alternativas g Tecla direita h Tecla End i Tecla retroceder j Tecla iniciar k Tela Enter l Tecla registrar Teclado Componentes do instrumento 171 pt br ...

Page 172: ...a as funções alternativas das teclas numéricas Se houver funções alternativas ligadas o ícone Fn aparece na barra de navegação Tecla da câmera Pressione para abrir o aplicativo da câmera Quando o aplicativo da câmera está aberto Pressionar para tirar uma foto Tecla liga desliga Liga ou desliga o Zenius5 Funções das teclas Componentes do instrumento 172 pt br ...

Page 173: ...xibido no canto inferior direito da tela Tecla End Finaliza ou rejeita uma chamada Retorna para a tela inicial Tecla retroceder Pressione para retroceder um caractere em uma campo de texto editável Tecla do Windows Pressione para abrir o menu inicial Componentes do instrumento 173 pt br ...

Page 174: ...a Função Tela Enter Aperte para confirmar as seleções Tecla registrar Aperte para registrar dados durante as medições Dependendo da implementação do software de terceiros Componentes do instrumento 174 pt br ...

Page 175: ...ície plana e estável ou segure o dispositivo na sua mão 2 Certifique se de que o dispositivo está conectado com o adapta dor de energia AC ou que as baterias estão carregadas Passo a passo para Ligar o Zenius5 Componentes do instrumento 175 pt br ...

Page 176: ...r Quando a tela principal é exibida o Zenius5 está pronto para uso 1 Pressione a tecla Liga Desliga por pelo menos 3 segundos para abrir o menu Power Off No menu as seguintes opções estão disponíveis OK O sistema operacional fecha e o dispositivo é desli gado Cancel Feche o menu Power Off e retorne para a tela principal Desligar o Zenius5 passo a passo Componentes do instrumento 176 pt br ...

Page 177: ...K Após desligar o Zenius5 espero pelo menos 5 segundos antes de ligar o dispositivo novamente Para Ativar o Modo de espero do Zenius5 faça o seguinte O Zenius5 deve ser ligado Passo a passo ativar o Modo de espera Componentes do instrumento 177 pt br ...

Page 178: ... no modo de espera O indicador LED acende a luz verde 2 Pressione a tecla Ligar Desligar novamente para continuar a ope ração O indicador de comunicação LED permanece verde durante p modo de espera Qualquer chamada que entra termina o modo de espera Componentes do instrumento 178 pt br ...

Page 179: ...2 Operação 2 1 Inserir e carregar a bateria 100 240 V 5b 5a 4b 4b 4a 2a 2a 2a 2b 3b 5s OFF 1 3a 100 2 0014003_001 0014003_001 Inserir e carre gar passo a passo Operação 179 pt br ...

Page 180: ...o lado de baixo da bateria no compartimento formando um ângulo e então abaixe o lado de cima para encaixar o conector 4 Recoloque a tampa do compartimento inserindo a parte de baixo primeiro Coloque a alavanca da trava no lugar Fixe a trava girando a no sentido horário para a posição de travamento hori zontal A classificação IP apenas é garantida se o comparti mento da bateria estiver encaixado co...

Page 181: ...rre gamento inicial leva aproximadamente 6 horas 2 2 Inserindo e Removendo o Cartão SIM e Cartão SD Mantenha o cartão seco Use somente dentro da temperatura especificada Não dobre o cartão Proteja o cartão de impactos diretos O não cumprimento destas instruções pode resultar em perda de dados e ou danos permanentes ao cartão Operação 181 pt br ...

Page 182: ...veis à eletricidade estática Precauções 1 Somente pessoas experientes devem abrir a caixa mecânica do dispositivo 2 Use uma pulseira de aterramento o tempo todo 3 Coloque todos os componentes eletrônicos em uma superfície estática dissipativa ou bolsa de estática blindada quando não estão no chassi Operação 182 pt br ...

Page 183: ...uer carga estática antes de abrir o dispositivo e tra balhar com o cartão SIM ou cartão SD O dispositivo não deve ser submetido a altos potenciais eletrostáticos quando ele estiver aberto Minimize o contato com os componentes internos do dispositivo Evite quaisquer descargas de eletricidade estática próximo ao disposi tivo e ao inserir o cartão SIM ou SD Operação 183 pt br ...

Page 184: ... 3 5s OFF 1 5 5 6 6 4b 4a 0014004_001 Os slots para car tão SIM e car tão SD estão den tro do comparti mento da bateria do Zenius5 Inserir e remo ver um car tão SIM ou um cartão SD passo a passo Operação 184 pt br ...

Page 185: ...o SD firmemente no compartimento superior b Insira firmemente o cartão SIM com o chip virado para baixo no compartimento inferior Não force o cartão na abertura O cartão deve ser segurado com os contatos virados para o slot 5 Insira a bateria de volta no compartimento da bateria 6 Recoloque a tampa do compartimento inserindo a parte de baixo primeiro Coloque a alavanca da trava no lugar Fixe a tra...

Page 186: ...icos Temperatura Temperatura de operação 30 C a 60 C Temperatura de armazenamento 40 C a 80 C Proteção contra água poeira e areia IP65 IEC60529 À prova de poeiras Especificações ambientais Dados técnicos 186 pt br ...

Page 187: ...ser eliminados de forma eficiente através da secagem periódica do dis positivo Vibração Proteção Resiste a forte vibração durante a operação em con formidade com MIL STD 810G método 514 6E I Quedas Proteção Resiste a quedas de 1 2 m Dados técnicos 187 pt br ...

Page 188: ... em http www geomax positioning com Downloads htm O Equipamento de Classe 1 de acordo com a Diretiva Europeia 2014 53 CE RED pode ser colocado no mercado e também colocado em serviço sem restrições em qualquer Estado membro do EEA conformidade para países com outras regulações nacionais não cobertas pela FCC part 15 22 e 24 ou pela Diretiva Europeia 2014 53 CE deve ser aprovada antes do uso e oper...

Page 189: ......

Page 190: ...GeoMax AG www geomax positioning com 853602 1 1 0pt br Traduzido do texto original 853602 1 1 0en 2018 GeoMax AG Widnau Suíça ...

Page 191: ...GeoMax Zenius5 Краткое руководство Версия 1 1 Русский ...

Page 192: ...ьтесь с Руководством пользователя которое доступно на веб сайте GeoMax Это краткое руководство содержит инструкции по первому использова нию а также начальные основные инструкции по настройке продукта и его эксплуатации Сохраните всю документацию для дальнейшего использования Покупка 192 ru ...

Page 193: ...ова теля Все инструкции необходимые для того чтобы эксплуатировать устройство на базо вом уровне содержатся в руководстве по эксплуатации Предоставляет обзор устрой ства вместе с техническими данными и пра вилами техники безопасности при эксплуата ции ü На сайте GeoMax есть вся документация программное обеспечение для Zenius5 Документация имеющаяся в наличии 193 ru ...

Page 194: ...или нанести персоналу серьезную травму ПРЕД УПРЕЖДЕНИЕ Указывает на потенциально опасную ситуацию или на неправильное использование инструмента которые могут привести к смерти или серьезной травме ОСТО РОЖНО Указывает на потенциально опасную ситуацию или на неправильное использование которые если их не избе жать могут привести к травмам легкой или средней тяжести Использование Символы 194 ru ...

Page 195: ...символом отмечены важные параграфы в кото рых содержатся рекомендации о технически правильном и эффективном использовании инструмента ОСТОРОЖНО Чрезмерная близость устройства к человеческому телу может причинить вред здоровью Устройсто прошло испытания на работе вблизи человеческого тела в ручном режиме на удалении 10 мм от тела Меры предосторожности Удаляйте устройство хотя бы на 10 мм от тела 19...

Page 196: ...от литиевых батарей средствами авиации должна осуществляться согласно Правилам IATA по опасным материалам GeoMax разработала Руководство по перевозке продуктов GeoMax и перемещению продуктов GeoMax с литиевыми бата реями Перед транспортировкой оборудования GeoMax прочитайте руководство по перевозке на сайте http www geomax positioning com dgr и убедитесь что не нарушаете Правила IATA по опасным ма...

Page 197: ...тилизироваться вместе с бытовыми отходами Батарея должна быть заряжена перед первым использованием инструмента Следующие рекомендации касаются батарей силовых адаптеров и док стан ций Прибор имеет слот для SD карты по умолчанию SD карта может быть вста влена или удалена Обратитесь к разделу Установка и извлечение карты SIM или SD пошаговая инструкция Запоминающее устройство 197 ru ...

Page 198: ...ты 0014001_001 a b c d f g e h i j e a Zenius5 b ZBA700 аккумуляторная батарея c Стилус d Ремень e Питание f Кабель MiniUSB g Кабель USB OTG h ZCH700 зарядное устрой ство опционально i Краткое руководство j Защита экрана Zenius5 страница Компоненты прибора 198 ru ...

Page 199: ...013752_001 g f e d c b a a Коммуникационный индикатор b Индикатор GPS c Индикатор питания d Экран e Клавиатура f Клавиша Питание g Микрофон Фронтовая часть Zenius5 Компоненты прибора 199 ru ...

Page 200: ... d a b e f a Камера b Динамик c Крепление ремня d Рычажок для вскрытия аккумуляторного отсека e Отсек со слотами для аккумулятора SIM карты и SD карты f Фиксатор ремешка Вид сзади Zenius5 Компоненты прибора 200 ru ...

Page 201: ...епление ремешка на руку c Серийный порт d Разъем питания 013776_001 a b c a Светодиодный индикатор состояния связи b Светодиодный индикатор GPS c Индикатор питания Нижняя панель Zenius5 Светодиодные индикаторы Компоненты прибора 201 ru ...

Page 202: ...циональная кнопка d Клавиша управления камерой e Клавиша Питание f Цифровые клавиши и альтернативные функциональные клавиши g Сенсорная клавиша перемещения курсора вправо h Клавиша End i Клавиша Шаг Назад j Кнопка Start k Кнопка ввода l Кнопка выбора Клавиатура Компоненты прибора 202 ru ...

Page 203: ...иональная кнопка Включает или выключает функциональные функции цифровых кла виш При включении альтернативных функций на панели навигации появляется значок Fn Клавиша управления камерой Нажать для открытия приложения камеры Если приложение камеры открыто нажмите чтобы сделать снимок Клавиша Питание Нажмите Zenius5 чтобы включить или выключить Функции кнопок Компоненты прибора 203 ru ...

Page 204: ... курсора вправо Выполняет команды отображаемые в нижнем левом или правом углу экрана Клавиша End Завершить или отклонить звонок возврат на главный экран Кнопка Шаг назад Нажмите для возврата на один символ в текстовом поле Клавиша Windows Нажмите чтобы открыть меню Пуск Компоненты прибора 204 ru ...

Page 205: ...ункция Кнопка ввода Нажмите для подтверждения выбора Кнопка Запись Нажмите для записи данных во время измерений Зависит от реализации программного обеспечения сторонних произ водителей Компоненты прибора 205 ru ...

Page 206: ...enius5 на ровную устойчивую поверхность или держите его в руке 2 Подключите прибор к сети с помощью адаптера переменного тока или убедитесь что аккумуляторы полностью заряжены Включение Zenius5 шаг за шагом Компоненты прибора 206 ru ...

Page 207: ...агрузки При отображении главного экрана Zenius5 готов к использованию 1 Нажмите и удерживайте клавишу питания не менее 3 секунд чтобы открыть окно Отключение питания В меню доступны следующие опции OK Операционная система отключается и прибор выклю чается Cancel Отмена Закройте меню Отключение питания и вер нитесь к главному экрану Отключение Zenius5 шаг за шагом Компоненты прибора 207 ru ...

Page 208: ...сле выключения Zenius5 подождите не менее 5 секунд перед повторным включением устройства Чтобы активировать спящий режим Zenius5 выполните следующие действия Zenius5 должен быть включен Пошаговая актива ция режима сна Компоненты прибора 208 ru ...

Page 209: ...5 переходит в спящий режим Светодиодный индикатор пита ния становится зеленым 2 Нажмите клавишу питания еще раз чтобы возобновить работу Светодиодный индикатор связи остается зеленым в спящем режиме Любой входящий вызов завершает спящий режим Компоненты прибора 209 ru ...

Page 210: ... Работа с инструментом 2 1 Установка и зарядка аккумулятора 100 240 V 5b 5a 4b 4b 4a 2a 2a 2a 2b 3b 5s OFF 1 3a 100 2 0014003_001 0014003_001 Установка и зарядка шаг за шагом Работа с инструментом 210 ru ...

Page 211: ...од углом а затем опустите верхнюю сторону чтобы подключить разъем 4 Установите крышку отсека на место вставив сначала нижнее отвер стие Установите ручку защелки на место Поверните безопасную защелку по часовой стрелке и переведите в замок в горизонтальное положение Класс защиты IP обеспечивается только в том случае если батарейный отсек подключен правильно 5 Подключите адаптер переменного тока к р...

Page 212: ...льная зарядка занимает около 6 часов 2 2 Установка и удаление SIM карты и SD карты Оберегайте карту от влаги Используйте карту только при допустимых для нее температурах Оберегайте карту от изгибов Защищайте ее от механических воздействий Несоблюдение приведенных выше правил может привести к потере данных или порче карты Работа с инструментом 212 ru ...

Page 213: ...ва чувствительны к статическому электри честву Меры предосторожности 1 Вскрывать корпус устройства может только квалифицированный персонал 2 Закрепляйте эластичный ремень когда держите прибор в руке 3 Храните все компоненты на поверхности от которой отводится ста тическое электричество Работа с инструментом 213 ru ...

Page 214: ...а Избавьтесь от статического напряжения перед вскрытием устройства и работой с картой SIM или SD Устройство в открытом виде не должно подвергаться воздействию высо ких электростатических потенциалов Избегайте контакта с внутренними частями устройства Не допускайте разрядов статического электричества рядом с устрой ством при установке карты SIM или SD Работа с инструментом 214 ru ...

Page 215: ...5 6 6 4b 4a 0014004_001 SIM карта и SD карта распола гаются в слотах предусмотренных внутри аккумуля торного отсека устройства Zenius5 Установка и извле чение карты SIM или SD пошаго вая инструкция Работа с инструментом 215 ru ...

Page 216: ...ю 4 a Вставьте карту памяти в верхний слот b Надежно сдвиньте SIM карту вниз в нижнюю прорезь Не применяйте силу при установке карты в слот Карта вставляется контактами вперед 5 Вставьте аккумулятор обратно в аккумуляторный отсек 6 Установите крышку отсека на место начиная с нижней стороны Установите ручку защелки на место Закрепите фиксатор повернув его по часовой стрелке для фиксации горизонталь...

Page 217: ...ктеристики Температура Диапазон рабочих темпе ратур 30шC до 60шC Температура хранения 40шC до 80шC Защита от влаги пыли и песка IP65 IEC60529 Пыленепроницаемый Условия окружаю щей среды Технические характеристики 217 ru ...

Page 218: ...влаги успешно устраняется перио дической просушкой устройства Вибрации Уровень защиты Выдерживает сильную вибрацию во время работы соответствие MIL STD 810G метод 514 6 E I Падения Уровень защиты Выдерживает падение 1 2 м Технические характеристики 218 ru ...

Page 219: ...сайте http www geomax positioning com Downloads htm Оборудование класса 1 согласно Директиве 2014 53 EC на радиообо рудование RED может выпускаться на рынок и использоваться без каких либо ограничений во всех странах ЕЭЗ Соответствие нормам других стран отличающимся от указанных в части 15 22 и 24 норм FCC или Европейской директивы 2014 53 EC должно быть обеспечено до начала эксплуатации Соответст...

Page 220: ...GeoMax AG www geomax positioning com 853602 1 1 0ru Перевод исходного текста 853602 1 1 0en 2018 GeoMax AG Виднау Швейцария ...

Page 221: ......

Page 222: ...GeoMax AG www geomax positioning com 853602 1 1 0multilingual Original text 853602 1 1 0en 2018 GeoMax AG Widnau Switzerland ...

Reviews: