

1
GETTING STARTED
1.4 3D Printed Parts
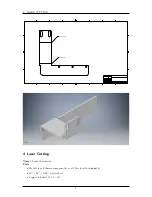
Models for all components that require 3D printing are located in
. These parts include the
electronics box assembly, brake disc aligners, rear wheel rotation sensor mounts, rear wheel rotation
sensor magnet mounts, brake master cylinder mount. It is advised to use a 3D printer with support
material. Print time for a complete set of chassis components is 26 hours and 35 minutes, which
will vary greatly based on the printer used, and is not included in the build time estimate. Material
usage for a complete set of chassis parts is about 250 cm
3
, not including support material. 3D
printed parts were made on a Dimension SST 768.
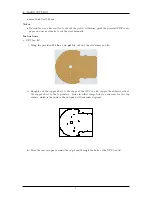
1.5 Laser Cutting
The GPS box lid and chassis battery fooam (available in
) are laser cut out of acrylic and
craft foam, respectively.
1.6 Software
A few software tools should be installed to complete the chassis configuration:
•
•
1.7 Resources Included with Instructions
•
•
Component models for 3D printing in
•
Product manuals and datasheets in
•
Video tutorials saved for offline viewing in
1.8 Useful Links
Note: all videos can also be found in the
for offline viewing.
•
Castle Creations Electric Conversion Video Tutorials
•
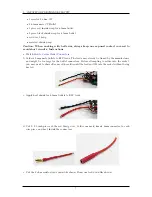
How to Solder Bullet Connectors
•
•
•
•
•
2
Summary of Contents for AutoRally
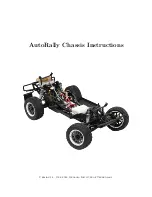
Page 1: ...AutoRally Chassis Instructions Version 1 4 June 2018 Georgia Institute of Technology...
Page 2: ......
Page 79: ...27 APPENDIX A PARTS Futaba FUTM1725 Charger for Futaba 4PV Glitch Capacitor GPS antenna 75...
Page 80: ...27 APPENDIX A PARTS GPS antenna cable GPS box fan Hallogic OH090U Hall Effect sensors 76...
Page 88: ...27 APPENDIX A PARTS 1 M3 4mm screw 27 7 3 GPS Box 8 M3 8mm screws 4 M3 hex nuts 84...
Page 89: ...27 APPENDIX A PARTS 2 M1 4 fan screws 2 M1 4 fan nuts 2 M3 25mm screws 85...
Page 92: ......


