background image

GS_GXR_GPS_User_Manual_V03.doc / 22.06.2010 

GeoSIG Ltd 

GPS User Manual 

Page 7 

3. Configuration and Checking 

3.1. With a GSR-xx 

In order to synchronise a GeoSIG GSR-xx with the GPS, appropriate configuration should be made in 
the Instrument. Once power supply, computer and GPS are connected to the Instrument, such 
configuration and checks can be performed using GeoDAS and logging into the Instrument. 


For more details about the GPS options, please consult GeoDAS and relevant Instrument 
manuals. 


At first installation or after a major (>2’000 km) relocation, it may take upto 5 minutes for 
the GPS to correctly compute the exact location of the antenna. 


The following is a brief recipe to check whether everything is operational in terms of the GPS: 

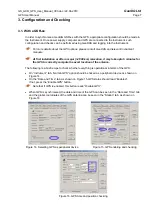
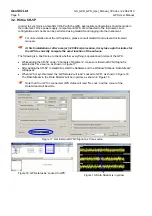
  On “Instrument” tab, “Garmin GPS” option should be ticked as a peripheral device as shown on 

Figure 14. 

  On the “Date and Time” tab, as shown on Figure 15,GPS status should read “Enabled”, 

if not, press the “Enable GPS” button. 


Note that if GPS is enabled, this button reads “Disable GPS”. 


  When GPS is synchronised, the date and time of the GPS can be seen in the “Date and Time” tab 

and the global coordinates of the GPS antenna can be seen in the “Station” tab, as shown on 
Figure 16. 


Figure 14. Selecting GPS as peripheral device 


Figure 15. GPS enabling and checking  


Figure 16. GPS time and position checking 

Summary of Contents for GXR-GPS

Page 1: ...GeoSIG Ltd Ahornweg 5A 5504 Othmarsingen Switzerland Phone 41 44 810 2150 Fax 41 44 810 2350 info GeoSIG com www GeoSIG com GXR GPS GXR GPS 485 User Manual ...

Page 2: ...ange the information contained in this document without notice While the information contained herein is assumed to be accurate GeoSIG Ltd assumes no responsibility for any errors or omissions Copyright Notice No part of this document may be reproduced without the prior written consent of GeoSIG Ltd The software described in this document is furnished under a license and may only be used or copied...

Page 3: ...Symbols and Abbreviations iv 1 Introduction 1 2 Electrical Connection 2 2 1 GPS Main Connector Pin Assignment 2 2 2 Mating Connector at the Instrument Side 3 2 3 Cable Connection GXR GPS 4 2 4 Cable Connection GXR GPS 485 5 2 5 Mounting the GPS Box 6 3 Configuration and Checking 7 3 1 With a GSR xx 7 3 2 With a CR 5P 8 ...

Page 4: ...vernment of the United States of America which is solely responsible for its accuracy and maintenance a GPS provides only UTC time at 0 Greenwich meridian without summer time adjustment Symbols and Abbreviations Instrument GeoSIG Recorder Digitiser or Data Acquisition system GPS Global Positioning System UTC Coordinated Universal Time ...

Page 5: ...ul for having one or several interconnected Instruments precisely synchronised a GPS provides only UTC time at 0 Greenwich meridian without summer time adjustment GXR GPS is provided in a box with a cable length to be defined at the time of order or provided by the customer Upto 70 m cable length is possible with the standard GXR GPS upto 1 000 m with the optional GXR GPS 485 All instructions with...

Page 6: ...nal of GSR 3 GPS_1PPS Green 1 PPS signal from GPS 4 V_MAIN Yellow 12V power from instrument 5 GPS_STDBY N A Usually not connected 6 GND Grey Ground from instrument 7 GND N A Usually not connected 8 GND N A Usually not connected Table 2 Electrical connections of the GXR GPS 485 connector Pin Signal Standard cable colors Comment 1 TX_H White Transmit signal of CR 5P 2 RX_H N A Usually not connected ...

Page 7: ...le Colors Comment 1 GSR_G_TXD White Transmit signal of GSR 2 GSR_G_RXD Brown Reception signal of GSR 3 N A N A Not connected 4 N A N A Not connected 5 GSR_G_1PPS Green 1 PPS signal from GPS 6 GSR_G_12V Yellow 12V power from instrument 7 GSR_G_GND Grey Ground from instrument Table 4 Electrical connections of the GXR GPS 485 input connector of an instrument Pin Signal Standard Cable Colors Comment 1...

Page 8: ...22 04 2005 Drawn by Checked by Approved by MS RB CHK Unit mm Revision Cable Type Datacable DIN 5x0 25 mm2 d 11 mm no shield length xx m GSN CA005 025 001 05 G_TX_H 1 G_RX_H 2 3 G_485_R_L 4 GPS_SYNC 5 GPS_POWER 6 GND 7 Connecton to GSR Housing Type Binder Serie 693 7 P M GSN J_CIR 007 002 M brown G_485_T_L green yellow grey white GSR_G_RXD 2 brown GSR_G_1PPS 3 green GSR_G_12V 4 GSR_G_GND 6 grey yel...

Page 9: ... 003 M SYNCI_RX 2 white SYNCI_1PPS 3 NC 4 5 green V_EXT_GPS 6 yellow brown SYNCI_1PPS 1 NC Cable Type GPS cable 25 m grey XY DIN 5x0 25 gu UL Style 2464 GSN CA005 025 003 05 SYNCI_RX GSR_1PPS RX_H 2 NC TX_L 3 brown 4 5 green NC TX_H 1 white RX_L GPS_SYNC 6 yellow V_MAIN 7 grey GND 50 0 9 0 Shrinkable tubbing 6 mm GSN RE060 BLK 001 8 5 GND_EXT 7 grey 8 NC GND 50 0 9 0 Pod insulated GSN PD003 080 00...

Page 10: ...lly the box is fixed on an outside wall or on a roof This is an important point since for the synchronisation of the instrument the antenna should receive at least signals from 3 satellites a Make sure that at least 75 of the sky is visible at all times over the GPS box Fixation of the housing should be done with M4 screws With spacings and locations as shown in Figure 11 Figure 12 and Figure 13 T...

Page 11: ...e upto 5 minutes for the GPS to correctly compute the exact location of the antenna The following is a brief recipe to check whether everything is operational in terms of the GPS On Instrument tab Garmin GPS option should be ticked as a peripheral device as shown on Figure 14 On the Date and Time tab as shown on Figure 15 GPS status should read Enabled if not press the Enable GPS button a Note tha...

Page 12: ...ly compute the exact location of the antenna The following is a brief recipe to check whether everything is operational in terms of the GPS While adding the CR 5P under Channels of Digitizers make sure External SYNC Signal is selected as Time source as shown in Figure 17 After adding the CR 5P to GeoDAS restart the Software and the Window Stations Data Stream will appear When GPS is synchronised t...

Reviews: