background image

2

/

21

Catalog

User Manual.................................................................................................................................................1

Overview....................................................................................................................................................... 3

Specifications:......................................................................................................................................4

Features:................................................................................................................................................... 5

Warranty Policy:..........................................................................................................................................6

PS:............................................................................................................................................................... 6

DJI Digital FPV System:.............................................................................................................................7

Bind FrSky R-XSR:...................................................................................................................................... 8

Bind TBS NanoRX:......................................................................................................................................9

Bind ELRS:...................................................................................................................................................10

Install Betaflight:.......................................................................................................................................11

ARM(DJI Transmitter):.............................................................................................................................12

OpenTX Transmitter................................................................................................................................13

IRC Tramp:..................................................................................................................................................15

Install Silicone Pad,Landing pad:........................................................................................................ 17

Install Propellers:...................................................................................................................................... 18

Quick disassembly scheme...................................................................................................................19

Pre-flight Check:...................................................................................................................................... 20

Includes:...................................................................................................................................................... 21

Contact Details:.........................................................................................................................................21

Summary of Contents for Cinebot30

Page 1: ...1 21 User Manual...

Page 2: ...JI Digital FPV System 7 Bind FrSky R XSR 8 Bind TBS NanoRX 9 Bind ELRS 10 Install Betaflight 11 ARM DJI Transmitter 12 OpenTX Transmitter 13 IRC Tramp 15 Install Silicone Pad Landing pad 17 Install Pr...

Page 3: ...aped Cob light strip is embedded in the propeller guard and the light effect is carefully tuned High strength grain cut carbon fiber sheet the overall strength of the fuselage is upgraded again Cinebo...

Page 4: ...GEPRC RAD 1W DJI O3 air unit Propeller Hq prop T76mm Antenna 5 8G Battery Interface XT60H M Motor SPEEDX2 1804 2450KV 6S Version SPEEDX2 1804 3450KV 4SVersion Weight 222g vista HD pnp Nebula Pro versi...

Page 5: ...trip carefully tuned light effect Color brightness in the day and night can be clearly displayed 6 The newly developed gimbal shock absorption structure can disintegrate high frequency jitter and jell...

Page 6: ...aken care of quickly for you 2 Any impact damage product liquid damage high temperature burn or other artificial damage is not covered by warranty PS 1 All components has been strictly inspected and t...

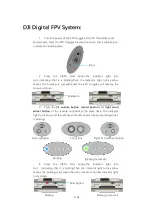
Page 7: ...he received picture 3 Press the C1 custom button record button and right scroll wheel button of the remote controller at the same time The indicator light turns blue and the remote controller sends a...

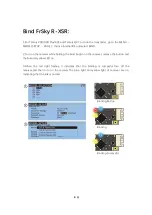
Page 8: ...n the receiver while holding the bind button on the receiver release the button and the bule red yellow LED on 3 When the red light flashes it indicates that the binding is successful Turn off the rec...

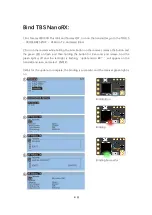
Page 9: ...button on the receiver release the button and the green LED on flash and then holding the button for 8 second and release And the green light is off and the red light is flashing update micro RX will...

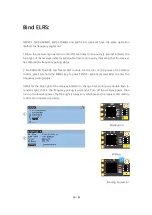
Page 10: ...tatus 2 For X9D X9D Plus X9E and Taranis QX7 remote control turn on the power of the remote control press and hold the MENU key to enter TOOLS ELRS and select Bind to enter the frequency pairing statu...

Page 11: ...he web page pull to the bottom and select the appropriate installation package to download EXE suffix is Windows system DMG suffix is MacOS system RPM DEB suffix is Linux system APK suffix is Android...

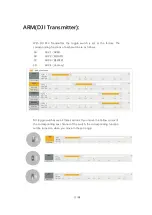
Page 12: ...ponding functions of each switch are as follows SA AUX1 ARM SB AUX2 MODES SC AUX3 BEEPER SD AUX4 Vacancy DJI toggle switches are all three sections If you move the Yellow cursor of the corresponding a...

Page 13: ...ourchannelsofrocker CH5 SF AUX1 ARM CH6 SG AUX2 MODES CH7 SA AUX3 BEEPER CH8 SB AUX4 Light strip switch FrSky X9D transmitter SF toggle switch are two sections If you move the Yellow cursor of the cor...

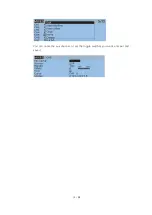
Page 14: ...14 15 You can name the aux channel or set the toggle switches you want and exit and save it...

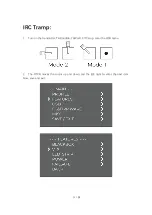
Page 15: ...15 15 IRC Tramp 1 Turn on the transmitter THR middle YAW left PITCH up enter the OSD menu 2 The PITCH moves the cursor up and down and the ELE right to enter the next item Now save and exit...

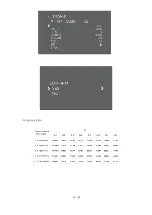
Page 16: ...16 15 Frequency table...

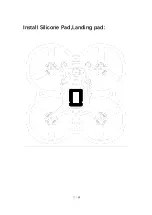
Page 17: ...17 15 Install Silicone Pad Landing pad...

Page 18: ...ebot30 are installed in the factory the direction of the propeller should be checked before taking off Although the blades of the CINEBOT30 have been installed in the factory it is necessary to check...

Page 19: ...19 15 Quick disassembly scheme It is only necessary to remove 6 screws of the arm plate to open the internal space for easy maintenance and replacement...

Page 20: ...hould be about 4 2 volts per cell or about 12 6 volts for a 3S or 16 8 volts for a 4S 5 Please comfirm the battery is securely attached to the aircraft by the strap And secure the balance lead so that...

Page 21: ...p M15 220mm 2 x Battery Silicone Pads 1 x Set of screws 1 x L shaped screwdriver 1 5mm 1 x L shaped screwdriver 2mm 1 x Antenna fixed tube pair 1 x Key Chain 1 x GoPro camera mount holder 1 x Antenna...

Reviews: