background image

Maintenance

 Your new faucet is designed for years of trouble-free performance. Keep it looking new by cleaning it periodically 

with a soft cloth. Avoid abrasive cleaners, steel wool and harsh chemicals as these will dull the finish and void your warranty.

Warranty Registration:

 Please log on to gerber-us.com to register your product today. 

5. 

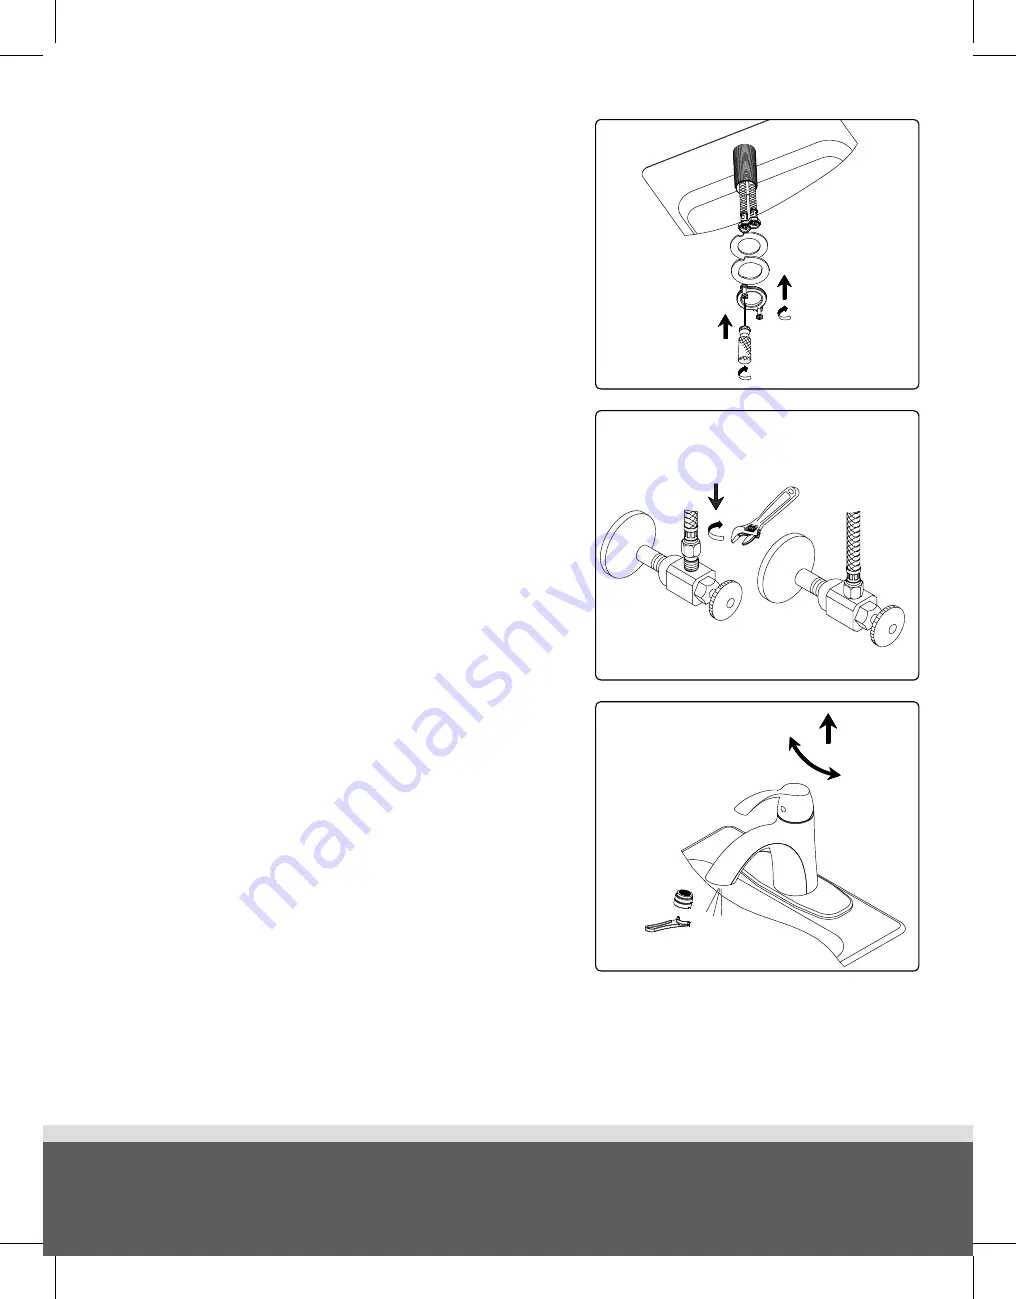
After installing the faucet, remove the aerator and turn on the water to 
remove any left over debris. Re-assemble the aerator.

Après avoir terminé l’installation du robinet, enlever le brise-jet, puis 

ouvrir le robinet pour que l’eau évacue tout débris pouvant se trouver à 

l’intérieur. Réassembler le brise-jet.
Después de instalar el grifo, remueva el aireador y abra el paso del agua 

para remover cualquier residuo. Vuelva a armar el aireador.

3. 

From underneath the sink, install the mounting hardware onto the valve 
shank. Use the phillips screwdriver for final tightening after the body is 

aligned.

Sous l’évier, installer le matériel de fixation sur la tige de robinet. Employer 

un tournevis Phillips pour effectuer le serrage final lorsque le corps est 

bien placé.
Instale las piezas de montaje en el vástago de la válvula por la parte de 

abajo del fregadero. Utilice un destornillador phillips para apretar al final, 

una vez que esté alineado el cuerpo.

4. 

Slip the coupling nut onto the inlet port and tighten with a wrench.

Glissez l'écrou de raccordement sur l'orifice d'entrée et serrez-le à l'aide 

d'une clé.
Cierre el suministro principal de agua girando las válvulas en sentido 

horario.

4

5

6

Summary of Contents for D150557

Page 1: ...e l aide ou un service supplémentaire Necesita ayuda En Estados Unidos favor de llamar a nuestra línea de servicio al cliente gratuita al 1 888 328 2383 o visitenos en WWW GERBER US COM para obtener asistencia o servicio adicional En Canada favor de llamar a nuestra línea de servicio al cliente gratuita al 1 800 487 8372 o visitenos en WWW GERBER US COM EN CA para obtener asistencia o servicio adi...

Page 2: ...ow requirements The flow rate is governed by the aerator If replacement is ever required be sure to request watersense compliant lavatory faucet aerator to retain the water conserving faucets of this product Ce produit a été conçu pour répondre aux exigences de débit du programme Watersense de l EPA Le débit est réglé par un aérateur Si jamais il doit être remplacé s assurer de demander un aérateu...

Page 3: ... Gerber aconseja siempre que sea un profesional autorizado quien instale los productos de plomería 1 Shut off the main water supply before installation by turning the valves clockwise Fermez l alimentation principale en eau avant l installation en tournant les valves d alimentation dans le sens horaire Antes de realizar la instalación cierre el suministro principal de agua girando las válvulas en ...

Page 4: ...lar el grifo remueva el aireador y abra el paso del agua para remover cualquier residuo Vuelva a armar el aireador 3 From underneath the sink install the mounting hardware onto the valve shank Use the phillips screwdriver for final tightening after the body is aligned Sous l évier installer le matériel de fixation sur la tige de robinet Employer un tournevis Phillips pour effectuer le serrage fina...

Page 5: ...or damaged Tighten the lock nut or trim cap Clean or replace o ring Fuites sous la manette La écrou de blocage ou le capuchon de garniture est desserré Le joint torique est sale ou endommagé Serrer la écrou de blocage ou le capuchon de garniture Nettoyer ou remplacer le joint torique Goteo debajo de la manija El contratuerca o la tapa ornamental se han suelto Empaque circular está sucio o dañado A...

Page 6: ...as las partes indicadas 1 Stopper Tampon Parador 2 Cartridge Cartouche Cartucho 3 Drain collar Collet de renvoi Boca de desagüe 4 Rubber washer Rondelle Arandela 5 Lock nut Écrou de blocage Contratuerca 1 Remove the rubber washer 4 and lock nut 5 from the drain assembly Enlever la rondelle de caoutchouc 4 et l écrou de blocage 5 du renvoi Quite la arandela de goma 4 y la contratuerca 5 del conjunt...

Page 7: ... washer 4 and lock nut 5 onto the drain collar Visser la rondelle en caoutchouc 4 et l écrou de blocage 5 sur le collet de renvoi Apriete la arandela de goma 4 y la contratuerca 5 en la boca del desagüe 3 For drain cartridge replacement or cleaning Pour remplacer ou nettoyer la cartouche de renvoi Para sustituir o limpiar el cartucho de desagüe 3 Remove the cartridge 2 from the drain Enlever la ca...

Page 8: ...he drain collar Tighten the lock nut to the complete seal Sous le lavabo installer le joint biseauté 10 côté courbé vers le trou de renvoi l anneau de friction 11 et l écrou de blocage 12 sur le collet de renvoi Serrer l écrou de blocage pour assurer l étanchéité Instale el empaque biselado 10 lado curvado contra el agujero de esagüe el anillo de rozamiento 11 y la contratuerca 12 en la boca del d...

Page 9: ... 8 You can lock the stopper assembly 8 to the ball rod 5 at this point by inserting the end of the ball rod 5 through the plunger hole prior to securing the ball in place Secure ball rod 5 to the drain assembly with the ball nut 6 Insérer le assemblage de bouchon 8 dans le drain Insérer le levier à rotule 5 dans l orifice de levier et dans le trou au bas du assemblage de bouchon REMARQUE À ce stad...

Reviews: