


P.9
P.8
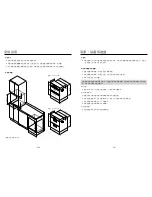
操作示範
詳細功能表
使用說明
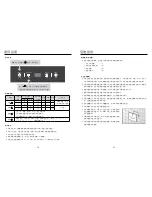
Disinfect
消 毒
Heat
烘 乾
Timer
定 時
Power
電 源
按一下
鍵,進入150分鐘標準消毒程序
(其中紫外線消毒75分鐘,水分烘乾60分鐘)
操作提示
●
功能設定時,按鍵連續按壓時間間隔不得超過5秒鐘,超過5秒即被鎖定。
●
功能一旦設定,若要更改必須先按「電源」鍵2秒後關機,然後重新開機設定。
●
從功能設定到主機工作將有5秒鐘延時功能。
●
櫃門鎖緊時如要解鎖,按「電源」鍵2秒後關機,門鎖解開。
●
功能設定後如需要延時工作,按「定時」鍵,可再延時1~12小時後進入工作狀態。
按鍵
按鍵
次數
指示燈
顯示時間
(分鐘)
消毒
間歇
烘乾
工作說明
消毒
烘乾
消毒
1
亮
150
75
15
60
消毒完成後,間歇
一段時間再進行烘乾
2
亮
180
90
15
75
烘乾
1
亮
60
60
只烘乾
2
亮
30
30
電源
1. 按一下「電源」鍵2秒,屏亮,進入待機狀態
2. 待機後可選擇所需的消毒模式或烘乾模式
3. 功能啟動後,按「電源」鍵,可解除鎖定
定時
功能設定後,5秒內按「定時」鍵進入預約時間設定,可設定1、2、3、4、5、6、
7、8、9、10、11、1 2……小時後啟動工作。
關好門,持續按住
鍵2秒,顯示屏亮
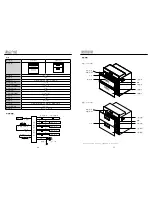
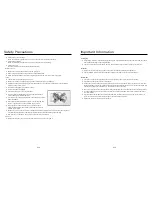
隨機附件(裝箱單)
●
在開始安裝消毒櫃前,請按照下列裝箱單核對隨機帶有的附件。
1. 嵌入式消毒櫃
1台
2. 使用及安裝說明書
1本
3. 自攻螺絲
4枚
4. 產品保養卡
1份
安全注意事項
●
如果您的廚房正處於裝修狀態,那麼請勿將消毒櫃暴露在外。因為建築材料、灰塵、油漆、塗料以
及它們所揮發的氣體,會使消毒櫃表面產生腐蝕和失去光澤,所以請在裝修完畢後安裝消毒櫃。
●
如果您發現該消毒櫃的電源線已損壞,那麼必須使用專用的電源線或從廠家的客戶服務中心處購買
專用的電源線,並由製造廠或其維修部或類似的專業人員進行更換。
●
搬運放置時應從底部抬起,輕搬輕放,切不可將櫃門把手作搬運支撐之用。
●
嚴禁將消毒櫃及電源插座安裝在可能受潮或被水淋濕的地方。
●
請將電源插座設置在安裝櫃體相鄰的櫃體中,以方便插拔電源插頭。
●
如果消毒櫃上方同時安裝燃氣灶具,或者燃氣管經過消毒櫃上方時,嚴禁使用橡膠軟管連接灶具燃
氣,必須使用金屬管或金屬波紋管。
●
請勿將櫃體泡在水中或用水沖淋櫃體內外,否則有短路或觸電的危險。
●
該消毒櫃是完全符合所有相關安全規定的。
●
該消毒櫃必須接地,它配有一個三芯插頭,這個插頭必須
插在確實接地的插座中。萬一漏電,接地可以提供電流回
路以避免觸電。
●
請確保您家中的供電系統(電流、電壓及連接導線)能夠
滿足消毒櫃的正常負荷要求。
●
請勿在電路中使用高容量保險絲或熔斷器,請按電器規格
選擇保險絲或熔斷器。
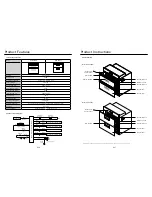
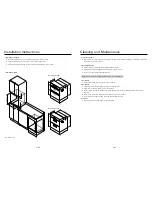
安裝說明
Summary of Contents for DSR-409BK
Page 3: ...P 5 P 4 4 20...


