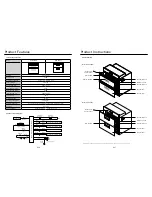
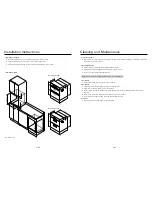
background image

P.11

P.10

安裝說明

安裝方法


請將消毒櫃安裝在乾燥且沒有陽光直射的地方。


安裝消毒櫃的櫃體應有足夠的強度,且表面平直。這樣能使消毒櫃安裝穩固,無晃動。


按下圖把消毒櫃嵌入櫥櫃的設定位置中,用隨機的自攻螺絲把消毒櫃水平地固定在櫃體上。
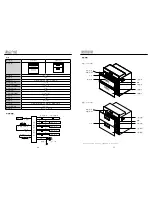
安裝示意圖

*圖中單位為毫米(mm)

≥20

≥45

0

585±3

560±

3

≥15

585±3

≥45

0

560±

3

595

51

0

330

545

50

595

435

26

595

51

0

330

545

50

595

435

20

試運行


安裝完畢後,請先對消毒櫃的表面和內腔進行清潔。然後將消毒櫃的電源插頭插到插座中,並按照

「使用說明」部分進行試運行操作。

清潔與保養您的消毒櫃 


清潔或保養消毒櫃前,請務必先拔下電源插頭。


清潔或保養消毒櫃時,請戴上手套,以防在擦拭過程中手指受傷。


請勿用水直接沖洗消毒櫃。

請根據您的使用頻率和周圍環境狀況,定期地清潔和保養消毒櫃。這樣能使您的消毒櫃保持良好的消

毒、烘乾效果和較長的使用壽命。

清洗內腔


應定期(如每月)用柔軟的濕布擦洗,勿使用硬物或鋼絲球。

清洗不銹鋼外殼


請使用中性的無研磨劑的不銹鋼清洗劑清洗不銹鋼表面。


請勿使用研磨海綿、含砂清潔劑、蘇打、酸性、氯化物等清潔不銹鋼表面。


請勿使用易傷害表面的工具(如鋼絲球)。


請勿使用衛生間清潔劑等強力清潔劑。

清洗門板玻璃


請用乾淨的柔軟抹布粘中性清潔劑擦拭。

清潔、保養和維護

型號:DSR-409BK

型號:DSR-409SV

Summary of Contents for DSR-409BK

Page 1: ...409BK DSR 409SV Built in Dish Sterilizer Please read these instructions and warranty information carefully before use and keep them handy for future reference Online Warranty Registration U S E R M A...

Page 2: ...nglish instructions please refer to P 13 P 13 Please register your warranty information now For Warranty Terms Conditions please refer to the last page of this user manual 4 5 5 5 6 6 7 8 8 8 9 9 10 1...

Page 3: ...P 5 P 4 4 20...

Page 4: ...P 7 P 6 DSR 409BK DSR 409SV 220V 50Hz 400W 253 7nm 5000 20W 400W 2000 80 40mg m 90 L 2L 5 kg 7kg 2 L N 220V 50Hz L E N DSR 409BK DSR 409SV www germanpool com...

Page 5: ...P 9 P 8 Disinfect Heat Timer Power 150 75 60 5 5 2 5 2 1 12 1 150 75 15 60 2 180 90 15 75 1 60 60 2 30 30 1 2 2 3 5 1 2 3 4 5 6 7 8 9 10 11 1 2 2 1 1 2 1 3 4 4 1...

Page 6: ...P 11 P 10 mm 20 450 585 3 560 3 15 585 3 450 560 3 595 510 330 545 50 595 435 26 595 510 330 545 50 595 435 20 DSR 409BK DSR 409SV...

Page 7: ...cuit Diagram 16 Operation Instructions Product Structure 17 Function Mode Diagram 18 Function Mode Reference 18 Operation Procedures 18 Installation Instructions Product Parts 19 Safety Precautions 19...

Page 8: ...r Open the Door only after the Sterilizer stops operation for 20 minutes to avoid ozone leakage and scalding Non utensils such as towels shoes etc must not put into the Sterilizer After use Disconnect...

Page 9: ...oor Lock Lower Rack Door Locked Left Lower Rack Door Locked Right Upper Rack Door Locked Left Upper Rack Door Locked Right 8 wires Starter Blue Blue Blue White White White Red Red Black Red Black Red...

Page 10: ...ey lock function will be released after pressing Power key Timer After function is set press Timer within 5 seconds and set time within the range of 1 to 12 hours to start operation After closing the...

Page 11: ...intenance to prevent injuries Do not rinse the Sterilizer directly with water Please clean the Sterilizer regularly and perform proper maintenance Inner surface Clean regularly with soft cloth Do not...

Page 12: ...ays follow the operating instructions This warranty does not apply to labour costs for on site installation check up repair replacement of parts and other transportation costs damages caused by accide...

Page 13: ...re Phase II 116 Ma Tau Kok Road Tokwawan Kowloon Hong Kong 3 F Takshun Plaza Nanguo East Road Shunde Foshan Guangdong 3 F Edificio Industrial Pou Fung 145 Rua de Francisco Xavier Pereira Macau Tel 852...

Reviews:

Related manuals for DSR-409BK