background image

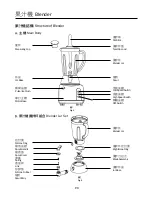
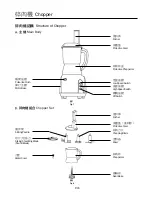
碎肉機 

Chopper

P.12

碎肉機操作

1.裝配時確保產品已關機。

2 . 檢 查 碎 肉 杯 已 穩 妥 地 裝 在 摩 打 主 體

上。在切片/切絲刀、碎肉刀片、攪
拌槳和混和器4款刀片中選擇其中1
種裝在產品上(圖8)。

3. 把電源線插上電源。

4. 把 碎 肉 杯 裝 上 摩 打 底 座 上 ( 往 順 時

針 方 向 旋 , 直 至 聽 到

咔 噠

聲)。

5. 因 應 你 的 需 要 , 選 擇 適 當 的 刀 片 並

裝 上 ( 參 閱 刀 片 說 明 ) , 然 後 把 透
明 保 護 蓋 放 上 碎 肉 杯 , 並 往 順 時 針
方 向 旋 , 直 至 鎖 緊 在 碎 肉 杯 上 ( 圖
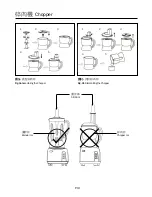
9a)。最後,插入推料棒將進料管
入口封住。(注意:應於裝配切片/
切絲刀前裝配刀套。)

6. 完 成 後 按 關 機 按 鍵 停 止 操 作 , 把 碎

肉 杯 按 逆 時 針 方 向 旋 出 , 取 出 推 料
棒 , 再 旋 出 保 護 蓋 , 就 可 以 把 食 物
倒出(圖9b)。

Chopper Operation

1. Always switch off before assembling.

2. Make sure that chopper jar is on the motor base 

properly. For the slicing/shredding blade, slicing 

blade, stirring blade, smashing blade, choose one 

of these four to mount on the appliance (Fig. 8).

3. Plug power cord into outlet.

4. Mount the chopper on the motor base (put the 

jar on the motor base, then lock the jar clockwise 

until you heard a sound of click).

5. Choose a proper blade and mount it on. Then 

lock the transparent lid into jar clockwise until 

you heard a sound of click. Press the low speed 

button, and then put in the food from the top hole 

on the lid using the pusher. (Note: fix the grater 

cover before fixing the slicing/shredding blade) 

(Fig. 9a).

6. Switch off when finish. Revolve the chopper cup 

off the motor base in anti-clockwise direction. 

Take out the stir stick. Twist the transparent lid off, 

incline the chopper and pour out the food (Fig.9b ).


注意

請注意攪拌棒只適用於攪拌杯,不能
在碎肉杯上使用。

Note

Please note that stir stick is only used for blender 

jar, and is not suitable for chopper cup. 


注意

不要讓產品連續運作超過3分鐘,需要
關機冷卻1分鐘,才能重新啟動產品。

Note

Do not run the appliance continuously for over 3 

minutes. Switch Off and let it stop for 1 minute for 

the motor to cool down before starting again.

Summary of Contents for PRG-550

Page 1: ...Multi Functional Food Processor PRG 550 Please read these instructions and warranty information carefully before use and keep them handy for future reference...

Page 2: ...Please register your warranty information now For Warranty Terms Conditions please refer to the last page of these operating instructions...

Page 3: ...ture of Coffee Grinder Grinder Operation Care Maintenance 06 09 11 17 Notice Before Use 04 Ice Lolly Accessory 16 Technical Specifications 18 Chopper Structure of Chopper Chopper Operation Functions o...

Page 4: ...e the plug with wet cloth 5 Never leave the appliance unattended while the appliance is on 6 Donotallowchildrentouseortouchtheappliance Children should be supervised to ensure that they do not play wi...

Page 5: ...liance is unplugged or in Off status Remove the plug power cord from outlet Revolve the chopper cup off the motor base in anti clockwise direction Take out the stir stick Twist the transparent lid off...

Page 6: ...e SpoutCover Spring Link SiliconeRubber SpoutBody BigSiliconeRing BladeAssembly JarBase StirStick TwistOpen Lid BlenderJar Spout JarBase LowSpeedSwitch MeasuringCup Pulse IceCrush OFFSwitch A Main Bod...

Page 7: ...the jar Make sure no water leaks from the jar 5 Lock the lid on the jar insert the measuring cup or the stir stick into the hole in the lid 6 Fit the jar base to the motor base then lock the jar cloc...

Page 8: ...a clean bowl under the valve and then press the lower setting button Finally lift the handle and juice will flow from the spout 7 8 2 2 9 10 Release the handle after juice has released Press the stop...

Page 9: ...Coffee Grinder P 9 CoffeeCup LowSpeedSwitch Pulse IceCrush HighSpeedSwitch OffSwitch A Main Body B Coffee Jar Set CoffeeCup SiliconeRing BladeBase MotorBase Structure of Coffee Grinder 4 Fig 4 5 Fig 5...

Page 10: ...a sound of click Fig 6a 5 Press the desired speed button for processing 6 Press the OFF button to stop grinding 7 Screw the coffee jar out from the motor base anti clockwise invert the coffee jar and...

Page 11: ...OffSwitch A Main Body B Chopper Set Pusher ProtectiveCover MotorBase Mixer ChoppingBlade Slicing Shredding Blade RoundBlade StirringPaddle GraterCover ChopperJar GearBase ProtectiveCover HighSpeedSwi...

Page 12: ...he transparent lid into jar clockwise until you heard a sound of click Press the low speed button and then put in the food from the top hole on the lid using the pusher Note fix the grater cover befor...

Page 13: ...Chopper P 13 9a Fig 9aAssembling theChopper 9b Fig 9b DismantlingtheChopper 1 2 3 4 5 1 2 3 4 5 BlenderJar ChopperJar StirStick...

Page 14: ...ze is achieved Hard Cheese Put cheese of no more than 300g into the jar and then cover the lid press PULSE P button 1 2 seconds at one time until the desired size is achieved Bread Put bread of no mor...

Page 15: ...its and vegetables C 10c d D Mixer Fig 10e The blade is for stirring and mixing the food For example Egg Mixture Put eggs of not more than 400g into the jar and then cover the lid press PULSE P button...

Page 16: ...t allow children to use the ice lolly maker without supervision After assembling the ice lolly put in the freezer without turning the product up side down for about 6 to 8 hours before serving When th...

Page 17: ...ing back onto the blender jar Then put the blender jar big silicon ring and blade base assembly clockwise into the jar base Fig 8b Coffee Grinder Do remember to put the silicone ring back onto the cof...

Page 18: ...1 D 225 Net Weight 4 04 kg Specifications are subject to change without prior notice If there is any inconsistency or ambiguity between the English version and the Chinese version the English version...

Page 19: ...PRG 550...

Page 20: ...3 F Takshun Plaza Nanguo East Road Shunde Foshan Guangdong 263 15 I Alameda Dr Carlos D Assumpcao No 263 Edif China Civil Plaza 15 Andar I Macau Tel 853 2875 2699 Fax 853 2875 2661 Macau All rights re...

Reviews: