P.36
P.37
Positioning and installing the appliance
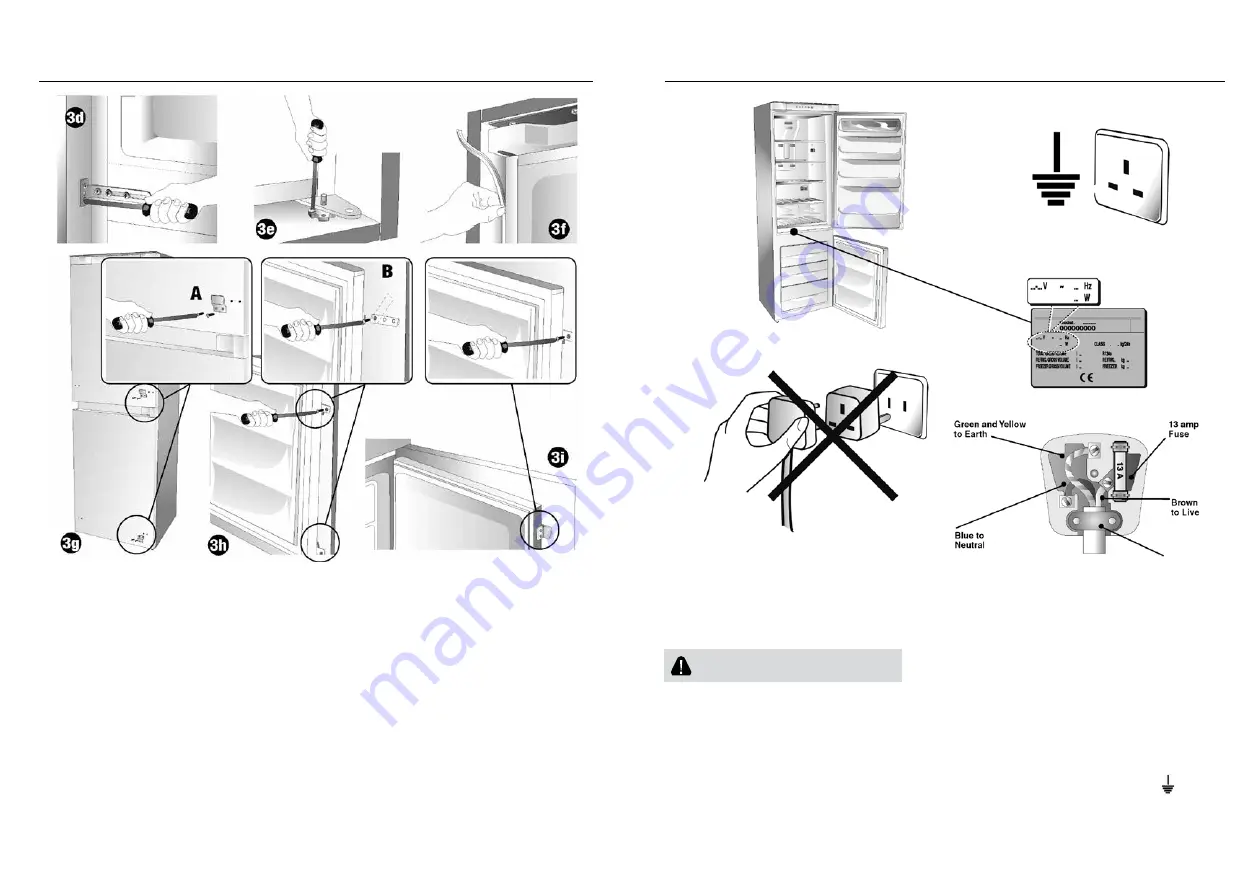
3d Anchor the centre of the appliance to the wall of the unit using the special brackets.
3e Fix the two bottom feet in the holes in the base of the unit.
3f Where provided, apply the plastic joint gasket.
3g Check that the guides of door opener “A” are positioned opposite the opening, otherwise remove them and
replace on the other side.
3h Fix guides “B”, supplied, on the fridge unit door in the fi rst hole to allow the guide to rotate until it engages
fridge door opener “A”.
3i Then screw in the other two fi xing screws to fi x opener “B”, such that the guide is blocked and that the
door moves together with that of the unit.
Electrical connection
Check that the mains voltage complies with that indicated on the rating plate located on the bottom left of the
freezer compartment.
If the mains socket does not have an earth connection or if the plug is not suitable for the mains supply sys-
tem, refer to a qualified electrician.
Do not use adapters or extension leads, as these may overheat and burn.
Warning:
This appliance must be earthed.
If the appliance has been fitted with a non-rewirable plug of the incorrect type for the mains socket, cut off the
plug and fit a new one. The removed plug must be thrown away. Inserting an unsuitable plug into a 13 Amp
socket is likely to cause an electrical hazard. When a non rewirable plug or rewirable 13 Amp (BS1363) plug
is used, it must be fitted with a 15 Amp ASTA approved (BS1362) fuse. If any other type of plug is used it must
be wired as follows.
Connect the GREEN & YELLOW wire to the earth terminal marked with the letter “E” or earth symbol, or
coloured green or green & yellow.
Connect the BLUE wire to the neutral terminal marked with the letter “N” or coloured black.
Connect the BROWN coloured wire to the live terminal marked with the letter “L” or coloured red.


