background image

7

GENERAL SAFETY INSTRUCTIONS (Cont.)

DO NOT INSTALL/USE THE APPLIANCE IN THE FOLLOWING AREAS:

  - outdoors or where water is likely to splash
  - near a bath, shower, laundry basin or swimming pool
  - in an area where oil is likely to splash
  - near a hot gas or electric burner, or sources of fire
  - near sources of heat, or exposed to direct sunlight
  - in an area where furniture or other objects can obstruct the airflow
  - in the presence of flammable substances or vapour such as alcohol, insecticides,  
    petrol, etc.
  - at a dry cleaner’s premises.

• Ensure that there is sufficient distance from the wall, fixtures or other 
  appliances. The distance must be at least 1.5 m from the front and sides wall of 
  the appliance to exclude the risk of fire.
• 

DO NOT

 place near any combustable materials, such as fabrics, blankets, 

  curtains, etc. May result in catching on fire or burning.
• Place the unit on a flat surface to reduce the risk of it tipping over. Do not tilt the 
  unit, always keep it upright during installation and use. 
  The unit will turn off automatically if accidently tipped over.
• We accept no responsibility for any eventual injuries or damages caused by 
  improper installation, faulty use or failure to follow the instructions.

WARNING:

• Do not expose the appliance to high heat, sparks and open flames.
• Do not pierce or burn the appliance. 
• Maintenance must only be carried out by properly qualified, authorised personnel. 
  If the appliance requires maintenance or service, contact our after sales support 
  centre info@ayonz.com

Summary of Contents for GECH2300W

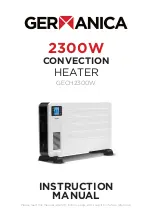
Page 1: ...INSTRUCTION MANUAL Please read this manual carefully before using and keep it for future reference 2300W CONVECTION HEATER GECH2300W ...

Page 2: ......

Page 3: ... 4 Remote Control 8 Product Overview 9 Tip Over Protection Process 9 Installation 10 Control Panel 11 Operation 12 Cleaning and Maintenance 14 Troubleshooting 15 Specifications 15 Customer Helpline Last Page CONTENTS ...

Page 4: ...of the equipment Do not bend twist or kink the power cord excessively Do not allow anything to rest on or roll over the power cord Doing so may cause a fire or an electric shock Do not run the power cord near heat producing appliances such as radiators stoves or irons The excessive heat could melt the insulation and expose live wires resulting in fire or electric shock Do not expose this product t...

Page 5: ...not use any chemical or cleaning agent or wet cloth please only ensure to utilize a dry cloth to wipe it down from marks or dust and only after unplugging the product from the power socket Do not direct airflow directly onto plants or animals as long exposure can affect them Please ensure to contact our call center for any repair or service required for the products not doing so will make warranty...

Page 6: ...n of the dangers Keep ventilation openings clear of obstructions Supervise children to ensure they do not play with the appliance Close supervision is necessary when any appliance is used by or near children Cleaning and user maintenance shall not be made by children without supervision Do not use this heater if it has been dropped Do not use if there are visible signs of damage to the heater Use ...

Page 7: ...rom the front and sides wall of the appliance to exclude the risk of fire DO NOT place near any combustable materials such as fabrics blankets curtains etc May result in catching on fire or burning Place the unit on a flat surface to reduce the risk of it tipping over Do not tilt the unit always keep it upright during installation and use The unit will turn off automatically if accidently tipped o...

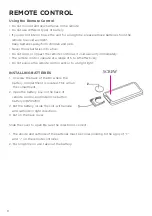
Page 8: ...a range of 5 to 6M effectively Do not expose the remote control sensor to a bright light INSTALLING BATTERIES 1 Unscrew the back of the RC where the battery compartment is located This will unlock the comartment 2 Open the battery box on the back of remote control and install One button battery CR20323V 2 Put the battery inside the slot with anode and cathode in right directions 3 Put on the back ...

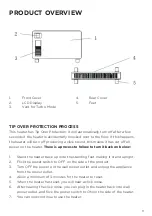
Page 9: ...o follow to turn it back on below 1 Stand the heater back up onto the standing feet making it stand upright 2 Flick the power switch to OFF on the side of the product 3 Turn OFF the power on the wall power outlet and unlpug the appliance from the power outlet 4 Allow a minimum of 3 minutes for the heater to reset 5 When the heater has reset you will hear a click noise 6 After hearing the click noi...

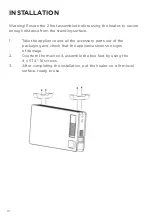
Page 10: ...he standing surface 1 Take the appliance and all the accessory parts out of the packaging and check that the appliance shows no signs of damage 2 Overturn the main unit assemble the two feet by using the 4 x ST4 16 screws 3 After completing the installation put the heater on a firm level surface ready to use ...

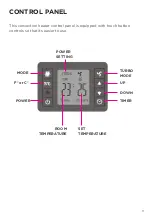
Page 11: ...This convection heater control panel is equipped with touch button controls so that its easier to use CONTROL PANEL MODE TURBO MODE POWER SETTING F or C UP DOWN TIMER SET TEMPERATURE ROOM TEMPERATURE POWER ...

Page 12: ...el ground or benchtop 2 Before inserting the power plug into an electrical outlet make sure that the electrical supply in your area matches that on the rating label on the unit 3 Set the Power switch on side of product to off Plug the cord set into a 220 240v AC electrical outlet 4 Turn the heater ON by flicking the POWER switch on side of the heater The unit will display the current Room temperat...

Page 13: ...nt frost After choose this mode icon is lighted environment temperature is 5 When the environment 3 1000W and 1300W heating elements work at the same time 2300W icon light When the environment 6 thermal fuse stop heating icon crush out only prevent frost icon light 8 By pressing you can set the timer from 1 24 hours 9 By pressing will turn on Turbo mode which activates the fan the fan icon will be...

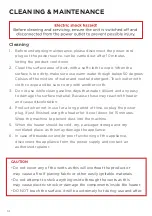
Page 14: ...oration 4 Product when not in use for a long period of time unplug the power plug if just finished using the heater let it cool down for 15 minutes Wrap the machine to prevent dust into the machine 5 When the heater should be cold dry packaged storage and dry ventilated place as this may damage the appliance 6 In case of breakdown and or poor functioning of the appliance disconnect the appliance f...

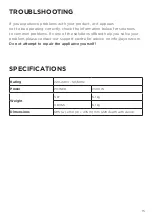
Page 15: ...utions to common problems If none of the solutions offered help you solve your problem please contact our support centre for advice on info ayonz com Do not attempt to repair the appliance yourself SPECIFICATIONS Rating 220 240V 50 60Hz Power POWER 2300 W Weight NET 5 1 kg GROSS 6 1 kg Dimensions 685 w x 130 d x 435 h mm 220 depth with stand ...

Page 16: ...CUSTOMER HELPLINE info ayonz com DISTRIBUTED BY AYONZ PTY LTD ...

Reviews: