10
Manual Raising and Lowering
(2 steps)
1
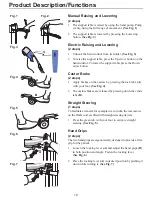
The support table is raised by using the hand pump. Pump
evenly, using the full range of movement.
(See Fig. 1)
2
The support table is lowered by pressing the Lowering
button.
(See Fig. 2)
Electric Raising and Lowering
(2 steps)
1
Unhook the hand control from its holder.
(See Fig. 3)
2
To raise the support table, press the Up arrow button on the
hand control. To lower the support table press the Down
arrow button.
Castor Brake
(2 steps)
1
Apply brakes on the castors by pressing the lock tabs
(A)
with your foot.
(See Fig. 4)
2
The castors brakes are released by pressing down the centre
tabs
(B)
.
Straight Steering
(1 steps)
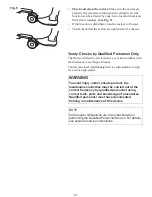
To facilitate a transfer, for example in a corridor, the rear castors
on the
Walker
aid are fitted with straight steering devices.
1
Press the green tab with your foot to activate straight
steering.
(See Fig. 5)
Hand Grips
(2 steps)
The two hand grips are ergonomically designed to provide a firm
grip for the patient.
1
Loosen the locking lever
(A)
and adjust the hand grips
(B)
in both position and angle. Fasten the locking lever.
(See Fig. 6)
2
Place the locking lever
(A)
in desired position by pushing it
down while turning it.
(See Fig. 7)
Fig. 1
Fig. 2
Fig. 3
Fig. 4
A
B
Fig. 5
Fig. 6
A
B
Fig. 7
Product Description/Functions


