background image


NOTE: 

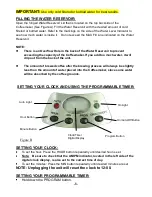
When you are holding down the PROGRAM button, the word BREW 

will appear in the digital display.   


Press the HOUR button to the desired hour.

 Note:    Be sure to check that 

the AM/PM indicator, located in the left side of the digital clock display, 
is also set to the correct time of day you want the Coffeemaker to begin 
brewing. 


Press the MIN button to the desired minute.   


Release the PROGRAM button. 


Make sure your current time is set correctly. 


Press the On/Auto/Off button TWICE and the red AUTO light will go on. Your 
Coffeemaker is now set to start brewing at the programmed time and Auto 
appears in the display 


If you are setting the unit to start brewing automatically, be sure that the unit 
is filled with water, the Filter Basket Holder is securely closed, and that the 
Carafe is sitting securely on the Carafe Holding Plate.


NOTE: Unplugging the unit will reset the clock to 12:00.


NOTE: 

When the Coffeemaker is set to Auto, the word AUTO will appear in                                             

the digital display.   
 

OPERATING INSTRUCTIONS: 

1.  Place the Coffeemaker on a flat, level surface such as a countertop. Plug the 

Coffeemaker into a 120 volt 60 Hz AC outlet. 

2.  Fill the Water Reservoir.    Swing the Filter Basket Holder outward to your left 

and insert a No. 4 Gevalia cone shaped paper filter into the Removable Filter 
Basket. Place the desired amount of ground coffee into the paper filter.    Brew 
Gevalia Kaffe with the coffee/water ratio you normally use when you prepare 
ground coffee (Experiment with the amount of coffee used in order to adjust 
the flavor to your taste.) 

3.  Be sure that the Removable Filter Basket is seated properly in the Filter 

Basket Holder, Swing the door closed and securely into place.    Ensure there 
is water in the Water Reservoir. 


IMPORTANT: 

Do not operate your Coffeemaker if the Filter Basket Holder is not 

securely in place. 

 
4.  To brew coffee immediately, push the ON/AUTO/OFF button once. The green ON light 

will illuminate and after a few moments the coffee will start to brew.     

5.  To set the Coffeemaker to start brewing at a certain time, hold down the PROGRAM 

button.    While holding down the PROGRAM button, push the MIN and HOUR buttons 
to set the timer.    Release the PROGRAM button.    Once the timer is set to the correct   

-7- 

Summary of Contents for C84-3A

Page 1: ...our use and care book Incidental or consequential damages are not covered by this guarantee This warranty gives you specific legal rights and you may also have other rights which vary from state to state FOR SERVICE Call the Gevalia Kaffe Import Service 1 800 438 2542 for further information on your Coffeemaker Gevalia Kaffe is only available through the Gevalia Kaffe Import Service To place an or...

Page 2: ...Programmable 10 Cup Coffeemaker HOUSEHOLD USE ONLY Model C84 3A OT ...

Page 3: ...When calling please have the unit model located on page 1 and the date code located on the bottom of the Coffeemaker ready ...

Page 4: ...g pads or abrasive cleaners Stainless Steel Carafe is NOT dishwasher safe hand wash only DECALCIFYING YOUR COFFEEMAKER Calcium deposits may build up in the Coffeemaker as a result of minerals commonly found in drinking water The build up is normal and may result in longer brewing times This slow down can be eliminated by periodically decalcifying the Coffeemaker We recommend decalcifying your unit...

Page 5: ...Turn the unit off 2 Wait 30 minutes 3 Follow steps in OPERATING INSTRUCTIONS above HINTS FOR GREAT TASTING COFFEE A clean Coffeemaker is essential for making great tasting coffee Regular cleaning as specified in CLEANING YOUR COFFEEMAKER is highly recommended Always use fresh cold filtered or bottled water in your Coffeemaker Fine grind coffee such as Gevalia promotes fuller extraction and provide...

Page 6: ...any controls To disconnect make sure the power is off the ON light will not be illuminated then remove the plug from the wall outlet 12 Always use cold filtered or bottled water for best results Warm water or other liquids could cause damage to the Coffeemaker 13 TURN OFF THE UNIT AND WAIT AT LEAST 30 MINUTES AFTER THE BREW CYCLE IS COMPLETED BEFORE OPENING THE FILTER BASKET HOLDER IF YOU DO NOT S...

Page 7: ...han its intended use SAVE THESE INSTRUCTIONS Household Use Only SAFETY FEATURES 1 A short power supply cord is provided to reduce the hazards resulting from entanglement or tripping over a longer cord 2 An extension cord may be used if care is exercised in its use 3 If an extension cord is used the marked electrical rating of the extension cord should be at least as great as the electrical rating ...

Page 8: ...lace the Coffeemaker on a flat level surface such as a countertop Plug the Coffeemaker into a 120 volt 60 Hz AC outlet 2 Fill the Water Reservoir Swing the Filter Basket Holder outward to your left and insert a No 4 Gevalia cone shaped paper filter into the Removable Filter Basket Place the desired amount of ground coffee into the paper filter Brew Gevalia Kaffe with the coffee water ratio you nor...

Page 9: ...the back of the unit The amount of brewed coffee after the brewing process will always be slightly less than the amount of water placed into the Coffeemaker since some water will be absorbed by the coffee grounds SETTING YOUR CLOCK AND USING THE PROGRAMMABLE TIMER SETTING YOUR CLOCK To set the hour Press the HOUR button repeatedly until desired hour is set Note Be sure to check that the AM PM indi...

Page 10: ... steel Carafe Control Panel Filter Basket Holder Place GEVALIA No 4 Disposable Filter in This Holder Water Level Indicator Water Reservoir Lid Removable Cone Filter Basket Carafe Lid Swing Out Filter Basket Holder Pause Serve Value Carafe Holding Plate ...

Page 11: ...ndicate how many cups of water have been poured into the Coffeemaker On Light The ON light lets you know when the Coffeemaker is on for safe operation will be illuminated green Press the ON AUTO OFF button once for the brew cycle to begin Swing Out Filter Basket Filter door swings open for convenient filling using a 4 disposable cone filter Removable Cone Shape Filter Basket Cone shaped Filter Bas...

Page 12: ...emember that the liquid inside the Stainless Steel Carafe is HOT Please be careful when pouring HOW TO USE YOUR COFFEEMAKER PREPARING YOUR COFFEEMAKER FOR USE Carefully unpack the Coffeemaker and remove all packing materials Before making coffee in your Coffeemaker thoroughly clean your Stainless Steel Carafe Carafe Lid and Filter Basket with warm soapy water Rinse and dry Do not use harsh or abra...

Reviews: