background image


HOW TO USE YOUR COFFEEMAKER 


PREPARING YOUR COFFEEMAKER FOR USE: 


z


Carefully unpack the Coffeemaker and remove all packing materials. 

z


Before making coffee in your Coffeemaker, thoroughly clean your glass carafe, 

carafe lid and Filter Basket with warm soapy water. Rinse and dry. Do not use 

harsh or abrasive cleaners. 

z


You may wipe the Warming Plate with a clean damp cloth, however, do not 

immerse the Coffeemaker in water or other liquid. 


Note:

 Prior to brewing your first pot of Gevalia coffee, we recommend that you run one 

brew cycle through the Coffeemaker using cold water only, without ground coffee or a paper 

filter. This will remove any dust that may have settled inside the Coffeemaker. 

IMPORTANT:

 Use only cold filtered or bottled water for best results. 


FILLING THE WATER RESERVOIR: 

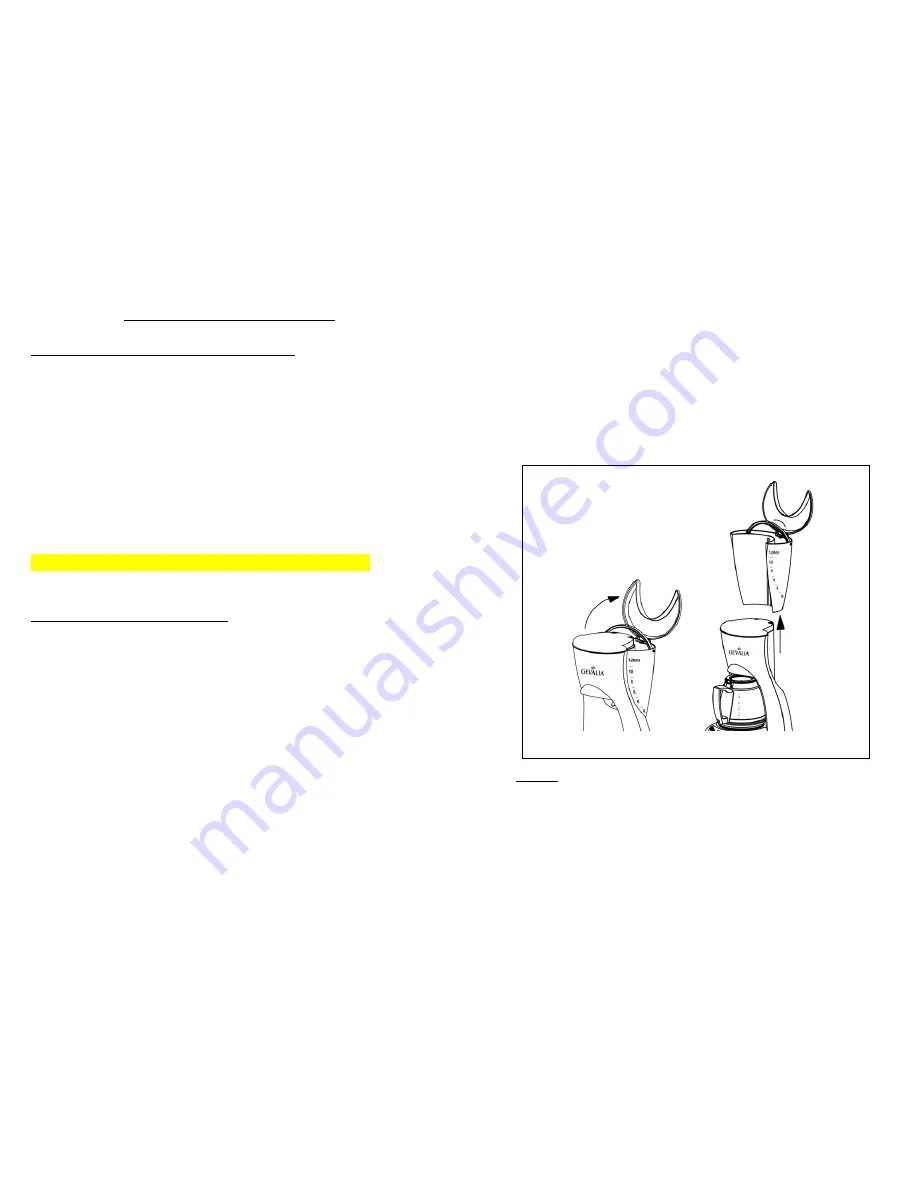
Open the hinged Water Reservoir Lid that is located on the top backside of the 

Coffeemaker. Remove the Water Reservoir from the backside of the Coffeemaker and fill 

the Reservoir with the desired amount of cold filtered or cold bottled water. Refer to the 

water level markers on the sides of the Reservoir to let you know how much water is in the 

container. Return the Water Reservoir to its position at the back of the Coffeemaker, making 

sure the groove in the Water Reservoir slides snugly over the back of the plastic guide at 

the back of the Coffeemaker. (See Figure D) 

NOTE: 

z


There is a drip hole in the back of the Water Reservoir to prevent exceeding the 

capacity of the Coffeemaker. If you add too much water, it will leak out from the 

back of the unit. 


9

z


The amount of brewed coffee after the brewing process will always be slightly 

less than the amount of water placed into the Coffeemaker, since some water 

will be absorbed by the coffee grounds. 

z


The Water Reservoir is removable for your convenience.    To remove, open the 

Water Reservoir Lid and lift straight up on the Reservoir until it is fully removed.   

When replacing the Reservoir, make sure to line up the guides on the back of 

the Reservoir with the guides on the back of the unit.    After lining up the 

guides, slide the Reservoir down into the unit. (See Figure D) 


Figure D 


Summary of Contents for XCC-1

Page 1: ...is guarantee This guarantee expressly excludes glass and thermal carafes broken by accident or misuse However replacements can easily be ordered by calling Gevalia Kaffee Imports Service at 1 800 438 2542 This warranty gives you specific legal rights and you may also have other rights which vary from state to state FOR SERVICE Call the Gevalia Kaffe Import Service 1 800 438 2542 for further inform...

Page 2: ...g over edge of table or counter or touch hot surfaces 10 Do not place on or near a hot gas or electric burner or in a heated oven 11 Always plug cord into the wall outlet before turning on any controls To disconnect make sure the power is off the ON light will not be illuminated then remove plug from the wall outlet 12 Always use cold filtered or bottled water for best results Warm water or other ...

Page 3: ...er 6 This glass carafe is designed to be used with this Coffeemaker only 7 Do not use this appliance for other than intended use SAVE THESE INSTRUCTIONS Household Use Only 5 SAFETY FEATURES 1 A short power supply cord is provided to reduce the hazards resulting from entanglement or tripping over a longer cord 2 An extension cord may be used if care is exercised in its use 3 If an extension cord is...

Page 4: ... off feature In both regular and auto start modes the Coffeemaker shuts off automatically 2 hours after the brewing cycle is completed To restart simply press the START STOP Button until the ON light illuminates z ON Light The ON light lets you know when the Coffeemaker is turned on and ready for safe operation will be illuminated green z Cord Storage Hidden cord storage allows you to hide excess ...

Page 5: ...servoir with the desired amount of cold filtered or cold bottled water Refer to the water level markers on the sides of the Reservoir to let you know how much water is in the container Return the Water Reservoir to its position at the back of the Coffeemaker making sure the groove in the Water Reservoir slides snugly over the back of the plastic guide at the back of the Coffeemaker See Figure D NO...

Page 6: ...d which produces rich full bodied flavor Use one level Gevalia scoop for each cup 6 fluid ounces or 12 level scoops per full pot of coffee Experiment with the amount of coffee used in order to adjust the flavor to your taste 3 Be sure that the Filter Basket is seated properly in the Filter Basket Holder by placing it securely into place Make sure the flip top lid is completely closed on the top of...

Page 7: ...YOUR COFFEEMAKER z CAUTION Always make sure Coffeemaker is unplugged before attempting to clean it To protect against electric shock do not immerse cord plug or unit in water or other liquid z The outside of your Coffeemaker can be cleaned by wiping the surface with a damp soft cloth z IMPORTANT Never immerse the Coffeemaker in water or other liquid z When cleaning the carafe DO NOT put your hands...

Reviews: