background image

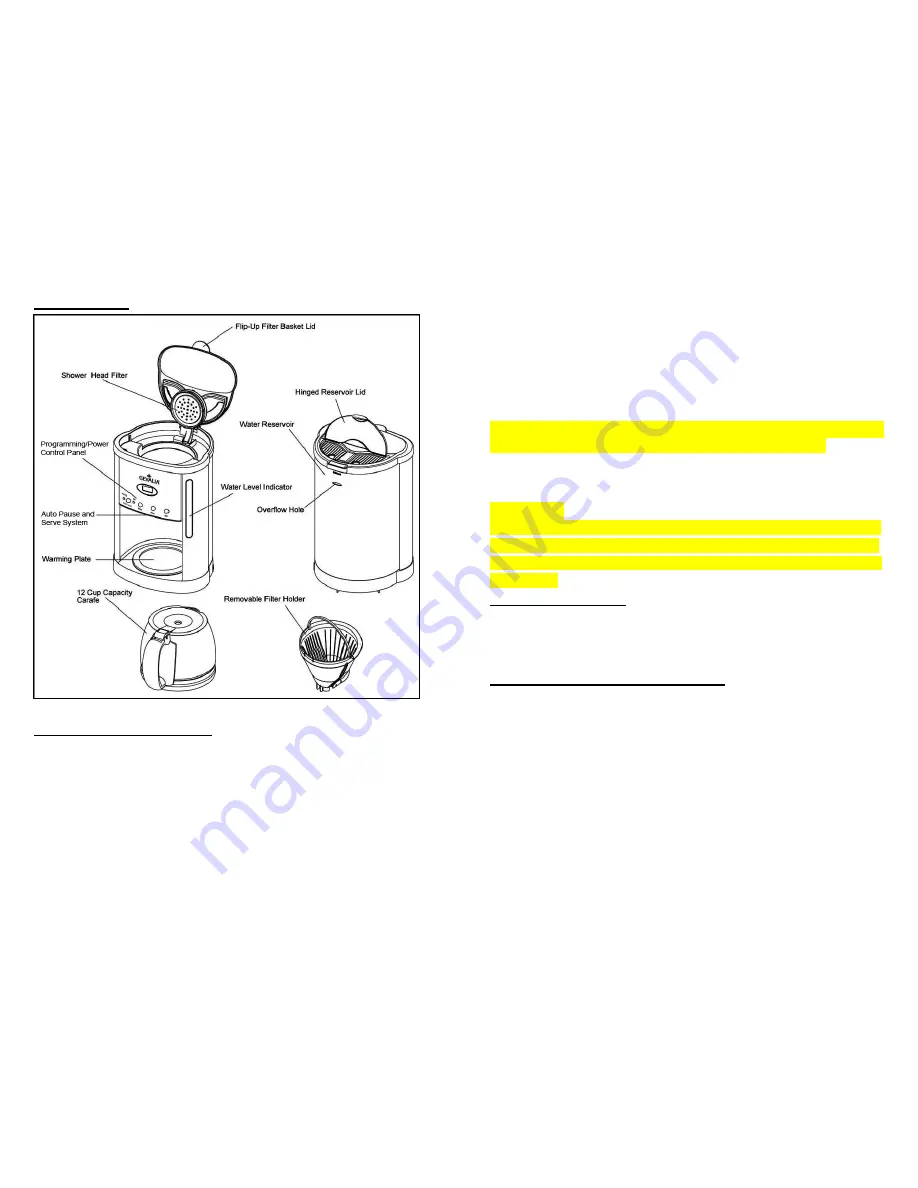
ILLUSTRATION


OPERATING INSTRUCTIONS 

1.  Place your drip Coffeemaker on a flat, level surface such as a countertop. Plug the 

Coffeemaker into a 120 volt 60 Hz AC only outlet. 

2.  Open the Flip-Up Filter Basket Lid on the top of your Coffeemaker and remove the 

Removable Filter Basket. Insert a No. 4 Gevalia cone shaped paper filter into the 

Removable Filter Basket. Place the desired amount of ground coffee into the paper 

filter. 


-7-


Brew Gevalia Kaffe with the coffee water ratio you normally use when you prepare   

ground coffee. If you prefer strong coffee, we recommend the following European   

method, which produces rich, full-bodied flavor. Use one level Gevalia scoop for each 

cup (6 fluid ounces) or 12 level scoops per full pot of coffee. Experiment with the 

amount of coffee used in order to adjust the flavor to your taste. 

3.  Return the Removable Filter Basket to the Filter Basket Holder. Be sure that the 

Removable Filter Basket is seated properly in the Filter Basket Holder, by placing it 

securely into place and closing the Filter Basket Lid. 


IMPORTANT: 

Do not operate your Coffeemaker if the Flip-Up Filter Basket Lid 

or the Hinged Reservoir Lid on the top of the unit is not securely closed. 

4.  Press the Start/Stop Button TWICE. The “ON” light will illuminate green indicating that 

the brew cycle has begun. 


CAUTION: 

After the brewing cycle is completed, there still will be HOT liquid in the Removable 

Filter Basket. Always turn off the unit and wait at least 30 minutes after the brewing 

cycle is completed before opening the filter basket lid and emptying the Removable 

Filter Basket.


TO BREW A SECOND POT 

1.  Turn the unit off.   

2.  Wait 30 minutes to prevent hot water in the tubes from splashing out.   

3.  Follow Instructions in “OPERATING INSTRUCTIONS” (above).   


HINTS FOR GREAT TASTING COFFEE 

z


A clean Coffeemaker is essential for making great testing coffee. Regular cleaning, 

as specified in “Cleaning Your Coffeemaker” is highly recommended. 

z


Always use fresh, cold filtered or bottled water in your Coffeemaker. 

z


Fine grind (such as Gevalia) coffee promotes fuller extraction and provides rich, 

full-tasting coffee. Regular grind will require slightly more coffee grounds per cup to 

provide the strength of a finer grind. 

z


Store coffee in a cool, dry place. Once coffee has been opened, keep it tightly sealed 

in the refrigerator or freezer to maintain freshness. 

z


For optimum coffee flavor, buy whole beans and grind them just before brewing. 

z


Do not re-use coffee grounds since this will lessen the coffee flavor. 


Reheating coffee is not recommended. Coffee is at its peak flavor immediately after 

brewing. 

-8- 

Summary of Contents for XCC-12

Page 1: ... by this guarantee This guarantee expressly excludes Glass and Thermal Carafes broken by accident or misuse However replacements can easily be ordered by calling Gevalia Kaffee Imports Service at 1 800 438 2542 This warranty gives you specific legal rights and you may also have other rights which vary from state to state FOR SERVICE Please call the Gevalia Kaffe Import Service at 1 800 438 2542 fo...

Page 2: ... a heated oven 11 Always plug the cord into the wall outlet before turning on any controls To disconnect make sure the power is off the ON light will not be illuminated then remove the plug from the wall outlet 12 Use cold filtered or bottled water for best results Warm water or other liquids could cause damage to the Coffeemaker 13 TURN OFF THE UNIT AND WAIT AT LEAST 30 MINUTES AFTER THE BREW CYC...

Page 3: ...ng Plate to prevent the Removable Filter Basket from overflowing Make sure that the Glass Carafe is positioned firmly against the back of the Coffeemaker 3 z Water Level Indicator Large easy to read numbers indicate how many cups of water have been poured into the Coffeemaker z On Light The ON light lets you know when the Coffeemaker is on for safe operation will be illuminated green Press the Sta...

Page 4: ...e Coffeemaker to begin brewing z Continue holding down the BREW button and press the MIN button until the desired minute is set 5 z Release the BREW button z Press the START STOP button ONLY ONCE The red AUTO light will go on Your Coffeemaker is now set to start brewing at the programmed time IMPORTANT CAUTION If the Flip Up Filter Basket Lid is not completely closed or the Lid on the Glass Carafe...

Page 5: ...ess the Start Stop Button TWICE The ON light will illuminate green indicating that the brew cycle has begun CAUTION After the brewing cycle is completed there still will be HOT liquid in the Removable Filter Basket Always turn off the unit and wait at least 30 minutes after the brewing cycle is completed before opening the filter basket lid and emptying the Removable Filter Basket TO BREW A SECOND...

Page 6: ...e inside of the Water Reservoir with a cloth as the cloth may have a lint residue that could clog the Coffeemaker z For stubborn stains use a nylon or plastic pad with a non abrasive cleaner Do not use metal scouring pads or abrasive cleaners 9 DECALCIFYING YOUR COFFEEMAKER z Calcium deposits may build up in the Coffeemaker as a result of minerals commonly found in drinking water The build up is n...

Reviews: