8
FILLING THE WATER RESERVOIR:
Open the hinged Water Reservoir Lid that is located on the top backside of the
Coffeemaker (See Figure A). Fill the Water Reservoir with the desired amount of cold
filtered or bottled water. Refer to the indicator markings on the side of the Water Reservoir
to see how much water is inside it. Do not exceed the MAX Fill Line indicated on the
Water Reservoir (See Figure A).
NOTE:
z
There is an Overflow Hole in the back of the Water Reservoir to prevent
exceeding the capacity of the Coffeemaker. If you add too much water, it will
drip out from the back of the unit.
z
The amount of brewed coffee after the brewing process will always be slightly
less than the amount of water placed into the Coffeemaker, since some water
will be absorbed by the coffee grounds.
SETTING YOUR CLOCK AND USING THE PROGRAMMABLE TIMER:
SETTING YOUR CLOCK:
•
To set the hour: Press the HOUR button repeatedly until desired hour is set.
•
Note: Be sure to check that the AM/PM indicator, located in the top left side of
the digital clock display, is also set to the correct time of day.
•
To set the minutes: Press the MIN button repeatedly until desired minutes are set.
NOTE: Unplugging the unit will reset the clock to 12:00.
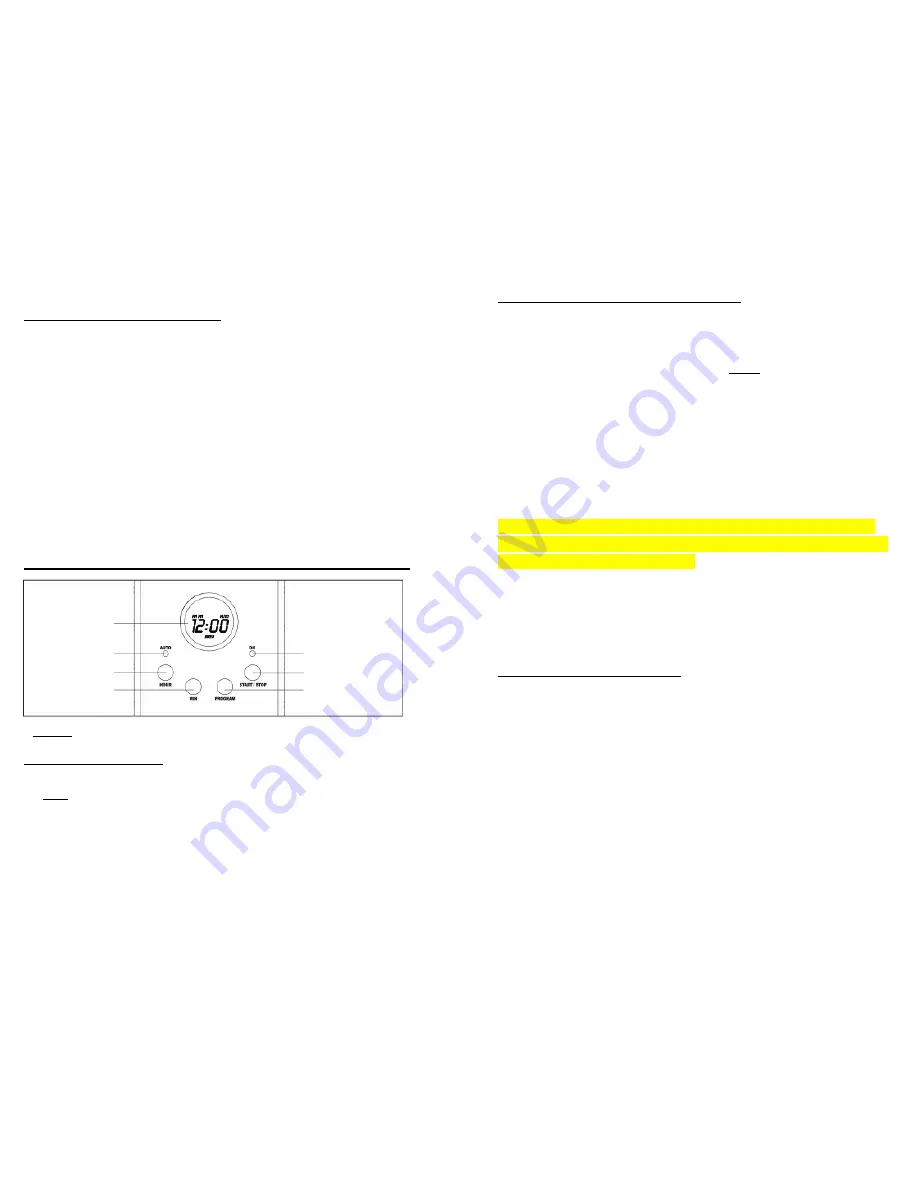
Hour Button
On Light
Program Button
Clock/Timer
Digital Display
Start / Stop Button
Minute Button
Auto Light
Figure B
9
SETTING YOUR PROGRAMMABLE TIMER:
•
Hold down the PROGRAM button.
•
NOTE:
When you are holding down the PROGRAM button, the word BREW
will appear in the digital display. (See Figure B)
•
Press the HOUR button to the desired hour.
Note: Be sure to check that
the AM/PM indicator, located in the top left side of the digital clock
display, is also set to the correct time of day you want the Coffeemaker
to begin brewing.
•
Press the MIN button to the desired minute.
•
Release the PROGRAM button.
•
Make sure your current time is set correctly.
•
Press the START/STOP button ONLY ONCE and the red AUTO light will go
on. Your Coffeemaker is now set to start brewing at the programmed time.
If you are setting the unit to start brewing automatically, be sure that the
unit is filled with water, the Filter Basket Lid is down, and that the Carafe is
sitting securely on the Warming Plate.
NOTE: Unplugging the unit will reset the clock to 12:00.
NOTE:
When the Coffeemaker is set to auto, the word AUTO will appear in
the digital display. (See Figure B)
OPERATING INSTRUCTIONS:
1. Place the Coffeemaker on a flat, level surface such as a countertop. Plug the
Coffeemaker into a 120 volt 60 Hz AC outlet.
2. Fill the Water Reservoir. Flip open the Filter Basket Lid and insert a No. 4 Gevalia
cone shaped paper filter into the Removable Filter Basket. Place the desired amount of
ground coffee into the paper filter. Brew Gevalia Kaffe with the coffee/water ratio you
normally use when you prepare ground coffee. If you prefer strong coffee, we
recommend the following European method, which produces rich, full-bodied flavor.
Use one level Gevalia scoop for each cup (6 fluid ounces) or 12 level scoops per full
pot of coffee. (Experiment with the amount of coffee used in order to adjust the flavor
to your taste.)


