background image

CONTENTS

1. WELCOME. . . . . . . . . . . . . . . . . . . . . . . . . . . . . . . . . . . . . . . . . . . . . . . . . . . . 
2. DESCRIPTION OF THE APPLIANCE. . . . . . . . . . . . . . . . . . . . . . . . . . . . . .  
3. IMPORTANT SAFEGUARDS . . . . . . . . . . . . . . . . . . . . . . . . . . . . . . . . . . . . .      
4. CORD & PLUG INSTRUCTION . . . . . . . . . . . . . . . . . . . . . . . . . . . . . . . . . . .   
     4.1 SPECIAL NOTES ON PLUG . . . . . . . . . . . . . . . . . . . . . . . . . . . . . . . . . . 
     4.2 SHORT CORD INSTRUCTION. . . . . . . . . . . . . . . . . . . . . . . . . . . . . . . .
5. MAIN OPERATION FUNCTION INSTRUCTION . . . . . . . . . . . . . . . . . . . . .   
     5.1 BEFORE FIRST USE OR A LONG TIME NOT USE . . . . . . . . . . . . . . . .
     5.2 HOW TO MAKE ESPRESSO. . . . . . . . . . . . . . . . . . . . . . . . . . . . . . . . . . .
             5.2.1 THE STEP OF OPERATION . . . . . . . . . . . . . . . . . . . . . . . . . . . . . 
             5.2.2 TROUBLESHOOTING DURING THE BREWING. . . . . . . . . . . .
             5.2.3 HOW TO CLEAN THE SEAL RING. . . . . . . . . . . . . . . . . . . . . . . .
             5.2.4 FROTH MILK AFTER BREWING ESPRESSO . . . . . . . . . . . . . . .
      5.3 HOW TO MAKE MILK FOAM. . . . . . . . . . . . . . . . . . . . . . . . . . . . . . . . . . 
             5.3.1 THE STEP OF OPERATION. . . . . . . . . . . . . . . . . . . . . . . . . . . . . . 
             5.3.2 HOW TO CLEAN THE STEAM NOZZLE. . . . . . . . . . . . . . . . . . . 
             5.3.3 BREW ESPRESSO AFTER MILK FROTHING. . . . . . . . . . . . . . .  
6. CLEANING AND MAINTENANCE . . . . . . . . . . . . . . . . . . . . . . . . . . . . . . . . . 
     6.1 DAILY TIPS FOR CLEANING AND MAINTENANCE. . . . . . . . . . . . . . .   
     6.2 REMOVING MINERAL DEPOSITS . . . . . . . . . . . . . . . . . . . . . . . . . . . . .
7. TIPS FOR PERFECT BARISTA . . . . . . . . . . . . . . . . . . . . . . . . . . . . . . . . . . . .
8. TROUBLESHOOTING . . . . . . . . . . . . . . . . . . . . . . . . . . . . . . . . . . . . . . . . . .    

5
6
6
9
9

14

12
13

2

2

3
5
5

14
14
16
17
17
17
18
20
21

Thanks for purchasing our Gevi products. Gevi has focused on creati-
ng perfect home appliances for our customers. In the past few years, 
it took us time to do lots of research and many prototypes to achieve 
our goal. We would like to give you a different user experience. If you 
want FAQs and more information, please feel free to contact us.    

2

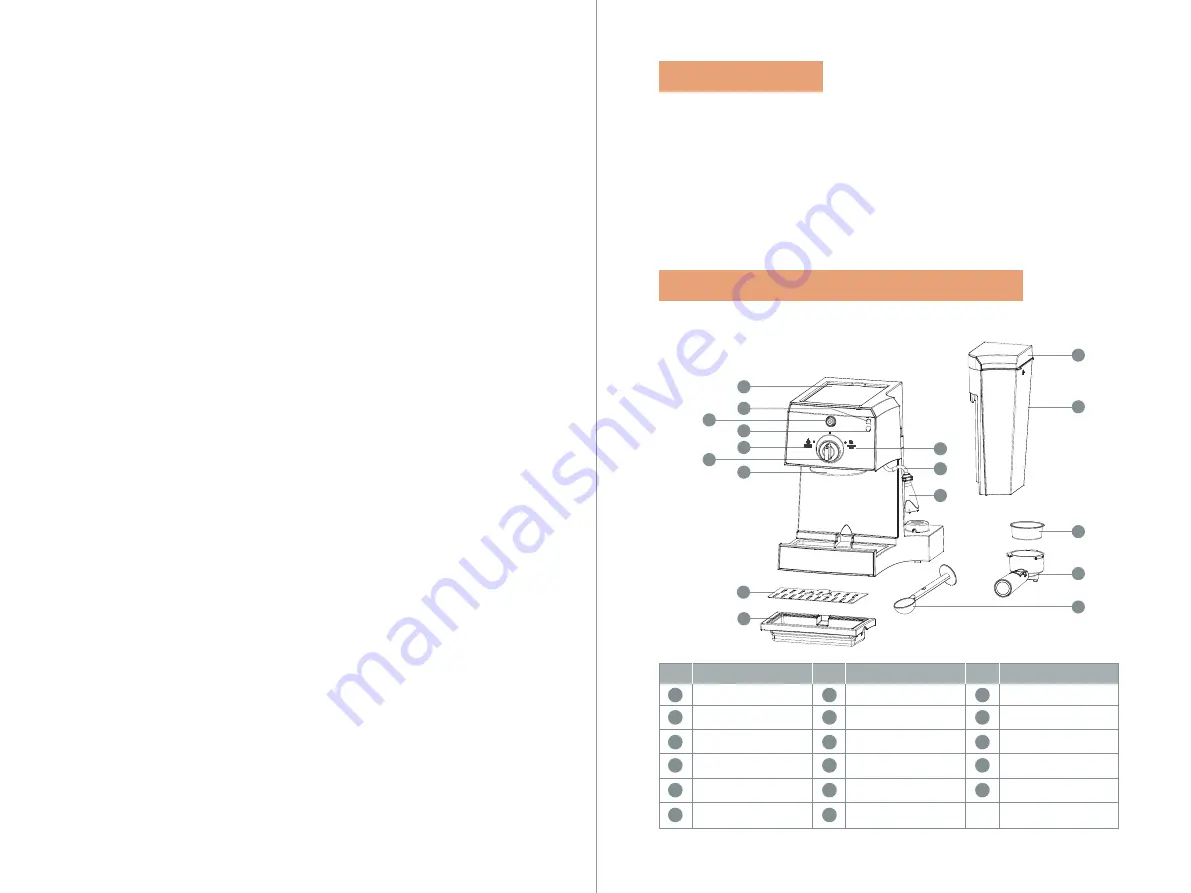
2. DESCRIPTION OF THE APPLIANCE

1. WELCOME

MODEL: GECMD627BK-U

Electrical parameters: 120V~ 60Hz  1350W

10

15

16

17

2

9

5

7

8

11

12

13

14

6

1

4

3

Description

Power button
Cup warming plate
Heating indicator
Power indicator
Brewing espresso 

indicator

Coffee/steam knob 

selector

Filter holder

Double-cup filter

Portafilter
Steam wand

Plastic sleeve 

Frothing milk indicator

Drip tray

Tank cover

Water tank
Spoon & Tamper

Removable cup shelf

Description

Description

Re.

Re.

Re.

1
2

3

4

5

6

7
8

9

10

11

12

13
14

15

16

17

Summary of Contents for GECMD627BK-U

Page 1: ...COFFEE MAKER INSTRUCTION MANUAL GECMD627BK U ...

Page 2: ... 14 12 13 2 2 3 5 5 14 14 16 17 17 17 18 20 21 Thanks for purchasing our Gevi products Gevi has focused on creati ng perfect home appliances for our customers In the past few years it took us time to do lots of research and many prototypes to achieve our goal We would like to give you a different user experience If you want FAQs and more information please feel free to contact us 2 2 DESCRIPTION OF...

Page 3: ...any hot surface of the appliance 9 Do not place the coffee maker on hot surface or beside fire in order to avoid damage 10 To disconnect turn off all control buttons then unplug from wall outlet When unplug the appliance always hold the plug and do not pull the cord directly 11 Do not use the device for other purposes than its intended uses and place it in a dry area 12 Close supervision is necessary...

Page 4: ...extension cord is used 1 The marked electrical rating of the cord set or extension cord should be at least as large as the electrical rating of the appliance 2 The power cord should be arranged so that it will not dangle on the countertop or desktop so as not to be pulled by children or trip over accidentally 4 CORD PLUG INSTRUCTION 4 1 SPECIAL NOTES ON PLUG 4 2 SHORT CORD INSTRUCTION For a better...

Page 5: ...inated red The heati ng indicator do not light up The appliance will start heating 10 When the appliance finished heating heating indicator illuminated green and the appliance pass to ready condi tion 11 Turn the coffee steam knob selector to brewing espresso indicator wait for a moment the water will flow out After about 1 minute turn the coffee steam knob selector back to off position to stop brewing...

Page 6: ...ste flavour of your coffee 3 Insert the portafilter into the appli ance in the flat position and turning clockwise from the position to the position 4 Place corresponding espresso cup on removable cup shelf 5 Make sure the coffee steam knob selector is in off position 2 Fix double cup filter into portafilter make sure the dot on the filter aligns with groove in the portafilter and add coffee powder to double...

Page 7: ...nd you should stop the operation by turn the coffee steam knob selector back to off position Remove the portafilter and clean the coffee powder and don t use the inside coffee powder again 1 There is some coffee powder on the edge of portafilter Clean coffee powder on the edge of the portafilter 2 The portafilter is not installed properly Re install the portafilter correctly 3 The coffee powder is too fine Do ...

Page 8: ...d for your health we suggest you to rinse the pitcher and release some water out from the steam wand 1 When the heating indicator is illuminated green it means the heating for steam function is finished Never skip to next step before heating indicator is illuminated green 5 3 HOW TO MAKE MILK FOAM 5 3 1 THE STEPS OF OPERATION 5 2 3 HOW TO CLEAN THE SEAL RING 5 2 4 FROTH MILK AFTER BREWING ESPRESSO ...

Page 9: ...e in volume by 2 times or your required purpose is re ached Turn the coffee steam knob selector back to off position to stop 7 Take away the pitcher and your milk foam is ready now TIPS For a better taste we suggest to release the water in the boiler before frothing milk Note Please mind the hot water and operate carefully Note 1 When you finish milk frothing and turn the coffee steam knob selector ba...

Page 10: ...d with wet sponge After making the milk foam through the steps above 5 3 1 THE STEPS OF OPERATION the machine will relieve the pressure automatically you can continue to make Espresso 1 A clean coffee maker is essential for making great taste coffee Clean all the accessories each time and clean the coffee maker s water scale regularly as specified in the REMOVING MINERAL DEPOSITS section 2 Clean the s...

Page 11: ...e pass to ready condition 7 Place a cup on removable cup shelf and make sure that the coffee steam knob is in off position 8 Turn the coffee steam knob selector to brewing espresso indicator wait for a moment the water will flow out After the appliance flow about 100mL 200mL turn the coffee steam knob se lector back to off position to stop 9 Move the cup under the steam wand Wait until the heating indica...

Page 12: ...ase clean all the water around the water outlet with a dry rag before put the water tank on the back of coffee maker again Please clean the drip tray Problem Possible Cause Solution The power outlet is not plugged well The coffee maker cannot work Plug the power cord into a wall outlet correctly if the appliance still does not work please contact with the aut horized service facility for assistance ...

Page 13: ...ed to making Espresso 30mL per cup A spoon of flat coffee powder is approximately equal to 7g Collect the coffee powder with the spoon and shake it gently to make the surface flat the amount of coffee powder is around 7g With one spoon coffee powder 7g can brew one cup of top grade coffee while two spoons 14g is two cups of top grade coffee Problem Possible Cause Solution Do not take apart the appliance b...

Page 14: ......

Reviews: