Slimdrive SL NT/SL NT-FR
16
Installation
6.2.4 Adjusting door leaves
X
X
Observe the applicable standards and guidelines on crushing, shearing and drawing-in spots.
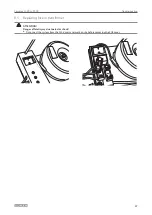
AdjustXtheXparallelXpositionXandXheightXofXtheXdoorXleaves
X
X
Place wedge under the door leaf.
X
X
Use the hanger bolts (3) to align the door leaf flush. Ensure the same height and parallel closing edges when
doing so.
X
X
Loosen the clamping screws for height adjustment (1).
X
X
Use the setting screw (2) (ring spanner size 8) to adjust the height of the door leaves.
2-leaf:X
adjust the height of both door leaves.
X
X
Tighten the screws (1) and (3).
X
X
Remove the mounting aid.
X
X
Move the door leaf into the open position.
X
X
Loosen the hexagon socket screws (4) of the
stop buffer.
X
X
Push the stop buffer on the roller carriages.
X
X
Tighten the hexagon socket screws (4).
X
X
Heed shearing and drawing-in spots in
accordance with DIN 18650, see safety
analysis.
X
X
Make the individual door leaves move
smoothly.
X
X
Use the same procedure for the second door
leaf.


