background image

20

GF Piping Systems  

JRG Sanipex MT

Cembre hydraulic unit

1.7  Bending with Hydraulic Bending Tool

;

;

Observe instruction manual for tool.

;

;

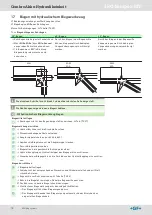
Start of bend: 

Middle

 of the pipe bend section for 

pipe bends:  

 Table [TV.25]

TV.21 

Bend begins at the pipe bend 90° bend

90° bend

45° bend

30° bend


J

Mark pipe bend as shown. When 
bending from the middle of the bend 


J

middle-middle

 (or 

middle outer

section, the geometrical changes in 
length on the straight pipe section can 
be disregarded.  


J

1/6 bend section* in direction of bend 
start, return measure and mark.

When bending from the middle of the 
bend, the geometrical changes in length 
can be disregarded.

When bending from the middle of the 
bend, the geometrical changes in length 
can be disregarded.

BM

1/6

M-M
M-A

M-M
M-A

M-M
M-A

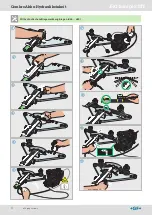
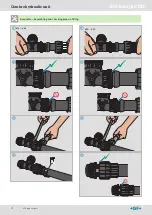
The individual steps for d26 to d63 are shown on the next page.

The figures show the new bending template.

Bending with Hydraulic Bending Tool

Determining middle of bend

:


J

Mark pipe bend as shown for the bend 

 Tab. [TV.27]

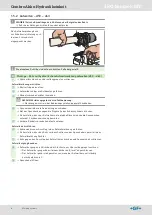
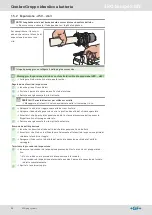
Setting up bending tool

a


J

Place hydraulic cylinder onto the base plate.

s


J

Apply dimension-specific scale.

d


J

Insert adapter nipple (only d26 to d40). 

f


J

Place required bending gauge onto the adapter nipple.

g


J

Insert mandrel into the bending roller. 


J

Insert bending rollers into the required hole. 

h


J

Connect hydraulic coupling to hydraulic nipple of the bending tool.

j


J

Connect control cable of the bending tool to the connector socket of the hydraulic 
unit.

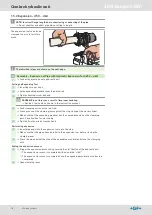
Performing bending 

k


J

Specify bending angle.


J

Adjust the slider to the corresponding dimensions and angle and fasten with the 
positioning screw.

l


J

Mark the middle of the curve on the pipe.  

 Table [TV.26]


J

Lay the pipe into the bending gauge. When doing so, observe the middle of the curve.

;

;

The pipe must protrude over the bending rollers.

;


J

Press and hold down start button on the bending tool

The bending instrument performs the bending procedure.

A

The bending instrument finishes the bending procedure automatically once the 
required bending angle has been reached.

Summary of Contents for JRG Sanipex MT 4812.000

Page 1: ...m Certi ed Quality Management System Montageanleitung Installation instructions Istruzioni per l installazione DE 2 11 EN 12 21 IT 22 31 JRG Sanipex MT Cembre Akku Hydraulikeinheit Cembre hydraulic un...

Page 2: ...kzeug Bedienungsanleitung zum Werkzeug beachten Das Hydraulische Aufweitwerkzeug ist zusammen mit weiteren Werkzeugen in einem Werkzeugkoffer erh ltlich Aufweitwerkzeug d26 d40 GV 23 Akku Aufweitwerkz...

Page 3: ...ewerkzeug d16 d63 GV 25 Aufweitwerkzeug d50 d63 a Bohrspanneinheit s Rohrabstreifer d Aufweitdorn f Ratschen drehmoment schl ssel g Konterschl ssel h Rohrabschneider j Aufweitwerkzeug a s d f g h j GV...

Page 4: ...unsachgem sser Bedienung Verletzungsgefahr J J Bei Handhabung des Spannhebels auf sichere Position der Finger achten Montage Rohr mit hydraulischem Aufweitwerkzeug aufweiten d26 d40 J J Hydraulikschl...

Page 5: ...JRG Sanipex MT 5 GF Piping Systems Cembre Akku Hydraulikeinheit a s d f g Montage Rohr mit hydraulischem Aufweitwerkzeug aufweiten d26 d40...

Page 6: ...wie in der Bedienungsanleitung gezeigt handhaben f J J Spanneinheit ber die Gelenkstangen schieben J J Nut der Spannbacken gegen die Ringkralle des Arbeitszylinders dr cken J J Sicherstellen dass der...

Page 7: ...JRG Sanipex MT 7 GF Piping Systems Cembre Akku Hydraulikeinheit s d f g h j a k l Montage Rohr mit hydraulischem Aufweitwerkzeug aufweiten d50 d63...

Page 8: ...g am Fitting muss durch den Rohrb rdel vollst ndig verdeckt sein HINWEIS Nicht korrekt ausgebildeter Rohrb rdel J J Nicht korrekt ausgebildete Rohrb rdel nicht nachb rdeln J J Zu kurze B rdel abschnei...

Page 9: ...JRG Sanipex MT 9 GF Piping Systems Cembre Akku Hydraulikeinheit a d s Montage Rohr an Fitting montieren und kontrollieren f f d16 d40 a d s d50 d63...

Page 10: ...gen Biegemitte festlegen J J Rohrbogen wie f r den Bogen dargestellt anzeichnen Tab TV 27 Biegewerkzeug einrichten a J J Hydraulikzylinder auf die Grundplatte setzen s J J Dimensionsbezogene Skala auf...

Page 11: ...o 15 o 15 o 0 o 0 o 60 o 60 o 50 GF JRG 63 GF JRG SanipexMT 90 o 90 o 75 o 75 o 45 o 45 o 30 o 30 o 15 o 15 o 0 o 0 o 60 o 60 o 32 40 Lorem ipsum MT 40 SanipexMT 90 o 90 o 75 o 75 o 45 o 45 o 30 o 30...

Page 12: ...nding Tool Observe instruction manual for tool The hydraulic expanding tool together with additional tools is available in a toolbox Expanding tool d26 d40 GV 28 Battery operated expanding tool a Expa...

Page 13: ...d16 d63 GV 30 Expanding tool d50 d63 a Drill clamping unit s Pipe scraper d Expanding mandrel f Ratchet torque wrench g Counter wrench h Pipe cutter j Expanding tool a s d f g h j GV 31 Battery operat...

Page 14: ...injury as a result of improper handling J J When handing the clamping lever make sure that your fingers are in a safe position Assembly Expansion of Pipe with Hydraulic Expansion Tool d26 d40 J J Con...

Page 15: ...JRG Sanipex MT 15 GF Piping Systems Cembre hydraulic unit a s d f g Assembly Expansion of Pipe with Hydraulic Expansion Tool d26 d40...

Page 16: ...n the instruction manual f J J Push clamping unit over the joint rod J J Press groove of the clamping jaws against the ring clamp of the work cylinder J J Make sure that the expanding mandrel has the...

Page 17: ...JRG Sanipex MT 17 GF Piping Systems Cembre hydraulic unit s d f g h j a k l Assembly Expansion of Pipe with Hydraulic Expansion Tool d50 d63...

Page 18: ...on the fitting must be covered completely by the pipe flange NOTE Incorrectly formed pipe flange J J Incorrectly formed pipe flanges must not be re flanged J J Cut off flanges that are too short and r...

Page 19: ...JRG Sanipex MT 19 GF Piping Systems Cembre hydraulic unit a d s Assembly Assembling and checking pipe on fitting f f d16 d40 a d s d50 d63...

Page 20: ...ddle of bend J J Mark pipe bend as shown for the bend Tab TV 27 Setting up bending tool a J J Place hydraulic cylinder onto the base plate s J J Apply dimension specific scale d J J Insert adapter nip...

Page 21: ...15 o 15 o 0 o 0 o 60 o 60 o 50 GF JRG 63 GF JRG SanipexMT 90 o 90 o 75 o 75 o 45 o 45 o 30 o 30 o 15 o 15 o 0 o 0 o 60 o 60 o 32 40 Lorem ipsum MT 40 SanipexMT 90 o 90 o 75 o 75 o 45 o 45 o 30 o 30 o...

Page 22: ...nersi alle istruzioni per l uso dell utensile L utensile idraulico di espansione viene fornito in una valigetta insieme ad altri utensili Utensile di espansione d26 d40 GV 33 Utensile di espansione a...

Page 23: ...35 Utensile di espansione d50 d63 a Unit di serraggio di foratura s Raschiatore per tubi d Perno ad espansione f Chiave dinamometrica a raganella g Controchiave h Tagliatubi j Utensile di espansione a...

Page 24: ...resti della leva di serraggio J J Quando si maneggia la leva di serraggio prestare attenzione a mantenere le dita in posizione sicura Montaggio Espansione del tubo con utensile idraulico di espansione...

Page 25: ...JRG Sanipex MT 25 GF Piping Systems Cembre Gruppo idraulico a batteria a s d f g Montaggio Espansione del tubo con utensile idraulico di espansione d26 d40...

Page 26: ...nelle istruzioni per l uso f J J Spingere l unit di serraggio sopra alla barra articolata J J Spingere il dado della ganascia contro la graffa ad anello del cilindro operatore J J Accertarsi che il p...

Page 27: ...JRG Sanipex MT 27 GF Piping Systems Cembre Gruppo idraulico a batteria s d f g h j a k l Montaggio Espansione del tubo con utensile idraulico di espansione d50 d63...

Page 28: ...completamente coperto dal bordo del tubo NOTA Estremit del tubo non correttamente allargata J J I bordi dei tubi che non sono stati allargati correttamente non possono essere sottoposti a nuovo tratt...

Page 29: ...JRG Sanipex MT 29 GF Piping Systems Cembre Gruppo idraulico a batteria a d s Montaggio Montaggio del tubo al raccordo e controllo f f d16 d40 a d s d50 d63...

Page 30: ...ire il centro della piegatura J J Tracciare la curva del tubo come raffigurato per la curva Tab TV 27 Messa a punto dell utensile di piegatura a J J Posizionare il cilindro idraulico sulla piastra di...

Page 31: ...o 15 o 15 o 0 o 0 o 60 o 60 o 50 GF JRG 63 GF JRG SanipexMT 90 o 90 o 75 o 75 o 45 o 45 o 30 o 30 o 15 o 15 o 0 o 0 o 60 o 60 o 32 40 Lorem ipsum MT 40 SanipexMT 90 o 90 o 75 o 75 o 45 o 45 o 30 o 30...

Page 32: ...Ident Nr 35 16 009 15 2 07 18 DH Georg Fischer JRG AG Hauptstrasse 130 CH 4450 Sissach Phone 41 0 61 975 22 22 Fax 41 0 61 975 22 00 info jrg ps georgfischer com www gfps com...

Reviews: