background image


28 


14


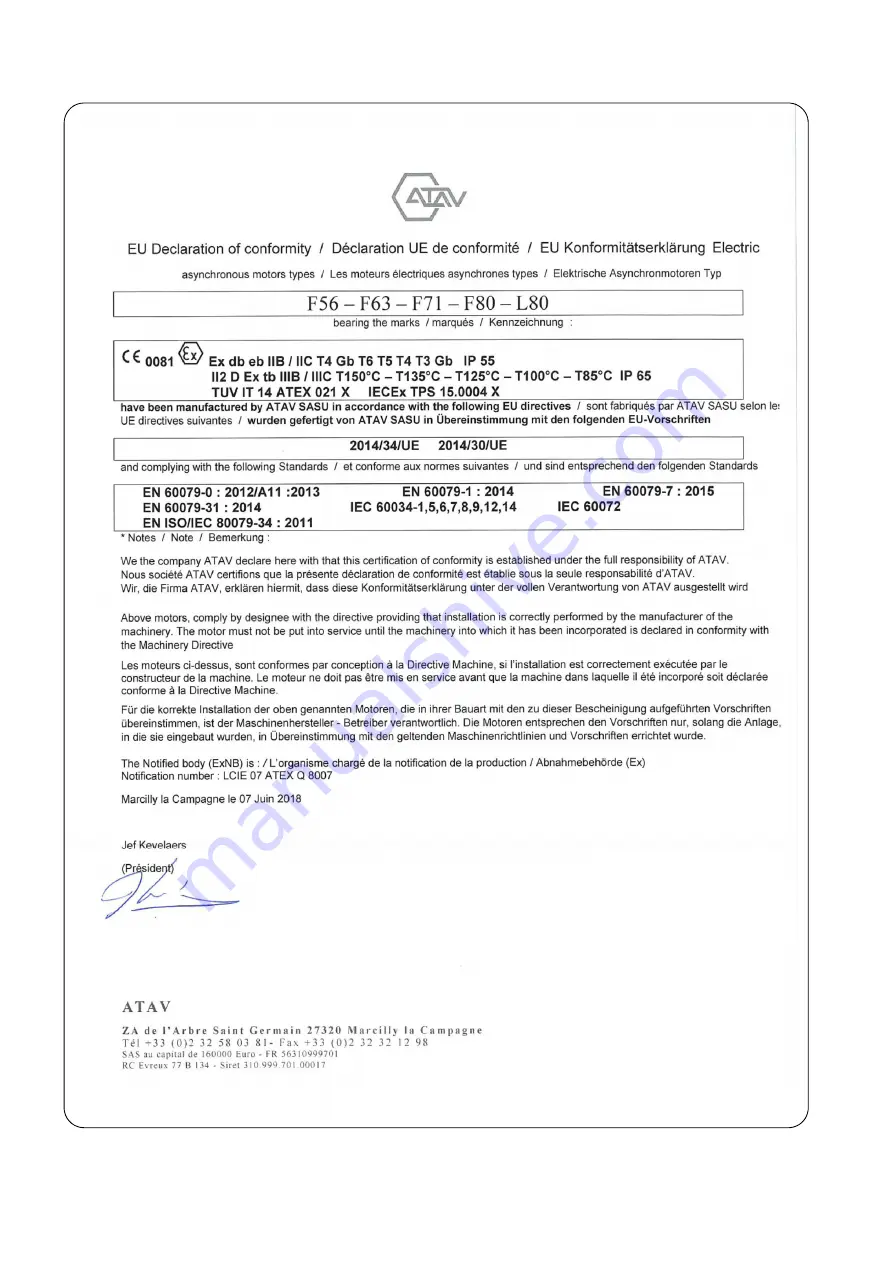
Declaration of conformity, Motor 


Summary of Contents for 10002551 00001

Page 1: ...f Installation Instructions ELEKTROMAT KE 40 24 40 00 Ex Model 10002551 00001 en Status 26 03 2021 ...

Page 2: ...2 GfA ELEKTROMATEN GmbH Co KG Wiesenstraße 81 D 40549 Düsseldorf www gfa elektromaten de info gfa elektromaten de ...

Page 3: ... 10 Motor connection 20 11 Limit switch connection 20 12 Emergency manual operation emergency hand crank 21 13 Completion of initial operation inspection operation 23 14 Declaration of conformity Motor 28 15 Declaration of conformity Accessories 29 16 Declaration of incorporation Declaration of conformity 31 Symbols Warning Potential injury or danger to life Warning Danger to life from electric cu...

Page 4: ...n the handling of door systems Expert knowledge relevant skills and practical experience are what set apart qualified persons They are capable of safely carrying out the tasks involving installation maintenance and modernisation according to the instructions Safe operation The safe operation of the product can only be ensured if it is used as specified Follow the installation instructions Observe ...

Page 5: ... third parties Warning Danger from improper use of the product Do not let children operate the product unsupervised or use as a toy Warning Danger to life from incorrect installation Work carried out improperly may result in death or severe injury from electrical current or falling parts Allow only competent people to carry out the work Disconnect all cables from the power supply Observe valid reg...

Page 6: ...Supply voltage 3 400 V Operating current 2 70 A Operating frequency 50 Hz Power factor cos φ 0 76 Maximum movements per hour 12 h 1 Manual force emergency manual operation 246 N Protection class IP 65 Limit switch range maximum revolutions of the output hollow shaft 20 Temperature range 20 40 C Installation height 1000 m Components used Gearbox SG 85 60 T4 Motor F80 2GD CTVF 4 Terminal box 8146 10...

Page 7: ...G 85 60 T4 Manufacturer GfA Explosion protection II 2G Ex h IIC T4 Gb II 2D Ex h IIIC 130 C Db Max output torque 400 Nm Max output speed 30 rpm Shaft centre distance 85 mm Transmission ratio 1 60 Temperature range 20 40 C Protection class IP 65 ...

Page 8: ...rating current 4 68 2 70 A Operating frequency 50 Hz Power 1 1 kW Power factor cos φ 0 76 Motor speed 1430 rpm Motor torque 7 3 Nm Operating mode S1 Protection class IP 65 Temperature class T4 PTC resistors 20 140 100 250 1600 4000 Ω IA IN ratio 4 9 Braking torque of spring loaded brake 8 Nm Braking voltage 205 V DC Operating current of spring loaded brake 0 12 A Rectifier type B2 DC 230 205 Tempe...

Page 9: ...T6 20 40 T5 20 55 C Protection class IP 66 6 Technical data of limit switch emergency manual operation switch Type 07 2511 113061G Manufacturer Bartec Explosion protection II 2G Ex d IIC T6 II 2D Ex tD A21 IP 66 T80 C Certificate of verification EPS 14 ATEX 1766 X Supply voltage 400 V Temperature range 20 40 C Protection class IP 66 Attention Damage to components The maximum allowable current appl...

Page 10: ...n walls mountings connection and transmission elements must not be exceeded even for maximum holding or locking torque observe technical data Connection elements Use self locking connection elements with a minimum strength of 800 N mm2 8 8 Use a screw that precisely fits the hole Use adequately dimensioned washers for elongated holes BAGAB00002_Z002 BAGAB00003_Z002 3 1 ...

Page 11: ...11 Permissible mounting positions BAGAC03203_Z002 Transmission elements Correctly fit the sprocket Correctly position the sprockets Correctly tension the chain BAGAB00021_Z001 BAGAB00022_Z001 ...

Page 12: ...12 Mounting 4 boreholes are provided for mounting BAGAD03201_Z005 ...

Page 13: ...ust also be observed Warning Injury or danger to life possible Use a lifting device with sufficient load carrying capacity for installation tasks Completely grease the output shaft BAGAE01201_Z001 Mount and fixate the sprocket Do not yet tighten Mount the output shaft at the right or left hand side and fixate it BAGAE03212_Z001 ...

Page 14: ... position the sprocket Mount the chain Fixate the sprocket BAGAE04214_Z001 Correctly tension the chain Tighten all connection elements M12 with 75 Nm Install all further connection elements according to the specifications of the door manufacturer BAGAE04215_Z001 175 Nm ...

Page 15: ...nect the cables mains OFF and check that the supply is off Observe the applicable regulations and standards Ensure proper electrical connection Use suitable tools Carrying out the electrical installation Remove the cover Remove the cover Connect motor limit switch connection cable ...

Page 16: ...ameproof motors d it must be equipped with a separate evaluation unit The evaluation unit measures the temperature of the motor coil and deactivates the motor as soon as the preset temperature is exceeded This safety device can only be reset by hand Short circuit protection is also required PTC resistor signal frequency inverter operation Evaluation is similar to that in mains operation The motors...

Page 17: ...e that the flameproof enclosure is closed In order to achieve the required tightness the cable glands are equipped with different sealing inserts They are available for the following cable diameters 5 5 8 0 8 0 10 5 and 10 13 mm Sealing insert and cable diameter must be aligned Cable glands are only suited for lines with a smooth surface ...

Page 18: ... by pressing the OPEN push button of the control If the door closes L1 and L2 must be swapped in a de energised state Setting of OPEN final limit position Open to the desired OPEN final limit position using the OPEN push button Turn the cam of the S3 OPEN limit switch to the centre of the switch plunger Tighten the screw of the cam ...

Page 19: ...S1 EMERGENCY OPEN limit switch is preset by the setting of the OPEN final limit position The door must stop without posing any risks should the rotating direction be incorrect or should there be a fault with the S3 OPEN limit switch Follow the fine adjustment procedure to correct the switching point of the limit switch as needed Setting of CLOSE final limit position and auxiliary limit switch The ...

Page 20: ...PTC thermistor R3 PTC thermistor Y1 Spring applied brake 11 Limit switch connection S10 Emergency manual operation X12 Terminal strip S1 Emergency OPEN limit switch S2 Emergency CLOSE limit switch S3 OPEN limit switch S4 CLOSE limit switch S5 Additional limit switch S6 Additional limit switch ...

Page 21: ...e the emergency manual operation must be carried out against the closed brake Warning Danger of the door dropping If you need to apply more than the permissible force of 390N according to DIN EN 12604 DIN EN 12453 to move the door by emergency manual operation this indicates a stalling on the drive unit or door Releasing the stalling may cause the door to drop Adopt a secure position For drive uni...

Page 22: ...hand crank be used A wrong crank will drop out of the mounting and injure people Only use a crank with the correct diameter The diameter is indicated on the crank handle switch 1 2 m m 1 0 m m BAUA000101_Z001 Plug in the crank and turn until it engages Open or close by turning the crank After use the crank may be attached to the drive unit Attach as illustrated ...

Page 23: ...ive Oil maintenance is inadmissible Motor Check motor for defective bearings Mounting Check all mounting elements consoles torque mounts screws retaining rings etc for tightness and impeccable condition Electric wiring Check connection cables and cables for damage or pinches Check screw connections for correct seating and electrical contact Emergency actuation Function to be checked in a de energi...

Page 24: ... possible Carry out brake test Overrun depends on the door and its equipment The manufacturer s specifications must be observed Warning Injury or danger to life possible Service life of the brake replacement of the entire brake with motor in the case of Operation with mains supply after 750 000 door cycles Operation with frequency inverter after 1 500 000 door cycles ...

Page 25: ... adequately short intervals should these be unavoidable due to operation processes Performed cleaning tasks should be documented Note Have a specialist check the drive unit once a year Shorter inspection interval for frequently used doors Observe the applicable regulations and standards ...

Page 26: ... above directive and that no new hazards arise from their assembly The assembled modules are intended only for installation in a door system Drive unit KE 40 24 40 00 Ex Part no 10002551 00001 Consisting of Gearbox series SG 85 60 T4 Motor F80 2GD CTVF 4 Terminal box 8146 1041 Limit switches 07 2511 Higher level product identification code II 2G Ex db eb h IIC T4 Gb II 2D Ex tb h IIIC 130 C Db Düs...

Page 27: ...he product according to Directive II 2G Ex h IIC T4 Gb II 2D Ex h IIIC 130 C Db Notified body pursuant to Directive TÜV Nord Anlagetechnik GmbH Am TÜV 1 30519 Hannover Deutschland Registration number 8000306986 Düsseldorf 01 10 2019 Stephan Kleine CEO Signature Standards applied EN ISO 80079 36 2016 Explosive atmospheres Part 36 Non electrical equipment for explosive atmospheres Basic method and r...

Page 28: ...28 14 Declaration of conformity Motor ...

Page 29: ...29 15 Declaration of conformity Accessories ...

Page 30: ...30 ...

Page 31: ...ed complies with the provisions of the above mentioned directives Authorised representative to compile the technical documents is the undersigned Düsseldorf 10 08 2018 Stephan Kleine CEO Signature The following requirements from Appendix I of the Machinery Directive 2006 42 EC are met 1 1 2 1 1 3 1 1 5 1 2 2 1 2 3 1 2 6 1 3 2 1 3 3 1 3 9 1 5 1 1 5 2 1 5 4 1 5 6 1 5 7 1 5 8 1 5 9 1 5 10 1 5 11 1 5 ...

Page 32: ...32 ...

Reviews: