7
EN
WATCHING TV
OPTIONAL SETTING
OPERATING DVD
INTRODUCTION
CONNECTION
INITIAL SETTING
DVD SETTING
INFORMATION
TROUBLESHOOTING
1
2
3
4
5
8
9
10
6
11
20
18
17
13
21
22
23
7
19
16
14
15
12
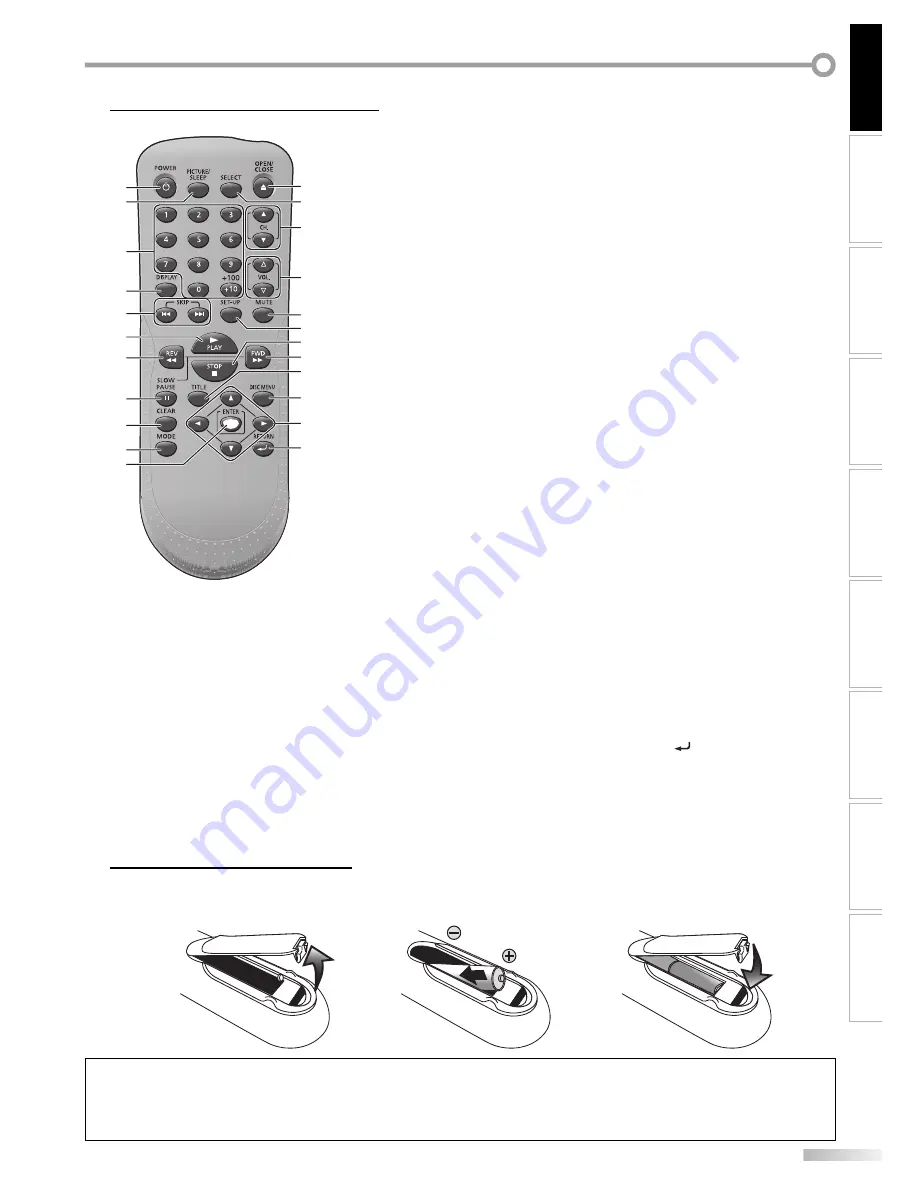
Remote Control Function
5
4. DISPLAY
button
(p14)
Digital Mode (DTV)
•
Press to display the channel number
and the program information.
Analog Mode (TV)
•
Press to display the channel number.
External Input Mode
•
Press to display the currently
selected external input mode.
DVD mode
• Press to display the current status
(DVD, CD).
5. SKIP
H
/
G
button
(p25)
Press to skip forward or backward
chapters, titles (DVD) or tracks (CD).
6. PLAY
B
button
(p23)
Press to begin disc playback.
7. REV
E
button
(p24)
Press to begin the slow reverse
playback during the pause mode
(DVD) and the search backward
through a disc.
8. PAUSE
F
button
(p23)
Press to pause the disc playback.
9. CLEAR
button
(p26)
• Press to clear the numbers entered
incorrectly.
• Press to cancel the point A for A-B
repeat (DVD, CD).
• Press to remove the track number in
program input (CD).
10. MODE
button
(p6)
• Press to arrange the playing order or
play back randomly (CD).
• Press to set the black level (DVD)
and virtual surround (DVD, CD) on or
off.
• Press to change the camera angle to
see the sequence being played back
from different angle (DVD).
• Press to search chapter, title (DVD),
time (DVD, CD) or track (CD).
• Press to set the marker (DVD, CD).
• Press to repeat playback chapter,
title (DVD), or track, disc (CD)
repeatedly or between designated
point A and B (DVD, CD).
• Press to select the audio language
(DVD), or sound mode (CD).
• Press to magnify the part of picture
(approx. 1.3x, 2x and 4x : DVD).
• Press to select the subtitles on a disc
(DVD).
11. ENTER
button
(p12)
Press to confirm your selection.
12. OPEN/CLOSE
A
button
(p23)
Press to open or close the disc tray.
13. SELECT
button
(p14)
• Press to access a connected external
device like a video game, camcorder
or VCR.
• Press to select the digital, analog,
external input or DVD mode.
14. CH.
K
/
L
buttons
(p13)
Press to select channels.
15. VOL.
X
/
Y
buttons
(p13)
Press to adjust the volume.
16. MUTE
button
(p13)
Press to turn the sound on and off.
17. SET-UP
button
(p11)
Press to display the main menu.
18. STOP
C
button
(p23)
Press to stop the disc playback.
19. FWD
D
button
(p24)
Press to begin the slow forward
playback during the pause mode
(DVD) and the search forward
through a disc.
20. TITLE
button
(p23)
Press to call up the title menu on a
DVD.
21. DISC MENU button
(p23)
Press to call up the disc menu on a
DVD.
22.
s
/
B
/
K
/
L
buttons
(p12)
Press to move left/ right/ up/ down
through the items.
23. RETURN button
(p26)
Press to return to the previous menu
operation.
Installing the Batteries
Install the batteries (AA x 2) matching the polarity indicated inside battery compartment of the remote control.
2
1
3
5
Battery Precautions:
• Be sure to follow the correct polarity as indicated in the battery compartment. Reversed batteries may cause damage to the device.
• Do not mix different types of batteries together (e.g., Alkaline and Carbon-Zinc) or old batteries with fresh ones.
• If the device is not to be used for a long period of time, remove the batteries to prevent damage or injury from possible battery leakage.
• Do not try to recharge batteries; they can overheat and rupture.
1. POWER
y
y
button
(p11)
Press to turn the unit on and off.
2. PICTURE/SLEEP
button
(p15 / p16)
•
Press to adjust the picture quality.
•
Press to activate the sleep timer.
3. Number
buttons
(p13)
Press to select channels.
+10/+100
button
• Press to select 100 or higher
channels. (CATV)
• Press to search if there are minor
channels on the currently selected
major channel. (DTV)
Summary of Contents for V7PFDVD20
Page 42: ...42 EN INFORMATION...


