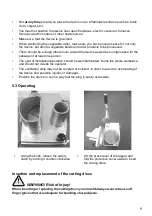
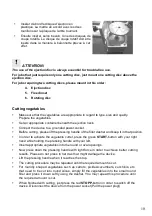
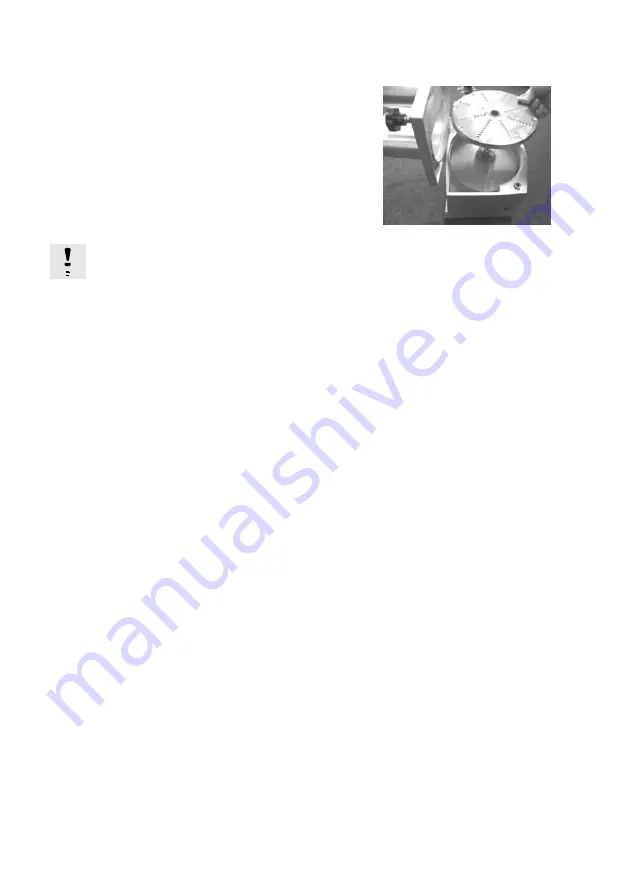
background image


10


• 

Insérer d

’abord le disque d’éjection en 

plastique. La mettre en accord avec les deux 
tourillons sur la plaque de l

’arbre tournant. 

• 

Ensuite insérer, selon besoin, l

’une des disques de 

coupe rotatifs. Le disque de coupe rotatif doit être 
inséré  dans la  monture  à  baï

onnette  prévue  à  cet 

effet. 


ATTENTION!


The use of the ejection disc is always essential for trouble-free use.


For jobs that just require only one cutting disc, just mount one cutting disc above the 
ejection disc.


For jobs requiring two cutting discs, please mount in this order:


4. 

Ejection disc


5. 

Fixed inset


6. 

Rotating disc


Cutting vegetables


• 

Make sure that the vegetables are appropriate in regard to type, size and quality. 
Prepare the vegetables. 

• 

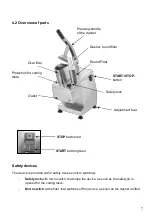
Set an appropriate container beneath the ejection neck. 

• 

Connect the device to a grounded power socket. 

• 

Before cutting, please lift the pressing handle of the filler dasher and keep it in that position. 

• 


In order to activate the vegetable cutter, press the green 

START

-button with your right 

hand while holding the pressing handle with your left. 

• 

Insert appropriate vegetables into the round or oval openings. 

• 


Now press down the pressing handle with light force in order to achieve better cutting 
results. Please do not press to hard as that might damage the device. 

• 

Lift the pressing handle when it reaches the stop. 

• 

The cutting procedure may be repeated until the required amount is cut. 

• 


For  roundly  shaped  vegetables  such  as carrots,  pickles/cucumbers,  zucchinis,  etc. 
that need to be cut into round slices, simply fill the vegetables into the small  round 
filler and press it down softly using the dasher. You may repeat this procedure until 
the required amount is cut. 

• 


When finished with cutting, just press the red 

STOPP

-button in order to switch off the 

device. Disconnect the device from the power socket (Pull the power plug!) 


Summary of Contents for GSH

Page 1: ...Vegetable cutter GSH...

Page 2: ...ons for the commercial use of the device 5 2 3 Intended use 5 3 Delivery packaging and storage 5 3 1 Delivery check 5 6 3 2 Packaging 6 3 3 Storage 6 4 Technical data 6 4 1 Technical specification 6 4...

Page 3: ...hazards which could lead to injury Please follow the instructions very carefully and proceed with particular attention in these cases WARNING Electrical hazard This symbol draws attention to potential...

Page 4: ...protection rights Any person unlawfully using this publication is liable to criminal prosecution 1 5 Declaration of conformity The device complies with the current standards and directives of the EU a...

Page 5: ...ice should never be left unattended during operation Keep away from children and other unqualified persons o Keep this manual in a safe place When passing on selling the device to a third party the ma...

Page 6: ...re usable packing materials to the recycling centre Please inspect the device for completeness In case any part is missing please contact our customer service center immediately 3 3 Storage Keep the...

Page 7: ...n Outlet Safety lock Adjustment feet STOP button red START button green Safety devices The device is provided with 2 safety devices micro switches Safety lock with micro switch that stops the device a...

Page 8: ...y device Keep the safety operating and warning notes on the device always legible and do not remove Make sure the device the workplace and the surface near the vegetable cutter are free of dust cuttin...

Page 9: ...t one person The spot of installation operation should be well illuminated illume the whole workplace and should not delude the operator The ventilation slots may not be covered or blocked in order to...

Page 10: ...cutting please lift the pressing handle of the filler dasher and keep it in that position In order to activate the vegetable cutter press the green START button with your right hand while holding the...

Page 11: ...ver and the tappets of the device with warm water and a mild detergent Rinse with clear water Dry the device with a soft cloth o Wipe off all parts with a soft sponge or cloth and a mild cleaning agen...

Reviews: