background image


15 


VII- How to manipulate 

Depending on options The “Pedispa Compact” could be electric or Non-Electric.  
Having one or more of the following options means that your Pedispa is electric;  


Assisted Seat Positioning Backward / Forward / Tilting. 


Feet Hydro-massage. 


Drain Pump. 

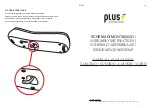
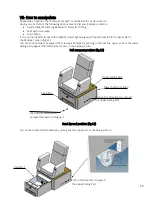
If so, you first need to activate the ON/OFF power lightening switch button located in the back side of 
the Pedispa Curve in (fig.13).


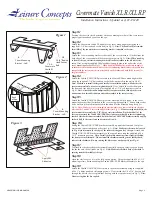
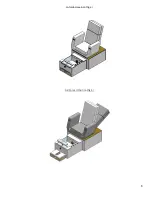
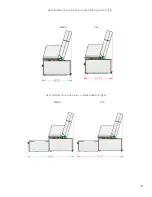
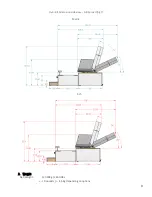
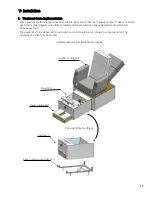
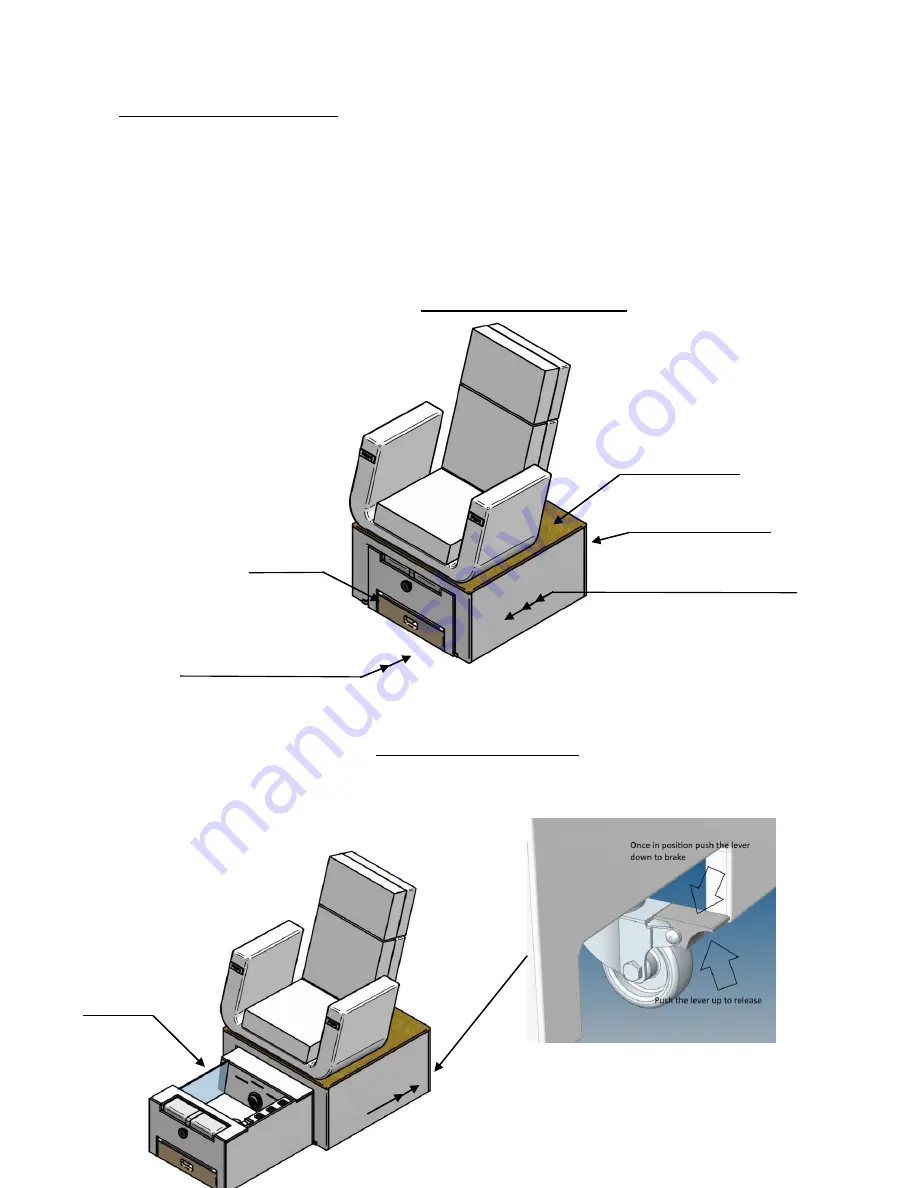
You can Fully Compact or spread the telescopic Pedispa by pushing in and out the upper and/ or the lower 
sliding parts against the fixed part as shown in the below picture.                           
                                                                                 

Full compact position (fig.13)


                                                                                                                                      Upper Sliding Part   
                                                                                                                                       
 
                                                                                                                                        Power button location 
 
                                   Fixed Part 
                                                                                                                          Push on this direction to compact 
                                                                                                                          The upper Sliding Part 


                          Push on this direction to 
                          Compact the lower sliding part 


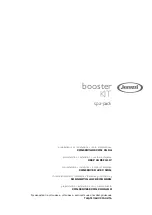
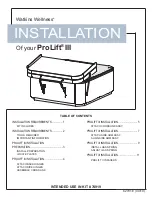
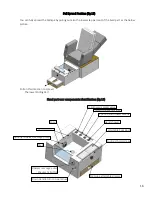
Semi Spread position (fig.14)


You can Semi spread the Pedispa by pulling out the upper part as the below picture.    


Fixed Part 


                              Pull on this direction to spread 

               The upper Sliding Part 

Summary of Contents for Pedispa Compact

Page 1: ...lation and User Manual Gharieni Group GmbH Gutenbergstra e 40 D 47443 Moers Tel 49 0 2841 88300 163 Email service gharieni de Fax 49 0 2841 88300 999 Internet www gharieni de Service Hotline 49 0 2841...

Page 2: ...Base frame fixation and inlets implementation drawing fig 10 P12 Perspective of the Base frame fixation and inlets implementation drawing fig 11 P13 VI Embedded System 1 Electric components embedded s...

Page 3: ...tment if damage is found It is absolutely vital that you read these instructions carefully and only use the unit as instructed here This will protect both your own and your customers safety Keep the m...

Page 4: ...ielded cables and guards must be installed for personal safety They must not be removed modified or by passed REMEDY ANY DEFECTS IMMEDIATELY OR HAVE THEM REMEDIED IMMEDIATELY 4 Dangers due to mechanic...

Page 5: ...eni Group GmbH reserves all rights of intellectual property with respect to the data in our offers and or agreements and or the models samples drawings representations and or instructions for use made...

Page 6: ...6 Unfolded position fig 2 Full Spread Position fig 3...

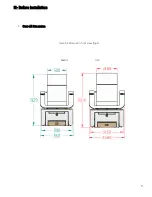
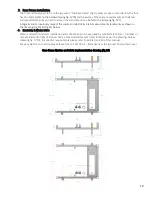
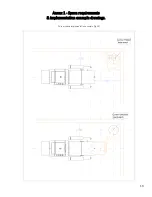
Page 7: ...7 III Before Installation 1 Over All Dimension Over All Dimension front view fig 4 Metric Inch...

Page 8: ...8 Over All Dimension Side view in fully folded position fig 5 Metric Inch Over All Dimension side view unfolded position fig 6 Metric Inch...

Page 9: ...9 Over All Dimension side view Full Spread fig 7 Metric Inch 2 Weight Net Weight 120 00Kg 265 00lbs 10 pounds 4 5 Kg depending on options...

Page 10: ...und Europe single Phase Neutral Ground 3 wire cable 3x 1 5mm2 USA single Phase Neutral Ground 3 wire cable 3x 2 5mm2 2 Water Inlets Requirements Hot and cold water costumer provide water inlets via a...

Page 11: ...hen fully unfolded and fully spread see Space Requirements in Overall Dimensions fig 7 The equipment s are delivered to customers on special pallets and in boxes in some countries The equipment is the...

Page 12: ...ectricity inlets measurements landmarks as shown in the drawing fig 10 fig 11 below 3 Electricity Water Inlets Water and electricity inlets Installation and connections to be executed by certified ele...

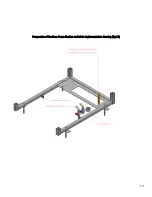
Page 13: ...13 Perspective of the Base frame fixation and inlets implementation drawing fig 11...

Page 14: ...14 VI Embedded System 1 Electric components embedded systems Electric circuit organs connections schematic diagram fig 12...

Page 15: ...Pedispa Curve in fig 13 You can Fully Compact or spread the telescopic Pedispa by pushing in and out the upper and or the lower sliding parts against the fixed part as shown in the below picture Full...

Page 16: ...on to spread The lower Sliding Part Fixed part user components identification fig 16 turn warm water valve turn cold water valve Spout Hand shower diverter Spout Hand shower Overload drain Extractable...

Page 17: ...ply voltage corrects range single phase 120V 60Hz Check GFCI reaction Check the external equipotential electric main security short circuit breaker and check your equipotential insulation Check the el...

Page 18: ...tal Vichy Massage Shower air cushioning and Steam Cocoon Device type Pedispa Compact Relevant EC directives Low Voltage Directive LVD 2006 95 EG Electromagnetic Compatibility 2004 108 EG Safety of Mac...

Page 19: ...19 Annex 1 Space requirements implementation example drawings Corner space Implementation example fig 16...

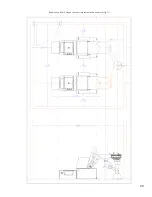
Page 20: ...20 Room space dual Pedispa compact Implementation example fig 17...

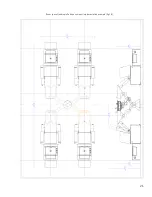
Page 21: ...21 Room space Quadruple Pedispa compact Implementation example fig 18...

Page 22: ...22 Room space Pedispa compact Circular Implementation Centralized single backwash station example fig 19...

Reviews: