background image

www.ghibliwirbel.com 

Professional Cleaning Machines Since 1968

ENGLISH 

- 12

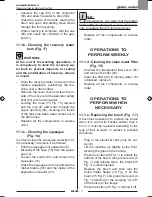
11.1.f - Replacing the squeegee rub-

ber blades (Fig. 20)

When it becomes clear that drying the floor 

is difficult or traces of water remain on the 

floor, it is necessary to check the wear on the 

squeegee rubber blades (14):

-  Remove the squeegee unit (14) as in-

dicated in the “Cleaning the squeegee” 

paragraph.

-  Loosen the finned nuts (68) and remove 

the rubber blades (66).

N.B.:

When the rubber blades (66) are worn on 

one side, on one occasion they may be 

turned over.

-  Replace or turn over the rubber blades 

(66) without inverting them.

-  Replace all the components in reverse 

order.

N.B.:

It is possible to have two types of rubber 

blade.

Para rubber blades for all types of floor and 

polyurethane rubber blades for mechanical 

workshop floors which are dirty with oil.

11.1.g - Squeegee incidence set up 

(Fig. 20)

-  Lower the squeegee using the specific 

lever.

-   Start the suction unit and advance  for 

some metres  before stopping the suction 

unit and the machine.

-  Check the angle of incidence of the rub-

bers (66) on the floor.

  Fig. A = too squatted

  Fig. B = too high

  Fig. C = correct position.

-  Take off the squeegee from the machine.

-   To set up, loosen the screw (70) of the 

wheel (71) and move the wheel vertically 

in the slot; by lifting the wheel, the angle 

of incidence increases, viceversa it de-

creases.

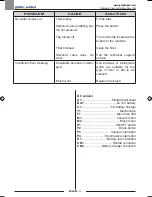
11.1.h - Replacing the fuses (for BC 

version only) (Fig. 21)

 WARNING:

Replace the blown fuse with one with the 

same amperage.

-  Pull the plug (21) (BC Long Run version 

only).

-   Unscrew the two bolts (72) that fasten the 

external box (73) and remove it.

-   Unscrew the two bolts (74) of the printed 

circuit board (75) and remove it.

Fuse (76) Green 30A

  Machine general protection.
-  Put the cover (75) and the box (73) back 

into place in reverse sequence.

Manuale FRECCIA 15_49021800_1ed_06-2017_a.indd   12

15/06/17   11:43

Summary of Contents for FR 15 E 38

Page 1: ...www ghibliwirbel com Professional Cleaning Machines Since 1968 EN Use and Maintenance 49 0251 00 ed 10 2018...

Page 2: ...www ghibliwirbel com Professional Cleaning Machines Since 1968 2 IPX3 GVW Kg Year Art Mod Scrubber Dryer V Tot W Nr MADE IN ITALY V Hz W 1 8 2 3 4 5 6 7...

Page 3: ...rische Eigenschaften Matrikelnr Schutzgrad Gewicht bei Betrieb Baujahr Artikelnummer Modell ES Fabricante Caracter sticas el ctricas N Matr cola Grado de protecci n Peso en orden de marcha A o de fabr...

Page 4: ......

Page 5: ...www ghibliwirbel com Professional Cleaning Machines Since 1968 5 EN English ENGLISH 1 Translation of original instructions...

Page 6: ......

Page 7: ...in terms of ease of use and reliability over time We are aware that in order for a good product to stay that way over time it requires continuous updates aimed at meeting the expectations of those wh...

Page 8: ...efore use EN 8 9 1 b Preparing the machine and choosing the cycle EN 8 9 1 c Adjusting the brush ground contact EN 8 9 1 d Adjusting the front wheel only for BC version EN 8 9 1 e Using the machine EN...

Page 9: ...umber 260 W x 1 370 W x 1 Motor speed 130 rpm 155 rpm Specific pressure 35 g cm 35 g cm Traction Maximum gradient which can be overcome at full load 2 2 Aspiration Motor power 250 W 250 W Negative pre...

Page 10: ...ton 26 Brush rotation button 27 Water delivery button 3 1 UNPACKING Fig 2 Once the packaging has been removed as shown in the instructions on the packaging it self check that the machine and all the c...

Page 11: ...Click of the attach ment of the brush then release levers 4 Fig 1 and press the button 26 Fig 1 and the light turns off WARNING Use only brushes provided by the manu facturer according to the model of...

Page 12: ...red LED it indicates that the battery charge status is at minimum With low battery red LED 24A on the machine shuts down or doesn t start up The red LED R flashes for a few sec onds indicating that t...

Page 13: ...tioned and locks in the nearest required position N B By positioning the handle 1 vertically it is possible to effect a more thorough cleaning of corners by rotating the machine on itself 7 2 MACHINE...

Page 14: ...t the cycle 9 1 c Adjusting the brush ground contact Fig 13 The machine has an adjustment system that makes it possible to have constant contact on the ground independently of the type and size thickn...

Page 15: ...present on the floor and then turn off the aspirator by pressing button 25 Lift the floor wiper 14 by pressing the pedal 3 to the end stop engaging it in its slot WARNING Always lift up the squeegee a...

Page 16: ...ours of work 10 1 DRAINING THE RECOVERY WATER Fig 15 At the end of the washing cycle or when the recovery water tank 6 is full it is necessary to empty the tank by proceeding as follows N B To dispose...

Page 17: ...ect the hose 16 from the squee gee 14 Loosen the knobs 65 and remove the squeegee 14 Wash the squeegee and in particular the rubber blades 66 and the inside of the aspiration connector 53 N B If durin...

Page 18: ...cal workshop floors which are dirty with oil 11 1 g Squeegee incidence set up Fig 20 Lower the squeegee using the specific lever Start the suction unit and advance for some metres before stopping the...

Page 19: ...sing the ma chine Replace the ratiomotor Press the button Aspirator does not work Suction unit outlet overcur rent error or suction unit open circuit error Intake motor damaged Aspirator enabling butt...

Page 20: ...filter Call the technical support service Insufficient floor cleaning Unsuitable brushes or deter gent Brush worn Use brushes or detergents which are suitable for the type of floor or dirt to be clea...

Page 21: ...www ghibliwirbel com Professional Cleaning Machines Since 1968 ENGLISH 15 WIRING DIAGRAMS BC version...

Page 22: ...irbel com Professional Cleaning Machines Since 1968 www ghibliwirbel com Professional Cleaning Machines Since 1968 ITALIANO 15 SCHEMI ELETTRICI Versione BC Hybrid BAT Li ion 24V 28A ENGLISH 16 BC Hybr...

Page 23: ...A1 Printed circuit board BAT 1x 24V battery U1 5A battery charger Y1 Electrovalve F1 Main fuse 30A M1 Vacuum motor M2 Brush motor P1 ON OFF switch P2 Brush button P3 Vacuum interruptor P4 Electrovalv...

Page 24: ...fessional Cleaning Machines Since 1968 ENGLISH 18 EV Solenoid valve M1 Aspiration motor M2 Brush motor MB Terminal board P1 Aspiration switch P2 Brush switch P3 Brush button P4 Solenoid valve switch R...

Page 25: ...www ghibliwirbel com Professional Cleaning Machines Since 1968...

Page 26: ...www ghibliwirbel com Professional Cleaning Machines Since 1968...

Page 27: ......

Page 28: ...1968 DEALER Ghibli Wirbel S p A Via Circonvallazione 5 27020 Dorno PV Italia P 39 0382 848811 F 39 0382 84668 M info ghibliwirbel com www ghibliwirbel com 100 MADE IN ITALY A COMPANY GROUP OF RIELLO I...

Reviews: