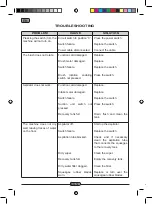
background image

EN

EN-12

TROUBLESHOOTING

PROBLEM

CAUSE

SOLUTION

Pressing the switch (34), the 

machine will not turn on.  

Circuit switch to position “0”.

Switch failure.

Power cable disconnected.

Press the power switch.

Replace the switch.

Connect the cable.

The brush does not rotate. 

Function card damaged.

Brush motor damaged.

Switch failure.

Brush rotation enabling 

switch not pressed.

Replace.

Replace.

Replace the switch.

Press the switch.

Aspirator does not work.

Function card damaged.

Intake motor damaged.

Switch failure.

Suction unit switch not 

pressed.

Recovery tank full.

Replace.

Replace.

Replace the switch.


Press the switch.

Drain, flush and clean the 

tank.

The machine does not dry 

well, leaving traces of water 

on the floor. 

Aspirator off.

Switch failure.

Aspiration tube blocked.

Dirty wiper.

Recovery tank full.

Dirty water filter clogged.

Squeegee rubber blades 

worn.

Start up the aspirator.

Replace the switch.

Check and if necessary 

clean the aspiration tube 

that connects the squeegee 

to the recovery tank.

Clean the wiper.

Empty the recovery tank. 

Clean the filter.

Replace or turn over the 

squeegee rubber blades. 
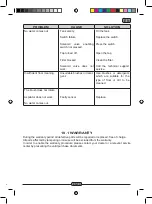
PROBLEM

CAUSE

SOLUTION

No water comes out.

Tank empty.

Switch failure.

Solenoid valve enabling 

switch not pressed.

Tap turned off.

Filter blocked.

Solenoid valve does not 

work.

Fill the tank.

Replace the switch.

Press the switch.

Open the tap

Clean the filter.

Call the technical support 

service. 

Insufficient floor cleaning.

Unsuitable brushes or deter-

gent.

Use brushes or detergents 

which are suitable for the 

type of floor or dirt to be 

cleaned.

The brush does not rotate. 

Aspirator does not work.

No water comes out.

Faulty sensor.

Replace.

10.1 WARRANTY

During the warranty period all defective parts will be repaired or replaced, free of charge.

All parts affected by tampering or misuse will be excluded from the warranty.

In order to enable the warranty procedure please contact your dealer or a relevant service 

center by presenting the valid purchase documents.

Summary of Contents for ROUND 45 E 55 TOUCH

Page 1: ...IT Uso e Manutenzione EN Use and Maintenance FR Utilisation et Entretien DE Gebrauch und wartung ES Uso y Mantenimiento PT Uso e manuten o NL Gebruik en Onderhoud NO Bruk og vedlikehold DK Brug og ved...

Page 2: ...0 2 Year Art Mod Scrubber Dryer V W Hz Nr IPX4 GVW Kg MADE IN ITALY 1 8 5 7 2 3 4 6 1 2 3 4 5 6 7 8...

Page 3: ...l ES Fabricante Caracter sticas el ctricas N Matr cola Grado de protecci n Peso en orden de marcha A o de fabricaci n C digo del art culo Modelo PT Produtor Caracter sticas el tricas N mero de s rie G...

Page 4: ...ability over time We are aware that in order for a good product to stay that way over time it requires continuous updates aimed at meeting the expectations of those who use it on a daily basis For thi...

Page 5: ...the cycle EN 7 7 1 d Using the machine EN 8 7 1 e Adjusting the movement direction EN 8 7 1 f Adjusting traction help EN 8 7 1 g End of use and switching off EN 8 7 1 h Maximum recovery tank water le...

Page 6: ...tical hourly efficiency 2120 m2 h Brushes Pad Diameter Number 530 mm 21 x1 Motor power number 750 Wx1 Motor speed 170 rpm Specific pressure 18 8 22 gr cm2 Carter weight 29 34 Kg Aspiration Motor power...

Page 7: ...sories 0 7 PPL brush 40 0003 00 POLY 0 7 Brush spray guard 24 0265 00 40 4003 00 Front rubber wiper element 39 0110 00 Rear rubber wiper element 39 0111 00 Water loading tube 30 0024 00 Cable extensio...

Page 8: ...and the carrier within 3 days of receipt Remove the bag 21 containing the ac cessories Cut the strap 22 Remove the wooden blocks 23 and 24 Lift the brush flange 9 by pressing down on the pedal 19 see...

Page 9: ...tap 4 counter clockwise to increase the quantity of water or turn it clockwise to decrease it 6 1 FILLING THE TANK Fig 7 WARNING Only add clean mains water to the tank at a temperature no greater than...

Page 10: ...g and drying of the floor is done by pushing the machine forwards if you go backwards the machine will not perform drying in this phase always lift the wiper to avoid damaging the blades 7 1 b Electri...

Page 11: ...nsing and brush rotation Lift up the brush by pressing the pedal 19 Fig 11 as far as it will go fitting it in the designated slot Continue with the aspirator inserted to aspirate all the liquid on the...

Page 12: ...m vel of d the drain lative nsors de of en the eces as fol omply ntry in n out sup To completely drain the water from the tank 5 disconnect the tube 47 from the quick connector 48 then turn the con ne...

Page 13: ...it becomes clear that drying the floor is difficult or traces of water remain on the floor it is necessary to check the wear on the squeegee rubber blades 50 Remove the squeegee unit 11 as in dicated...

Page 14: ...fuse Put the cover 65 Fig 19 back 9 1 l Wiper adjustment Fig 20 It is possible to adjust the height of the wiper and adjust the incidence of the blades on the floor Height adjustment only if necessar...

Page 15: ...otor damaged Switch failure Suction unit switch not pressed Recovery tank full Replace Replace Replace the switch Press the switch Drain flush and clean the tank The machine does not dry well leaving...

Page 16: ...ing Unsuitable brushes or deter gent Use brushes or detergents which are suitable for the type of floor or dirt to be cleaned The brush does not rotate Aspirator does not work No water comes out Fault...

Page 17: ...or board 6 pole connector CN 2 circuit board 4 pole connector CN 3 EV circuit board 2 pole connector F1 Fuse MA Vacuum motor MS Brush motor EV Solenoid P1 230V Bipolar switc P2 EV Switch P3 Brush swit...

Page 18: ...DEALER Ghibli S p a via Circonvallazione 5 27020 Dorno PV Italy Tel 39 0382 848811 Fax 39 0382 84668 http www ghibli it e mail info ghibli it Cod 49 0187 00 1 ed 06 2015 ISO 9001 2008...

Reviews: