background image


Instruction Manual 

KH Director®


EN

   2018-02-19                                                                                                                                                                          

23


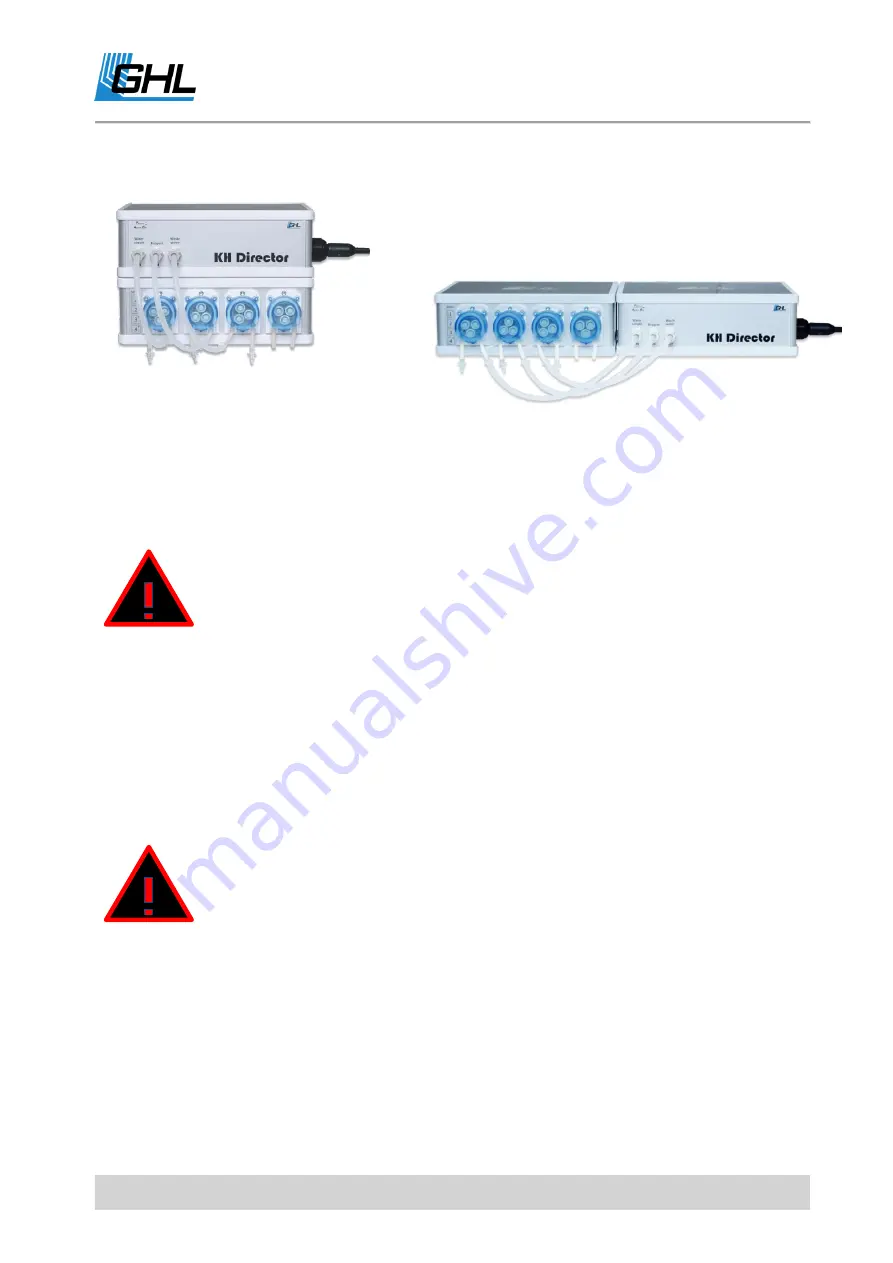
Assembly stacked and next to each other: 


DANGER 


Before activation, the connected reagent tube (pump 2) must be 
completely deaerated. 


Carefully perform the deaeration, as otherwise accurate 
measurement results cannot be achieved.  


Guide the reagent tube in a way that no air bubbles can form 
during operation. 


The venting of the internal reagent tube takes place shortly before 
the measurement is carried out (see point 5). 


DANGER 


During operation, it must be ensured that no air bubbles can form 
in the reagent tube, as these can falsify the measurement result. 


The tube length to the reagent liquid must not exceed 50 cm / 

19,69”


If you detect air in the tubes, deaerate them again and then vent 
the internal reagent tubing using KH Director -> Maintenance -> 

Vent internal reagent tube


Summary of Contents for KH Director

Page 1: ...KH Director Instruction Manual Valid from Firmware Version 1 00 As of 2018 02 19 ...

Page 2: ...Maxi Stand Alone 12 4 2 CONNECTION OF PAB DEVICES 13 4 2 1 What is the PAB 13 4 3 INSTALLING GHL CONTROL CENTER 13 4 3 1 Requirements 13 4 3 2 General 14 4 4 STATUS INDICATORS OF THE KH DIRECTOR 14 4 4 1 System Status LED on the housing cover 14 4 4 2 PAB Status LEDs on the Back Panel 15 4 5 INSTALLING THE KH DIRECTOR 15 4 6 HOW IT WORKS 17 4 7 SELECTION AND ASSIGNMENT OF THE PUMPS 18 4 8 ACTIVATI...

Page 3: ... 6 2 CONTROL VIA REACTOR CALCIUM REACTOR MODE 37 7 MEASUREMENT ACCURACY 39 7 1 WHAT DOES THE MEASURING TOLERANCE MEAN IN PRACTICE 39 7 2 COMPARISON WITH OTHER KH MEASUREMENTS 40 7 3 CONCLUSION 40 8 MAINTENANCE 40 9 WARRANTY LIABILITY 40 10 ADDITIONAL INFORMATION 41 10 1 HELP AND INFORMATION 41 10 2 FIRMWARE UPDATE 41 11 TECHNICAL DATA 42 ...

Page 4: ...ng and maintenance routines Please not that the KH Director does not have an internal controller and therefore requires for operation a ProfiLux 3 Aquarium controller with latest firmware 6 32 or newer a ProfiLux 4 7 10 or newer a GHL Doser 2 2 1 Stand Alone or GHL Doser Maxi Stand Alone both with firmware 1 27 or higher We are confident that our product will help make your hobby more efficient sa...

Page 5: ...ecome a GHL Product expert and fully utilize the full range of functions offered from your device 1 Safety Instructions Please read these instructions carefully before operating the KH Director GHL products are built with maximum security and safety in mind However product safety for this device can only be guaranteed if you follow these guidelines Anyone who uses this device must become familiar ...

Page 6: ...f aquarium water or pond water Make sure to place the device away from splashing water moisture or other liquids WARNING Moisture indicators are placed inside the unit and will change color when exposed to excessive moisture Removing these indicators will void all warranty claims DANGER Warning that non compliance can result in injury or damage to the device DANGER Make sure that the power cord is...

Page 7: ...ble repair or alter the equipment by yourself Do not insert sharp objects into the electrical contacts and ports DANGER If the unit falls into the aquarium or has been exposed to moisture or humidity first turn off the power to the device via the fuse or circuit breaker then pull the power cord Never touch the power plug with wet hands If the device has become wet or dirty thoroughly clean and dry...

Page 8: ...the included Doser Please check to make sure all items are in perfect condition In case of damage immediately contact the dealer from whom you purchased the KH Director WARNING A damaged KH Director or components may not be put into operation under any circumstances 2 4 Important Operating Instructions WARNING To ensure safe operation the following guidelines must be followed Disregarding these sa...

Page 9: ...onnected WARNING Connect only original accessories from GHL Do not use excessive force when plugging in connectors If a plug contact does not fit it is imperative to check that you have chosen the correct socket DANGER Incorrect connection For example inserting a USB connector into a PAB connector can lead to damaging the KH Director A repair caused by this is not covered under warranty and will t...

Page 10: ... to connect devices with AUX plugs 3 2 4 Vent Connector Ventilation and emergency overflow 3 2 5 Power Supply 24 VDC hollow socket The KH Director does not have its own power supply The device needs to be connected to the power supply of the GHL Doser 2 1 via the power supply splitter cable To install first connect each Y ends of the splitter cable to the DC connector of the KH Director 24 VDC pol...

Page 11: ...one from model 2 or a GHL Maxi Doser Stand Alone is required DANGER To establish the power supply the supplied Power supply splitter cable may only be connected to the KH Director and to the GHL Doser 2 1 24 V consumer and its power supply unit Under no circumstances connect 12 V consumers e g ProfiLux to 24 V power supply units or vice versa this will inevitably lead to malfunction or destruction...

Page 12: ...ults and calculate the KH value 4 1 2 Operation with ProfiLux Aquarium Controller and GHL Doser Maxi Stand Alone The KH Director is connected to the ProfiLux 3 3 1 4 or a GHL Doser Maxi Stand Alone and a GHL Doser 2 2 1 Slave via the ProfiLux Aquatic Bus PAB With this option the ProfiLux or the GHL Doser Maxi Stand Alone has full control over the measuring process and behavior of both the GHL Dose...

Page 13: ...tore EU and GHL USA Shop US in different lengths from 0 5 m up to 50 m To enable the operation of the KH Director the device needs to be assigned to the respective controller For thorough information on how to assign PAB devices please refer to the corresponding Instruction manuals They can be downloaded here https www aquariumcomputer com downloads 4 3 Installing GHL Control Center Full device se...

Page 14: ...on of your aquarium The color and blink codes shown depend on the particular Firmware For the meaning of the blink codes please refer to the Support FAQ section of our homepage www aquariumcomputer com DANGER Never leave your aquarium or terrarium unsupervised for an extended amount of time The maximum amount of time without personal view depends on how long your aquarium terrarium or pond can sur...

Page 15: ...lashes quickly KH Director is started firmware update Green LED flashes every second yellow LED is OFF KH Director has not received PAB commands from ProfiLux GHL Doser SA or GHL Doser Maxi SA for more than 30 seconds Both LEDs are OFF KH Director has no supply voltage 4 5 Installing the KH Director The device must be protected from water at all times Mount the KH Director in a water protected are...

Page 16: ...ted devices must be disconnected from the mains all plugs must be disconnected When working in the basin it can never be ruled out that a heating element a pump or a luminaire is defective Please also note the following notes TIP Please ensure good access to the connections of the device Please consider the maximum cable lengths of the connected PAB cables sensors etc when selecting the installati...

Page 17: ...e of the aquarium water the sample tube is automatically deaerated Subsequently with the slow addition of a reagent liquid and measurement of the pH value the KH value is precisely determined After the KHD has calculated the KH value the sample water is pumped out once again and then dispensed into a separate container for later disposal Finally the content of the sample tube is pumped back into t...

Page 18: ...s For the measurement three pumps of the GHL Doser 2 1 are required As default pumps 1 3 are preselected for the functions Water sample Reagent and Waste water WARNING KH Director and Doser must be positioned away and protected from splashing water and excess humidity Splashing water saltwater and or condensing humidity e g occurring nearby the sump will destroy the devices this voids all warranty...

Page 19: ...an once 4 8 Activation of the Pumps 1 Set the pump speeds required for the KH measurement Dose overview Dosing pump 1 or the pump that is designated in your system for the KH measurement Pump settings Maximum Speed Pumps Water Sample and Waste water here numbers 1 3 Speed 3 fast Pump Reagent here number 2 Speed 0 slow WARNING Note the conveying direction Pump 1 and 2 convey to KH Director Pump 3 c...

Page 20: ...Doser calculates the fill level indicator according to the specified capacity of 500 ml and the filling level If you choose a larger fluid container for example 1000 ml at a later time then you need to save that again so that this capacity change can be taken into account in the level indicator The container is emptied by dosing therefore choose Container is emptied For the pump Waste water here 3...

Page 21: ... or stack the devices Please note that depending on the chosen mounting method you need different tube lengths between KHD and Doser For orientation you will find below a tabular overview of the required tube lengths In order to achieve maximum measuring accuracy it is necessary to keep the tube to the reagent liquid as short as possible max 50 cm 19 69 Please make sure that bubbles cannot collect...

Page 22: ... be done manually using the buttons on the GHL Doser 2 1 or via the GCC under Manual dosing TIP Make a note of the assembled tube length for taking the water sample here Pump 1 and the tube length to the Water Sample input of the KH Directors and add the two lengths You will need this total tube length later when determining the Sample tube volume Assembly Water sample Reagent Waste water stacked ...

Page 23: ...at no air bubbles can form during operation The venting of the internal reagent tube takes place shortly before the measurement is carried out see point 5 DANGER During operation it must be ensured that no air bubbles can form in the reagent tube as these can falsify the measurement result The tube length to the reagent liquid must not exceed 50 cm 19 69 If you detect air in the tubes deaerate the...

Page 24: ...irector must also be tubed and connected to the Waste water container WARNING The vent tube must never be positioned in a way that will allow it to suck in water Therefore please make sure the vent tube is placed above the water surface at all times An incorrectly installed vent tube will result in incorrect measurement results ...

Page 25: ...nsor Connect the pH Sensor If you have not already done so check the check box for KH Director enabled and save the changes DANGER Sensor plugs must not be wet or damp when connecting to the socket Do not use force Products that are already powered should never be pulled by the cable This may cause malfunction or damage the connected products and the KH Director The KH Director may NEVER be used w...

Page 26: ...omatic measurement while the pH electrode is removed Switch the automatic measurement back on measurements per day larger 0 only after the pH electrode has been fitted correctly and watertight Go to Probe sensor controls KH Director Maintenance and click the button Calibrate electrode Start the calibration Prepare the red calibration fluid pH 4 immerse the electrode and start the calibration ...

Page 27: ...inutes As soon as the calibration of the electrode to pH 4 has been completed you will be asked to immerse the sensor in the green calibration liquid pH 7 Shake the electrode well and wipe it dry with a lint free cloth Then immerse the sensor in the calibration liquid and continue the calibration with pH 7 ...

Page 28: ...Instruction Manual KH Director EN 2018 02 19 28 Wait for the completion of the calibration Save the calibration values ...

Page 29: ...stallation of the pH Electrode can destroy the KH Director Any repair caused by this is not a warranty claim and is therefore subject to a charge WARNING Please note that the pH electrode must not dry out KH Director retains a small amount of water in the cell after each measurement to protect the pH electrode from drying out After 3 days without measurements it is possible that the humidity in th...

Page 30: ...nt with 50 ml sample volume may be sufficient 5 2 Enter sample tube volume The sample tube is automatically deaerated before a measurement After the measurement the water in the tube is pumped back into the aquarium This ensures that a current measured value is always determined For that the KH Director requires the exact specification of the Sample tube volume When calculating the volume you are ...

Page 31: ...m manual and automatic measurements only when the pH electrode is installed and the fitting is screwed tightly and watertight 5 3 1 Preparation Before the initial implementation the following steps must first be carried out by pressing the corresponding buttons 1 Vent internal reagent tube 2 Flush measurement cell Please carry out both steps one after the other ...

Page 32: ...illing volume 5 3 2 Manual KH value measurement Before starting a measurement please make sure that the pH Electrode has been calibrated and installed correctly and that all dosing pumps involved in the measurement have been correctly selected adjusted and calibrated Then the measurement can be started via the button Start measurement now Depending on the KH value a measuring process will take abo...

Page 33: ...07 00 the second time is automatically 07 00 24h 2 19 00 In most cases it will not be necessary to measure more than once or twice a day If the dosing pumps regulating the KH value are used correctly and the control procedure explained below is followed a sufficiently stable KH value will be reached The more often you measure the more reagent fluid will be consumed 5 4 Alarm The KH Director can mo...

Page 34: ...alue of your aquarium as usual for example according to the Balling or Triton method Here you already set times and dosing quantities optimally That means the desired water values should be achieved as well as possible and be stable The KH regulation intervenes in a corrective manner which means that the set amounts of certain dosing pumps are varied Two modes are available for the KH control by m...

Page 35: ...r dosing amount Dosing pump 4 doses 4 x 100 ml daily You want to have a KH value of 8 0 dKH and if your KH drops below 1 dKH you want to dose 20 ml more with each single dosing here 4 a day For KH setpoint 8 0 dKH must be set for pump 4 a volume change of 20 ml Don t forget to press Save changes after each entry What happens after the KH measurement KH actual value Calculated volume change for pum...

Page 36: ...gle dosage If the set point is exceeded by 1 dKH the set individual doses will be reduced by this percentage Volume change as a percentage lower KH For control differences other than 1 dKH the percentage change is calculated proportionally Limit for raise KH in If KH is too low This can be used to limit the percentage increase in the volume of regular dosing Limit for lower KH in If KH is too high...

Page 37: ...tpoint to KH actual value control difference the pH setpoint of a reactor can be influenced for example by switching a CO2 solenoid valve First the pH sensor is selected for its regulation then the following parameters must be set Nominal value change in pH If the KH actual value is too low by 1 dKH then the pH setpoint is reduced by this value DANGER In any case safe limits must be set The limits...

Page 38: ...5 You want a KH value of 7 5 dKH and that the pH value is reduced by 1 5 if it falls below 1 dKH For KH setpoint 7 5 dKH must be set for the pH setpoint of the reactor control pH 6 5 Don t forget to press Save changes after each entry What happens after the KH measurement KH actual value Calculated pH setpoint change 6 5 dKH 1 5 pH 5 0 7 0 dKH 0 75 pH 5 75 7 5 dKH 0 pH 6 5 no change KH value fits ...

Page 39: ...sing pump Careful ventilation of reagent liquid tubes Under these optimal conditions a tolerance of approximately 0 1 dKH can be achieved per measurement If not all optimal conditions are met for example because of smaller sample volume to consume less reagent the tolerance becomes slightly higher typically to about 0 3 dKH In any case the measured value resolution is 0 1 dKH 7 1 What does the mea...

Page 40: ... recommend the following 1 Make sure the measurement achieves reasonable accuracy with reasonable effort 2 Adjust the control in a way that the desired optimum KH range is maintained 3 Do not choose this area too narrow recommendation range approx 1 5 dKH for example 7 dKH to 8 5 dKH 8 Maintenance The KH Director is largely maintenance free It is recommended to clean the device from dust and other...

Page 41: ...nal product is damaged or modified 10 Additional Information 10 1 Help and Information For help or further information please visit our Support Forum at www aquariumcomputer com or contact your retailer 10 2 Firmware Update The firmware of your GHL Devices is constantly being further developed If you want to use new features that are not supported by your current firmware you can update your devic...

Page 42: ...ature 0 C 40 C 32 F 104 F Humidity Max 80 rel Humidity non condensing Current consumption 200 mA max Dimensions 220 mm 8 66 x 150 mm 5 9 x 75 mm 2 95 without pH Electrode 310 mm 12 20 x 150 mm 5 9 x 75 mm 2 95 with pH Electrode GHL Advanced Technology GmbH Co KG Marie Curie Straße 20 67661 Kaiserslautern www aquariumcomputer com ...

Reviews: