background image

E40.0.2x.6C-01 

Operating Manual EASY

LOG

 80NS 

page 7 of 16 

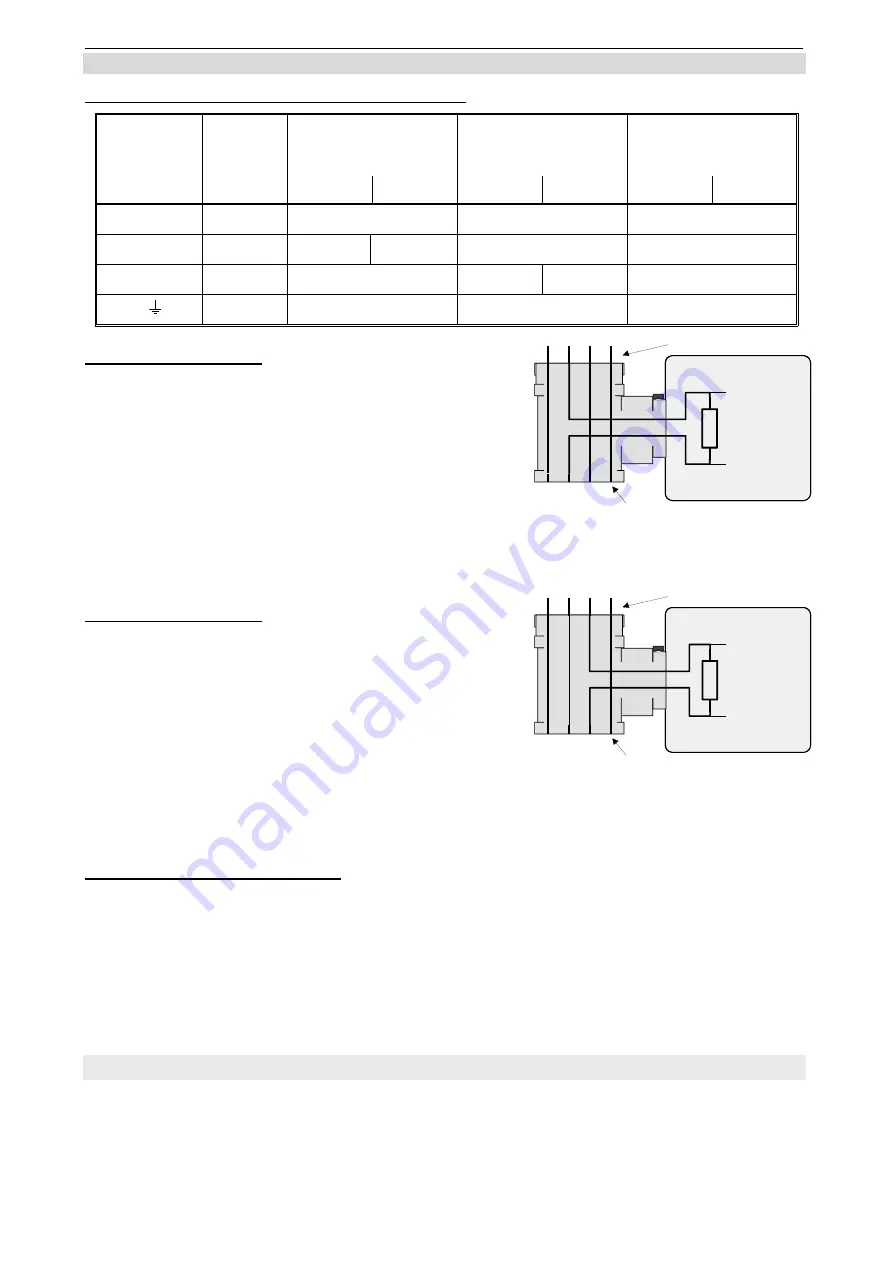
5.2.1  Assignment of the angle-type plug 

Standard assignment of the angle-type plug: 

Contact no.: 

wire colour 

(socket contact)


… – E420 (4-20mA) 

… – E020 (0-20mA) 

… – EV010 (0-10V) 

… – EV01 (0-1V) 
… – EV02 (0-2V) 

pin 

socket 

pin 

socket 

pin 

socket 

blue 

connected 

connected 

connected,  

red 

signal - 


connected 

connected, signal - 

black 

connected 

Signal - 


connected


4 (

yellow 

connected


connected


connected


Input signal: 4-20mA 

I

n the angle-type plug the male contacts 1, 3 and 4 

are directly connected 1:1 with the socket. The 

EASY

LOG 

(Rs = 50 Ohm)

 is located between the male 

contact 2 (-) and the jack 2 (+). 
If the '

Signal/GND

'- line in your transmitter is not as-

signed to contact 2, please do not forget to adjust 
the 

EASY

LOG 

-angle-type plug accordingly.  

To do so open the 

EASY

LOG 

-angle-type plug and exchange the red wire of contact 2 

against the wire of the contact representing the signal 'Signal/GND' in your transmitter. 
Then exchange and/or rewire the two contacts in the angle-type plug of your connecting 
cable. 

Input signal: 0-20mA 

In the angle-type plug the male contacts 1, 2 and 4 
are directly connected 1:1 with the socket. The 

EASY

LOG 

(Rs = 50 Ohm)

 is located between the male 

contact 3 (-) and the jack 3 (+). 
If the '

Signal/GND

'- line in your transmitter is not as-

signed to contact 3, please do not forget to adjust 
the 

EASY

LOG 

-angle-type plug accordingly.  

To do so open the 

EASY

LOG 

-angle-type plug and exchange the black wire of contact 3 

against the wire oft he contact representing the signal 'Signal/GND' in your transmitter. 
Then exchange and/or rewire the two contacts in the angle-type plug of your connecting 
cable. 

Input signal: 0-1V, 0-2V, 0-10V


In the angle-type plug the 4 male contacts are directly connected 1:1 with the socket. The 

EASY

LOG 

connection is on contact 1 () and contact 2 (signal - ). 

If your transmitter assignments for the ‘’ and ‘signal-‘ are different, please do not 
forget to adjust male contacts of your angle-type plug accordingly: 
To do so open the 

EASY

LOG 

-angle-type plug and remove the red and the blue wires en-

tering the housing from the coupling of the angle-type plug. Connect wires with the re-
spective contacts, representing  (blue wire) and signal 

– (red wire) at your trans-

mitter. 

5.3  Connection advice 

If more than 

EASY

BUS

-sensor modules are connected at the same 

EASY

BUS

, the input 

signals of each 

EASYBUS

-sensor module (e.g. 

EASY

LOG

 80NS

…, 

EASY

LOG

 80IMP, 

EBN

) has to be isolated from the others. 


pin


+


_


1


2


3


4


1


2


3


4


socket


Rs = 50 Ohm


pin


+


_


1


2


3


4


1


2


3


4


socket


Rs = 50 Ohm


Summary of Contents for EASYLOG 80NS Series

Page 1: ...3 0 info greisinger de www greisinger de Installation and operating manual Data logger for standard signals from version 2 4 EASYLOG 80NS Please read these instructions carefully before use WEEE Reg Nr DE 93889386 Please consider the safety instructions Please keep for future reference EASYLOG 80NS K EASYLOG 80NS W ...

Page 2: ...Operating possibilities at the device display selection 8 6 2 Operating possibilities at the device logger operation 8 6 3 Operating possibilities via software GSOFT 40K 9 6 4 Operating possibilities via software EASYBus Configurator 9 7 Battery life time and recording period 9 8 Operating displays 10 8 1 Measured value display 10 8 2 Logger status messages 10 8 3 System messages 11 8 4 Alarm and ...

Page 3: ...anufacturer for damages and consequential damages are voided with misuse disregard of this operating manual assignment of inadequately qualified technical personnel and arbitrary modifications of the product 2 2 Safety signs and symbols Warnings are labelled in this document with the followings signs Caution This symbol warns of imminent danger death serious injuries and signifi cant damage to pro...

Page 4: ... only be guaranteed if the device is not subjected to any other climatic conditions than those stated under Specification 5 When connecting the device to other devices e g PC the interconnection has to be designed most thoroughly as internal connections in third party devices e g connection GND with protective earth may lead to undesired voltage potentials 6 If there is a risk whatsoever involved ...

Page 5: ...wer consumption is at its minimum When there is a communication with the software for the first time the EASYLOG leaves the sleep mode and Stop is displayed Then the device is ready for operation Note That sleep mode nothing is displayed cannot be restored again Stop or Halt are similar to the sleep mode Both of that operation modes ensure minimum consumption Note Logger start over keypad before l...

Page 6: ...4 20 mA and 0 20 mA mind the maximum input current rating of 40 mA under any circumstances 5 1 EASYLOG 80NS K The connection of the logger occurs via 2 wire connection cable connection number wire colour EASYLOG 80NS K 1 red signal 2 transparent signal 5 2 EASYLOG 80NS W To connect the logger it is simply plugged into an existing transmitter by means of a special adapter for the cubic plug accordi...

Page 7: ...SYLOG Rs 50 Ohm is located between the male contact 3 and the jack 3 If the Signal GND line in your transmitter is not as signed to contact 3 please do not forget to adjust the EASYLOG angle type plug accordingly To do so open the EASYLOG angle type plug and exchange the black wire of contact 3 against the wire oft he contact representing the signal Signal GND in your transmitter Then exchange and...

Page 8: ...on again Delete min value Push button for about 5 seconds CLr is displayed and the min values of all measuring channels are deleted 6 2 Operating possibilities at the device logger operation Function Procedure Display and adjust cycle time Push button and at the same time The main display shows CYCL The secondary display shows the currently adjusted cycle time in sec If the logger is currently not...

Page 9: ...alarm delay 1 activate the function logger stop via buttons disabled 1 Please note The alarm settings can be only changed if the logger is stopped logger without logger data 6 4 Operating possibilities via software EASYBus Configurator The software EASYBus Configurator V2 0 is needed to change the configuration settings With that software the following adjustment are additionally possible adjustme...

Page 10: ...er status messages are dis played STOP The EASYLOG recording has been stopped The logger memory is empty Note At this state the power consumption is at its minimum HOLD The EASYLOG recording has been halted No data is stored but the logger memory contains data The number of the saved recording sets is shown at the secondary display START DELAY The logger is activated but no data is recorded yet As...

Page 11: ...the logger to the manufacturer for repair 8 4 Alarm and error messages The following messages correspond to a particular measuring channel and are dis played accordingly ALARM LOW The measured value is below the selected min alarm limit This and the current value is displayed alternately ALARM HIGH The measured value is above the selected max alarm limit This and the current value is displayed alt...

Page 12: ...bout 7 and 5 8 mm high Interface EASYBus Busload equals to 2 EASYBus elements Battery 1x fixed lithium cell Li SOCl2 3 6V 1200 mAh 4 32 Wh Battery life time depending on the chosen measuring cycle about 5 years at 15 minutes and nominal temperature Measured value memory 250 000 measuring values Measuring cycle 2 seconds to 5 hours 18000 seconds Memory type cyclic logger recording can be activated ...

Page 13: ...nd standards The instruments confirm to following European directives 2011 65 EU RoHS 2014 30 EU EMV directives Applied harmonized standards EN 50581 2012 EN 61326 1 2013 emissions level class B emi immunity according to table 1 additional error 1 Note When connecting long leads adequate safety measures against voltage surges have to be taken 10 Decommissioning reshipment and disposal 10 1 Reshipm...

Page 14: ...lete data Problem A error message is displayed Error message Possible reason procedure remedy measuring range exceeded Measuring range has been exceeded Operate logger within its specifica tions Assignment of the angle type plug does not match with the transmitter assignment Check assignment and adjust it if necessary measuring range under run Measuring range is under run Operate logger within its...

Page 15: ...ction diagram for a relay with self induction recuperation diode b Connection information for GR 10 GNR 10 or GNR 232 A GND to be connected to terminal 11 of the GNR NPN to be connected to terminal 10 or 9 of the GNR Specification Alarm function alarm points selectable within the measuring range and alarm delay adjustable from 0 to 500 min Alarm via display AL xx interface communication and alarm ...

Page 16: ...E40 0 2x 6C 01 Operating Manual EASYLOG 80NS page 16 of 16 ...

Reviews: