LPPYRA13
- 7 -
V2.3
•
The pyranometer must be mounted in an easy-to-reach location in order to clean
the dome regularly and carry out maintenance. At the same time, make sure that
no buildings, constructions, trees or obstructions exceed the horizontal plane where
the pyranometer lies. If this is not possible, select a site where obstructions in the
path of the sun from sunrise to sunset do not exceed 5 degrees of elevation.
•
The pyranometer must be located far from any kind of obstruction, which might al-
ter the measurement of diffused light.
•
In order to allow an accurate horizontal positioning, the pyranometer is equipped
with a levelling device: the adjustment is made by means of the levelling screws
that allow adjusting the pyranometer inclination.
3.1
M
OUNTING THE SHADOW RING
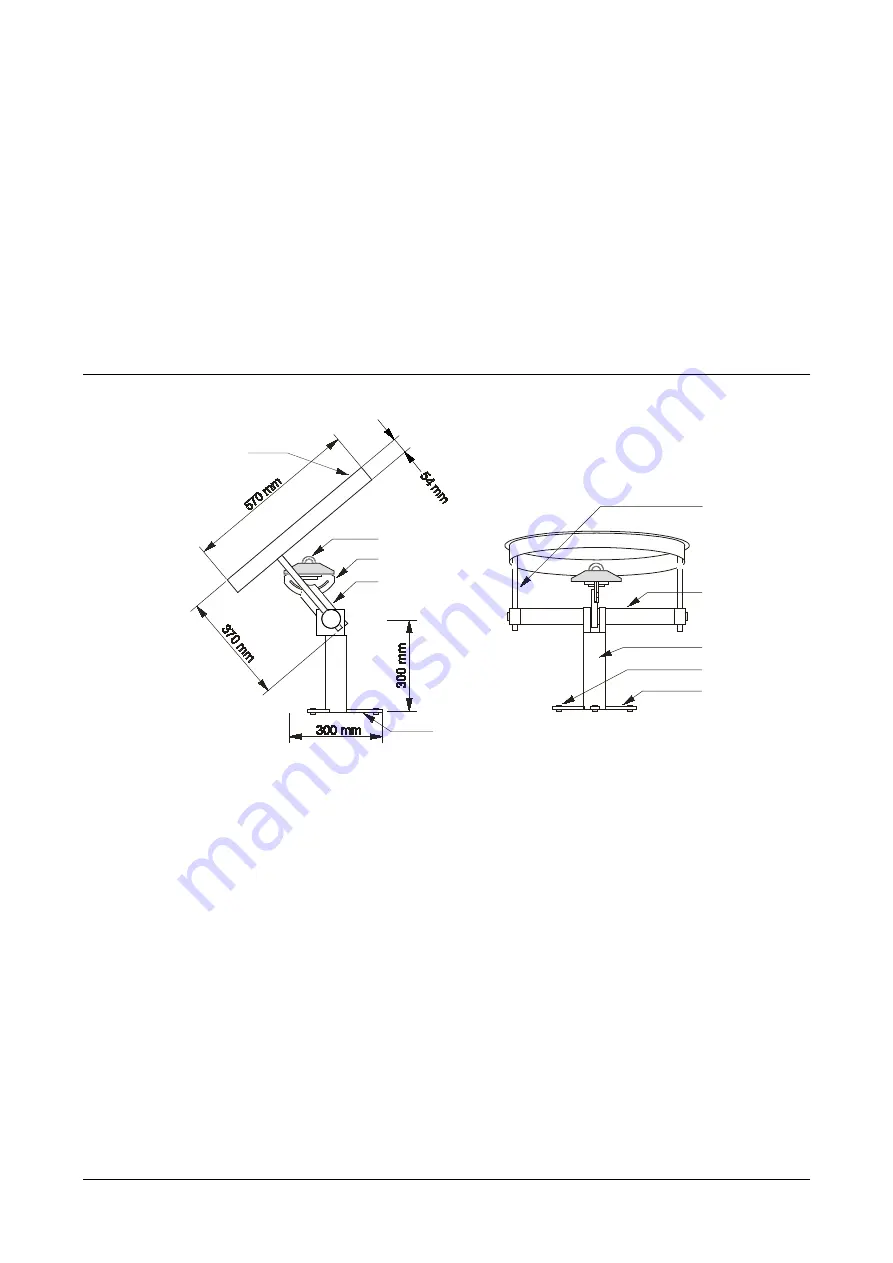
LPPYRA13 is made up of two parts: the pyranometer and the shadow ring.
Fig. 3.2: LPPYRA13 dimensions and description
To make the transport easier, the shadow ring is disassembled in the following pieces:
•
Base (composed of three spokes).
•
Shadow ring with “L” profile.
•
Sliding bars with graduated scale.
•
cr pyranometer s goniometer (factory assembled and
aligned).
Mounting Instructions:
1.
Screw the three spokes of the base to the pillar.
2.
Screw the two sliding bars to the shadow ring.
3.
Insert the sliding bars of the ring in the two slots at the crossbar ends (if correct-
ly mounted, the ring axis crosses the pyranometer thermopile center).
Levelling device
Screw with ring nut
Pillar
Crossbar
Graduated
sliding bar
Base
Pyranometer
support
Goniometer
Pyranometer
Shadow ring
Summary of Contents for Delta OHM LPPYRA13
Page 32: ...LPPYRA13 32 V2 3 NOTES...
Page 33: ...LPPYRA13 33 V2 3 NOTES...
Page 34: ...LPPYRA13 34 V2 3 NOTES...
Page 35: ......

