G 1700 series
5 | Measurement Basics
B-H86.0.0X.DK2-3.1
13 / 20
5
Measurement Basics
5.1
Sensor/device accuracy
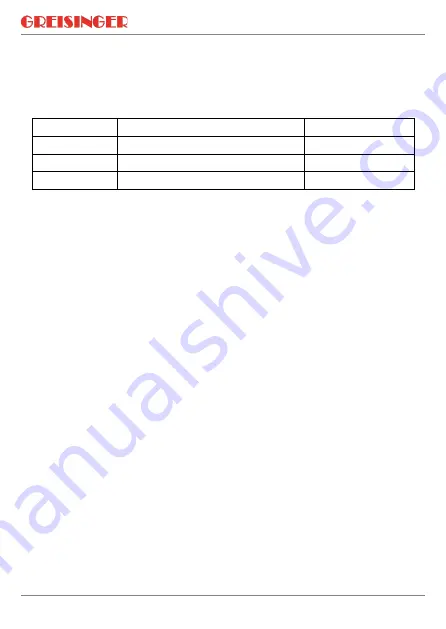
The device can be equipped with different interchangeable sensors. The temperature
sensors are divided into the following classes according to EN 60751.
class
deviation
temperature range
B
±0,3 °C ±0,5 % of measured value
-
50 … +500 °C
A
±0,15 °C ±0,2 % of measured value
-
30 … +300 °C
AA =
1/3 DIN B
±0,1 °C ±0,17 % of measured value
0 … +150 °C
In order to achieve high exchange accuracy without the necessity of an additional
correction, we recommend using class A or AA temperature sensors.
5.2
Possible measuring errors
5.2.1
Immersion depth
Immerse to a depth of at least 20 mm and then stir. Otherwise, measuring errors can
occur due to the heat transmission of the sensor tube if the immersion depth
is too shallow.
Gas:
Immerse as far as possible into the gas to be measured so that the measur-
ing sensor is subjected to a heavy flow.
5.2.2
Surface effects and poor heat transfer
Special measuring sensors are required for this purpose. Surface characteristics, de-
sign of the measuring sensor, heat transfer and environmental temperature influence
the measurement result.
NOTE: Thermally conductive paste between the measuring sensor and surface can
also in-crease measurement accuracy in some cases.
5.2.3
Cooling / evaporation
When measuring the air temperature, the probe should be dry, otherwise the tempera-
ture measured will be too low.
5.2.4
Response time
An adequate wait time must be observed for the measuring process before reading the
measured value. The response time T
90
describes the time in which the displayed
measured value reached 90% of the end value.


