background image

6

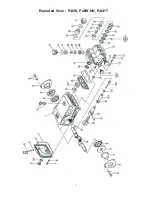
Exploded View - P46W, P46W-HK, P46HT

Summary of Contents for P46HT

Page 1: ...stallation Instructions page 2 Pump Specifications page 3 4 Kits Torque Specs page 5 Pump Mounting Selection Guide page 5 Exploded View page 6 Parts List page 7 Trouble Shooting page 8 Recommended Spa...

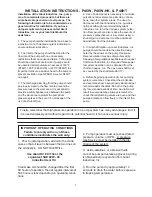
Page 2: ...a base to a maximum of a 15 degree angle of inclination to ensureoptimumlubrication 2 The inlet to the pump should be sized for the flow rate of the pump with no unnecessary restrictions that can cau...

Page 3: ...motor and B section belts When selecting desired GPM allow for a 5 tolerance on pumps output due to variations in pulleys belts and motors among manufactur ers 1 Select GPM required then select appro...

Page 4: ...red GPM allow for a 5 tolerance on pumps output due to variations in pulleys belts and motors amongmanufacturers 1 SelectGPMrequired thenselectappropriatemotor and pump pulley from the same line 2 The...

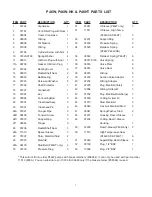
Page 5: ...lves Item Part Description Qty 34 05593 Spring Retainer 3 35 06017 0100 Valve Spring 3 36 06016 Valve Plate 3 37 06014 Valve Seat 3 38 06015 O Ring 3 40 07234 O Ring Adaptor 3 42 12004 O Ring Inlet Pl...

Page 6: ...6 Exploded View P46W P46W HK P46HT...

Page 7: ...ing 3 ITEM PART DESCRIPTION QTY 31 07241 V Sleeve P46W only 3 31 11511 V Sleeve High Temp P46W HK P46HT 3 32 07231 SupportRing 3 33 07232 PressureSpring 3 34 07325 Retainer Spring 6 P46W P46W HK 34 05...

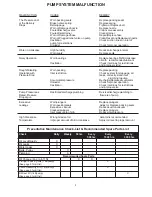
Page 8: ...correctly sized inlet plumbing to pump Accumulatorpressure Recharge Replaceaccumulator Unloader Checkforproperoperation Cavitation Check inlet lines for restrictions and orpropersize Pump Pressure as...

Page 9: ...spring 35 and valve plate 36 4 Drain the oil from the pump Turn the pump over to remove the two manifold stud nuts 46 with a 17mm wrench 7 Inspect and clean the valve assembly parts If pitted or worn...

Page 10: ...d Install new v sleeves 31 with grooved sides towards front of pump For P46W HK P46HT pumps install high temperature seal 50 before v sleeve 31 with grooved sides towards front of pump Replace the sup...

Page 11: ...tap with a rubber mallet untill bearing and seal are completely removed The bearing can only be removed from the inside by inserting the Giant Bearing Tool through the opposite side of the crankcase...

Page 12: ...factured or authorized by Giant 4 Improper use of the product as a component part 5 Changes or modifications made by the customer or third party 6 The operation of pumps and or accessories exceeding t...

Reviews: