background image

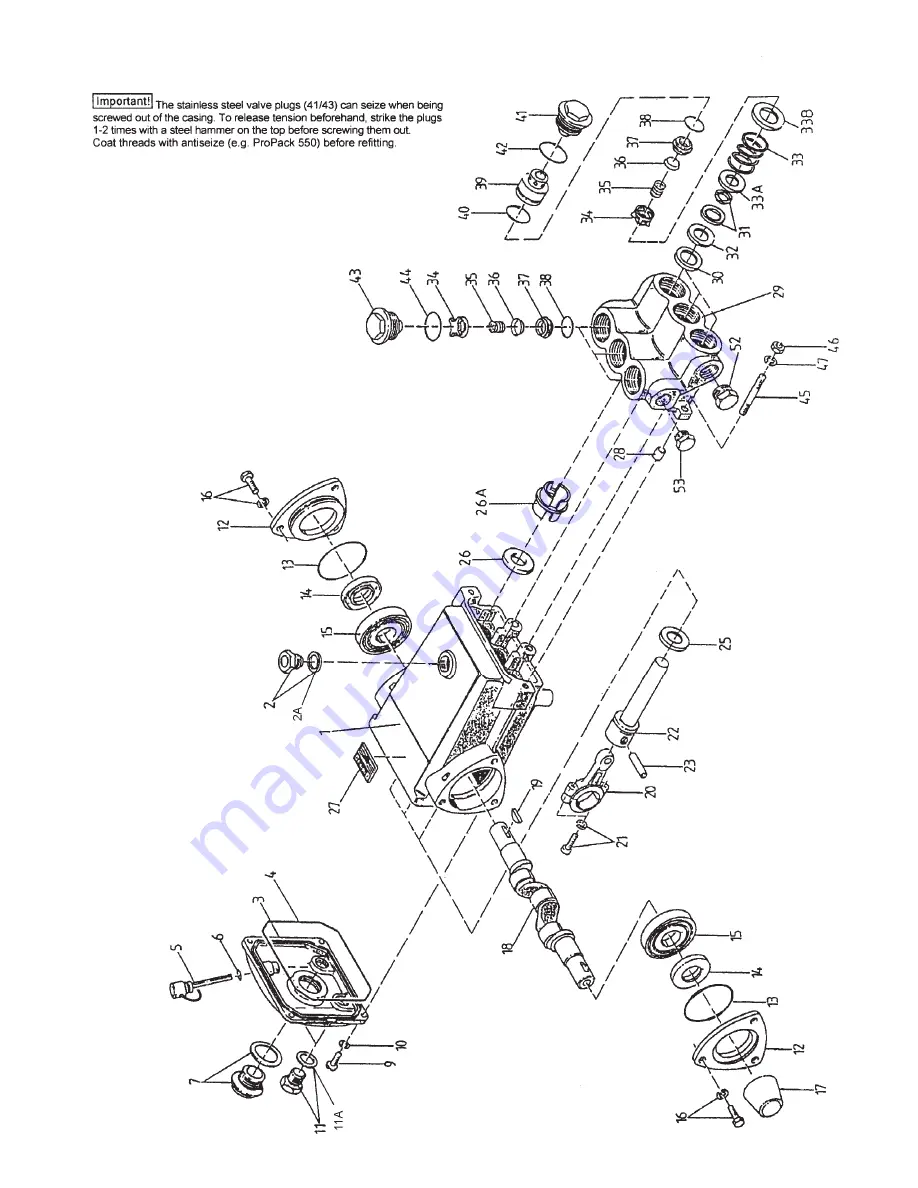
Exploded View - P57 & P57-0011

4

Summary of Contents for P57

Page 1: ...tion Instructions page 2 Pump Specifications page 3 Exploded View page 4 Parts List Kits page 5 Torque Specifications page 5 Trouble Shooting page 6 Pump Mounting Selection Guide page 6 Recommended Maintenance Schedule page 6 Repair Instructions page 7 Dimensions back page Warranty Information back page Updated 7 07 ...

Page 2: ...stries Inc 4 Run the pump dry approximately 10 seconds to drain the water before exposure to freezing temperatures 1 Prior to initial operation add oil to the crankcase so that oil level is between the two lines on the oil dipstick DO NOT OVERFILL Use Giant 20W 50 oil p n 01153 or use SAE 80 90W Industrial Gear Lube oil p n 01154 Crankcase oil should be changed after the first 50 hours of operatio...

Page 3: ...B section belts When selecting desired GPM allow for a 5 tolerance on pumps output due to variations in pulleys belts and motors among manufacturers 1 Select GPM required then select appropriate motor and pump pulley from the same line 2 The desired pressure is achieved by selecting the correct nozzle size that corresponds with the pump GPM HORSEPOWER INFORMATION Horsepower ratings shown are the p...

Page 4: ...Exploded View P57 P57 0011 4 ...

Page 5: ...Drain Plug Assembly 1 11A 07191 Gasket 1 12 13402 Bearing Cover 2 13 07193 O Ring Bearing Cover 2 14 01166 Radial Shaft Seal 2 15 01086 Bearing 2 16 07114 Hex Screw with Washer 6 17 05023 Shaft Protector 1 18 12128 Crankshaft 1 19 01024 Woodruff Key 1 20 07199 Connecting Rod 3 21 01027 Screw with Washer 6 22 07396 Plunger Assy 3 23 01031 Crosshead Pin 3 25 13403 Flinger 3 26 08026 Radial Shaft Sea...

Page 6: ...rictions and or proper size PumpPressureas Dropat gunRated Pressure Restricteddischargeplumbing Re sizedischargeplumbingtoflow rateof pump Excessive Leakage Wornplungers Replaceplungers Wornpacking seals Adjust or Replacepackingseals Excessivevacuum Reducesuctionvacuum Crackedplungers Replaceplungers Inlet pressuretoohigh Reduceinlet pressure HighCrankcase Temperature WrongGradeof Oil Giant oil is...

Page 7: ... to examined and replaced if necessary After re moving the valve casing 29 and its components drain the oil and remove crankcase cover 3 and bearing cover 12 2 Remove the connecting rod screws 21 and push the outer connecting rod halves as far as possible into the crosshead guides Important The connecting rods are marked for identification Do not twist the connecting rod halves Connecting rods are...

Page 8: ...third party 2 Normal wear and tear to standard wear parts 3 Use of repair parts other than those manufactured or authorized by Giant 4 Improper use of the product as a component part 5 Changes or modifications made by the customer or third party 6 The operation of pumps and or accessories exceeding the specifications set forth in the Operations Manuals provided by Giant Industries Inc Liability un...

Reviews: